Dr Virago Pete's
Plastic Welding/Fabrication/Custom Service
Over the years I have developed methods to repair broken plastic parts and pieces. Some of which are impossible or difficult to find replacements for. Repairing these pieces was necessary to get the machine or applicane or equipment back up0and-running. Otherwise that device would never work again - and go the way of the landfill.
Sometimes I didnt have a solution to the problem - so I stored that device/equipment in hopes that someday I would figure out HOW to repair it. Over the years I have accumulated a mountain of rare equipment in need of repair - simultaneously, I would work on some of these and others I would put to the side - due to the level of difficulty. At this time - no not everything is fixable. But amazingly - alot of it is fixable. I amaze myself sometimes with my ingenuity and resourcefulness. No it didnt happen overnight. It took decades of thought and finding good deals on equipment and paid jobs from time to time. Experience and trial and error and experience is the key.
Summary of the Basics
1. Hand tools and shop tools
2. Glues and adhesives and solvents
a. epoxy and superglue - work for certain plastics but not all
b. solvents which fuses certain types of plastics together and then evaporates leaving the original plastic only
3. Electrical equipment to mold and sculpt and cut and drill
a. Dremel- with numerous bits and attachments
b. Drill/saw/bandsaw/sander etc
4. Electrical equipment to build new parts from scratch
a. Stratasys Genisys Xs 3d Printer
b. Alunar Hb-R100 3d Printer
c. CNC mill - homemade 2ea with various custom rotary etc attachments
d. Roland PNC-300 CAMM-3 mill and Roland PIX-3, MDX-3, Picza and Modela scanners and mills
e. Plastic Injections molder and Rotational Molder and Vacuum former and plastic sheet bender - Emco
f. Flexible silicon strip heater
5. Electrical equipment to weld and fuse
a. LCD handheld 3d Printing Pen - ABS or PLA
b. Soldering iron
c. Harbor Freight Plastic welder
d. GL8018 LCD handheld hotair rework station
6. Many more tools and techniques too many to list including sheetmetal forming and cutting equipment
My goal is to have viewers SEND me parts/pieces for repair and quote - Of course I charge a fee
1. Quote Consultation Fee
2. Part fix or replace fee etc
Nothing is free in life and money keeps everybody working and being able to buy daily necessities. Even water to drink costs money.
If you expect to contact me for something for free -
I cant do free - sorry.
Sometimes people phone me for a service and what they are willing to pay - wouldnt even cover the shipping both ways. Nowadays the flat rate box is approx 15 US dollars each way for a medium sized item or $8 each way for a small item. Plus my time and materials cost and $10 quote fee.
You gotta love the item to be repaired and be willing to spend some money on its repair.
Dr Virago Pete
(847) 454-7858 between 11am and 7pm daily
drviragopete@att.net
Illinois USA
Here are some of my pictorials for some repairs that I have performed.
--------------------------------------------------------------------------------------------------------------------------------
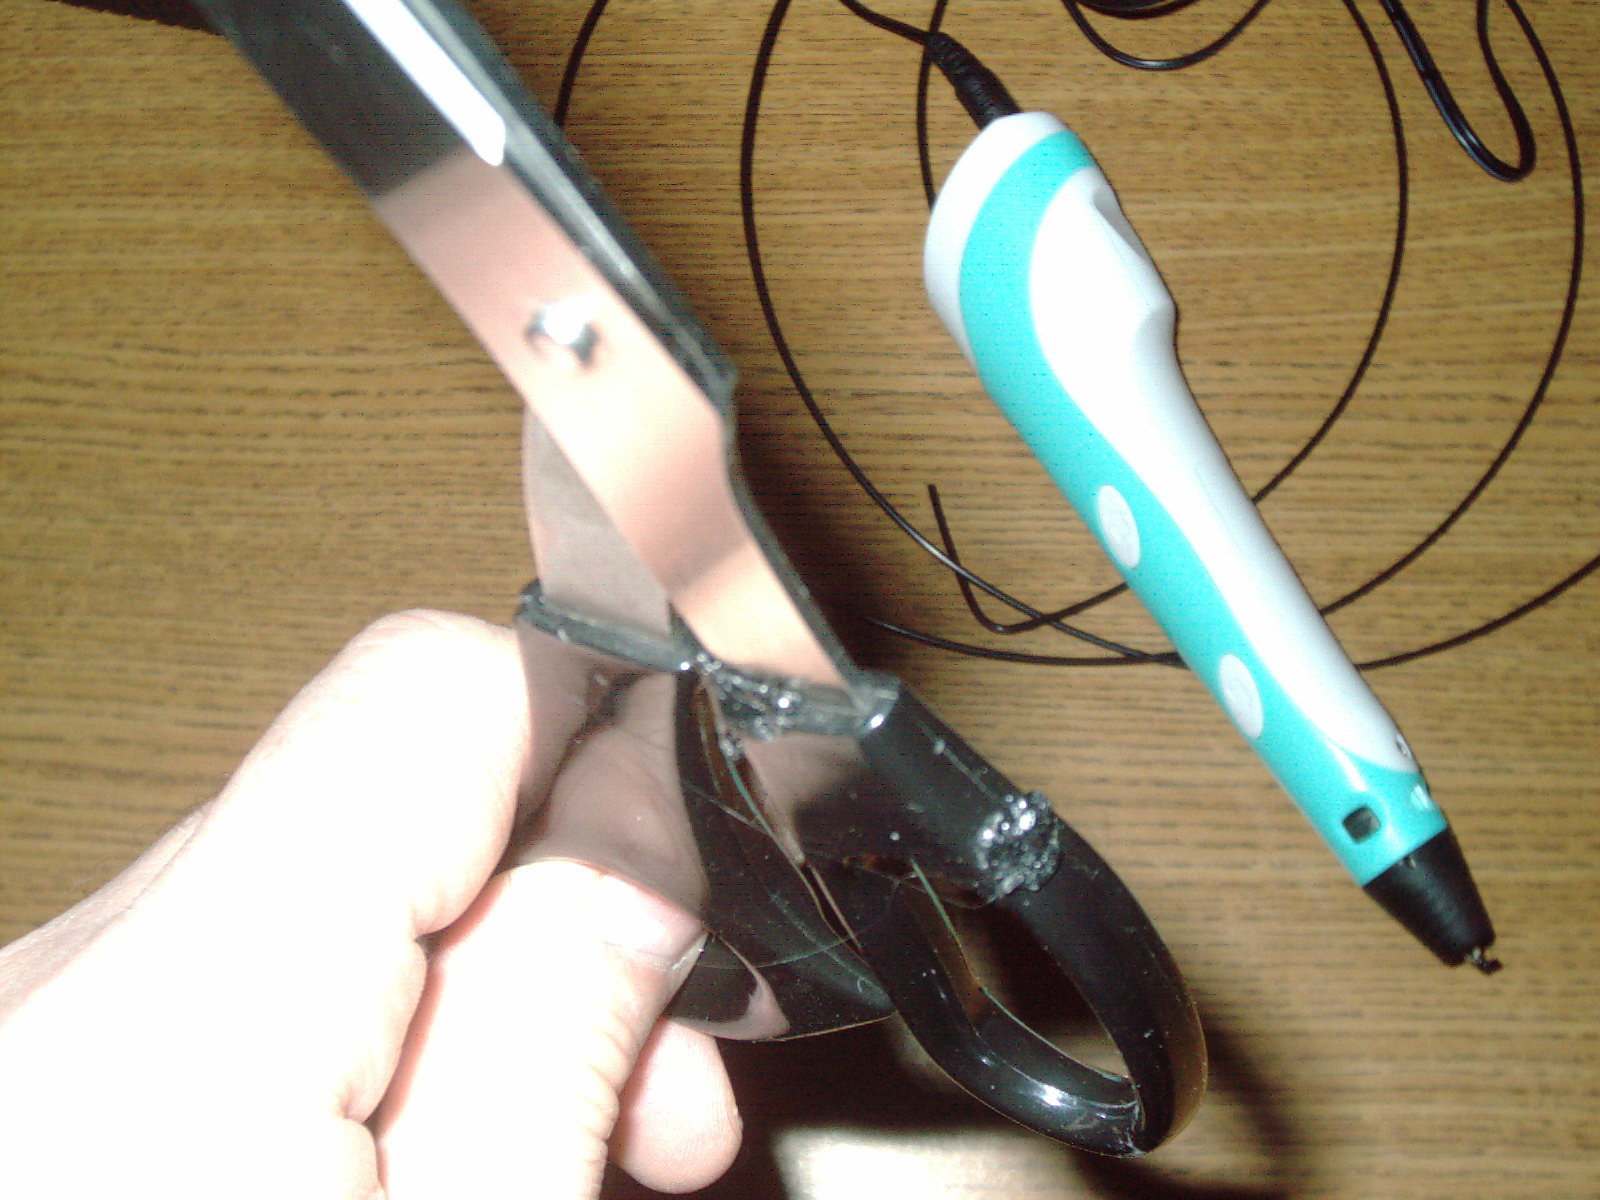
3d Printing Pen - used as a welder for ABS - summary
1. Fix a light fixture with broken clip
2. Fix a scissor handle with missing plastic pieces and crack
3. Fix a cracked faucet water filter
4. Fix TV enclosure mounting points
5. Fix a dog chewed TV remote with missing chunks etc.
Description:
Many household items are made from ABS plastic and for missing pieces or gaps or chips - these areas can be filled in with ABS from a 3d Printing Pen running the very same filament as 3d Printers use. The working/melting point is approx 230degrees C. I find that I can carefully weld plastic and then sand any bumps or excess. The dull sanded look can be heated with a hot air rework tool and this restores the gloss finish. Careful use of plastic solvent and plastic welding with a 3d Printing Pen restored the scissor to full strength and looks decent also. If I didnt tell you it was broken and repaired - you even wouldnt notice the small imperfections - especially when using black plastic as it blends in perfectly color with original. White plastics welded show a slight color difference as shades of white differ - and old plastics sometimes get yellow with age. The white welds are brighter than the original areas to each side. Of course a new scissor costs only a few dollars or less- but the same technique is used for other parts and pieces - which are not so easy to replace.
In the hands of an unskilled / skilled person - this small repair can look dramatically different and the functional end result can result in weak or strong repair. It depends on the experience and techniques used by the repairer.
This pair of scissors had a chip in the handle where as you cut the tip of the scissor would not fully close. I had to choose whether to modify the scissor so the limiter bump - gets sanded down so the tip would close. Or to fix it as original as much as possible. This was the better solution. I intentionally added a bit of extra plastic where it broke originally. This pair of scissors is still being used today for my own packing and boxing of shipped items. I especially use this scissor when I need to cut a piece of paper to hide some writing or printing on the outside of the box- and then glue or tape that in place- so the Post Office rule of no-writing-on-the-outside-of-the-box is met. Some Post Offices are more sticklers than others about this - mine is a stickler.
Plastic Welding/Fabrication/Custom Service
Over the years I have developed methods to repair broken plastic parts and pieces. Some of which are impossible or difficult to find replacements for. Repairing these pieces was necessary to get the machine or applicane or equipment back up0and-running. Otherwise that device would never work again - and go the way of the landfill.
Sometimes I didnt have a solution to the problem - so I stored that device/equipment in hopes that someday I would figure out HOW to repair it. Over the years I have accumulated a mountain of rare equipment in need of repair - simultaneously, I would work on some of these and others I would put to the side - due to the level of difficulty. At this time - no not everything is fixable. But amazingly - alot of it is fixable. I amaze myself sometimes with my ingenuity and resourcefulness. No it didnt happen overnight. It took decades of thought and finding good deals on equipment and paid jobs from time to time. Experience and trial and error and experience is the key.
Summary of the Basics
1. Hand tools and shop tools
2. Glues and adhesives and solvents
a. epoxy and superglue - work for certain plastics but not all
b. solvents which fuses certain types of plastics together and then evaporates leaving the original plastic only
3. Electrical equipment to mold and sculpt and cut and drill
a. Dremel- with numerous bits and attachments
b. Drill/saw/bandsaw/sander etc
4. Electrical equipment to build new parts from scratch
a. Stratasys Genisys Xs 3d Printer
b. Alunar Hb-R100 3d Printer
c. CNC mill - homemade 2ea with various custom rotary etc attachments
d. Roland PNC-300 CAMM-3 mill and Roland PIX-3, MDX-3, Picza and Modela scanners and mills
e. Plastic Injections molder and Rotational Molder and Vacuum former and plastic sheet bender - Emco
f. Flexible silicon strip heater
5. Electrical equipment to weld and fuse
a. LCD handheld 3d Printing Pen - ABS or PLA
b. Soldering iron
c. Harbor Freight Plastic welder
d. GL8018 LCD handheld hotair rework station
6. Many more tools and techniques too many to list including sheetmetal forming and cutting equipment
My goal is to have viewers SEND me parts/pieces for repair and quote - Of course I charge a fee
1. Quote Consultation Fee
2. Part fix or replace fee etc
Nothing is free in life and money keeps everybody working and being able to buy daily necessities. Even water to drink costs money.
If you expect to contact me for something for free -
I cant do free - sorry.
Sometimes people phone me for a service and what they are willing to pay - wouldnt even cover the shipping both ways. Nowadays the flat rate box is approx 15 US dollars each way for a medium sized item or $8 each way for a small item. Plus my time and materials cost and $10 quote fee.
You gotta love the item to be repaired and be willing to spend some money on its repair.
Dr Virago Pete
(847) 454-7858 between 11am and 7pm daily
drviragopete@att.net
Illinois USA
Here are some of my pictorials for some repairs that I have performed.
--------------------------------------------------------------------------------------------------------------------------------
3d Printing Pen - used as a welder for ABS - summary
1. Fix a light fixture with broken clip
2. Fix a scissor handle with missing plastic pieces and crack
3. Fix a cracked faucet water filter
4. Fix TV enclosure mounting points
5. Fix a dog chewed TV remote with missing chunks etc.
Description:
Many household items are made from ABS plastic and for missing pieces or gaps or chips - these areas can be filled in with ABS from a 3d Printing Pen running the very same filament as 3d Printers use. The working/melting point is approx 230degrees C. I find that I can carefully weld plastic and then sand any bumps or excess. The dull sanded look can be heated with a hot air rework tool and this restores the gloss finish. Careful use of plastic solvent and plastic welding with a 3d Printing Pen restored the scissor to full strength and looks decent also. If I didnt tell you it was broken and repaired - you even wouldnt notice the small imperfections - especially when using black plastic as it blends in perfectly color with original. White plastics welded show a slight color difference as shades of white differ - and old plastics sometimes get yellow with age. The white welds are brighter than the original areas to each side. Of course a new scissor costs only a few dollars or less- but the same technique is used for other parts and pieces - which are not so easy to replace.
In the hands of an unskilled / skilled person - this small repair can look dramatically different and the functional end result can result in weak or strong repair. It depends on the experience and techniques used by the repairer.
This pair of scissors had a chip in the handle where as you cut the tip of the scissor would not fully close. I had to choose whether to modify the scissor so the limiter bump - gets sanded down so the tip would close. Or to fix it as original as much as possible. This was the better solution. I intentionally added a bit of extra plastic where it broke originally. This pair of scissors is still being used today for my own packing and boxing of shipped items. I especially use this scissor when I need to cut a piece of paper to hide some writing or printing on the outside of the box- and then glue or tape that in place- so the Post Office rule of no-writing-on-the-outside-of-the-box is met. Some Post Offices are more sticklers than others about this - mine is a stickler.
Of course the above example seems basic - but rest assured my skills are more advanced. For example a broken plastic gear inside a device, applicance, gizmo or gadget can render this device inoperable.
Im very pleased to be able to produce a nice looking clean gear from an Alunar 3d Printer model Hb-R100. It is a very uncommon printer and I enjoy using it and modifying it and upgrading it. The fine level of detail is unusual in its precision. Of course, this is the end result - but it required alot of tinkering and adjusting and failed attempts - to finally make this gear from scratch. Yes I discovered that 3d printing on egg carton or styrofoam plate gives good adhesion. That is my discovery - I know of no-one else who does it this way. The foam gives way to the hot printhead as it moves back and forth printing a raft foundation. The foam insulates the heat and allows even layer height. The gear shown is ABS grey color and 1/2" in diameter. Pardon the blurry photo. This is a replacement part for a vacuum cleaner. The original gear was stripped when the vacuum cleaner sucked in the fringes of a throw rug- which shredded the teeth of the original gear. The vacuum cleaner now has a second chance at life.
A 3d printer in the hands of an expert or a novice - will give varying results.
Just like a violin played by an amateur gives ear-piercing horrible results. or a Violin played by a master gives pleasing results.
Its not just the 3d Printer itself - its how its used and the experience of the person using it. It takes skill to make functional miniature machine parts which look good and function good.

This page last updated November 9 2025