Film Scanner Maintenance, Repairs and Mods
I am not affiliated with any vendor or manufacturer or seller and am posting this page based on my own opinions and experience. I own one scanner at this time and have had some pitfalls along the way and my resolutions to these issues may be helpful to the reader. Use my information at you own risk. I dont have any personal experience with other brands and models and they may or may not be similarities between brands and models.
My livelihood depends on film transfers, videotape transfers and delivering a high quality end product is important to me. I own many brands and models of film transfer equipment. Frame-by-frame slow scanning is something new to me and I am learning about it as I go. There exists no service manuals parts or help-along-the-way for most of the equipment I own. My own skills in repairs and maintenance is self taught from several decades of personal repairs maintenance of my own equipment purchased new and used.
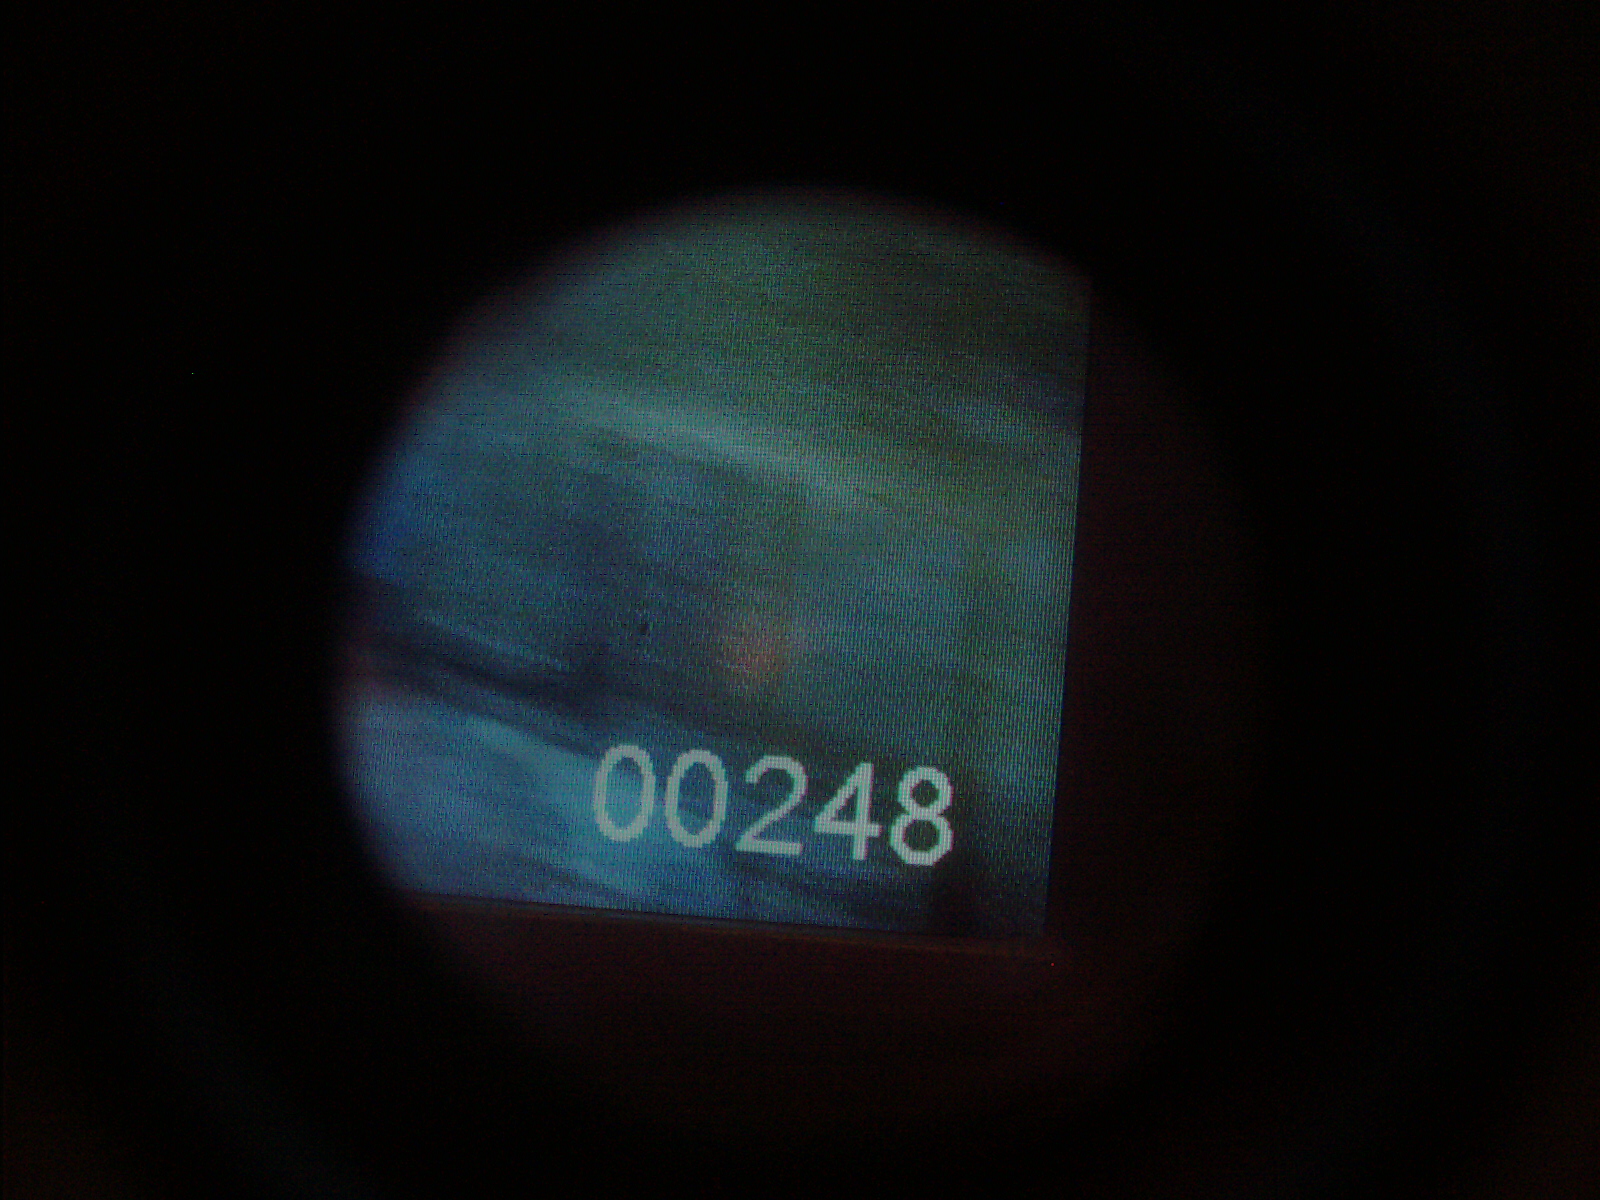
Very recently (a few days ago) in March 2017 I ordered and received my very first frame-by-frame film scanner and after only 2 orders (film counter odometer 00025 approx) was seeing and hearing some telltale signs that something was not working correctly.
Symptoms
1. Clickity Clackity scraping noise
2. Video image instability and twitching left/right/leftright on lower righthand corner of image
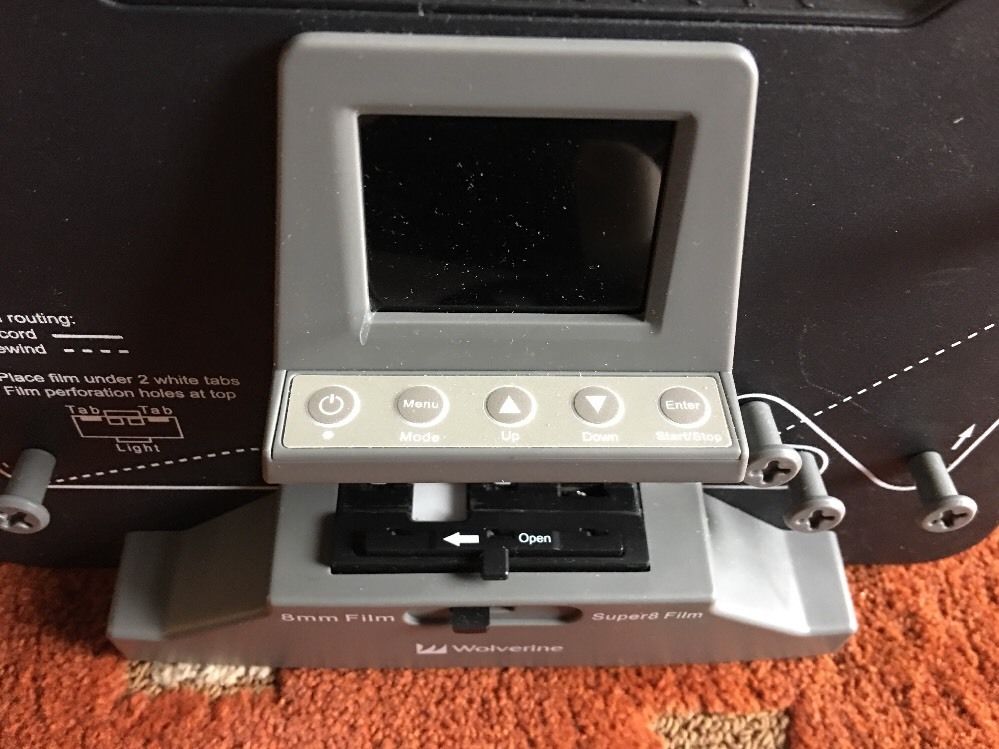
I opened up the unit ("odometer" as I call it) showed at 00025 and I knew that opening up this unit will void the warranty (what warranty? Is there any such thing anyhow?)
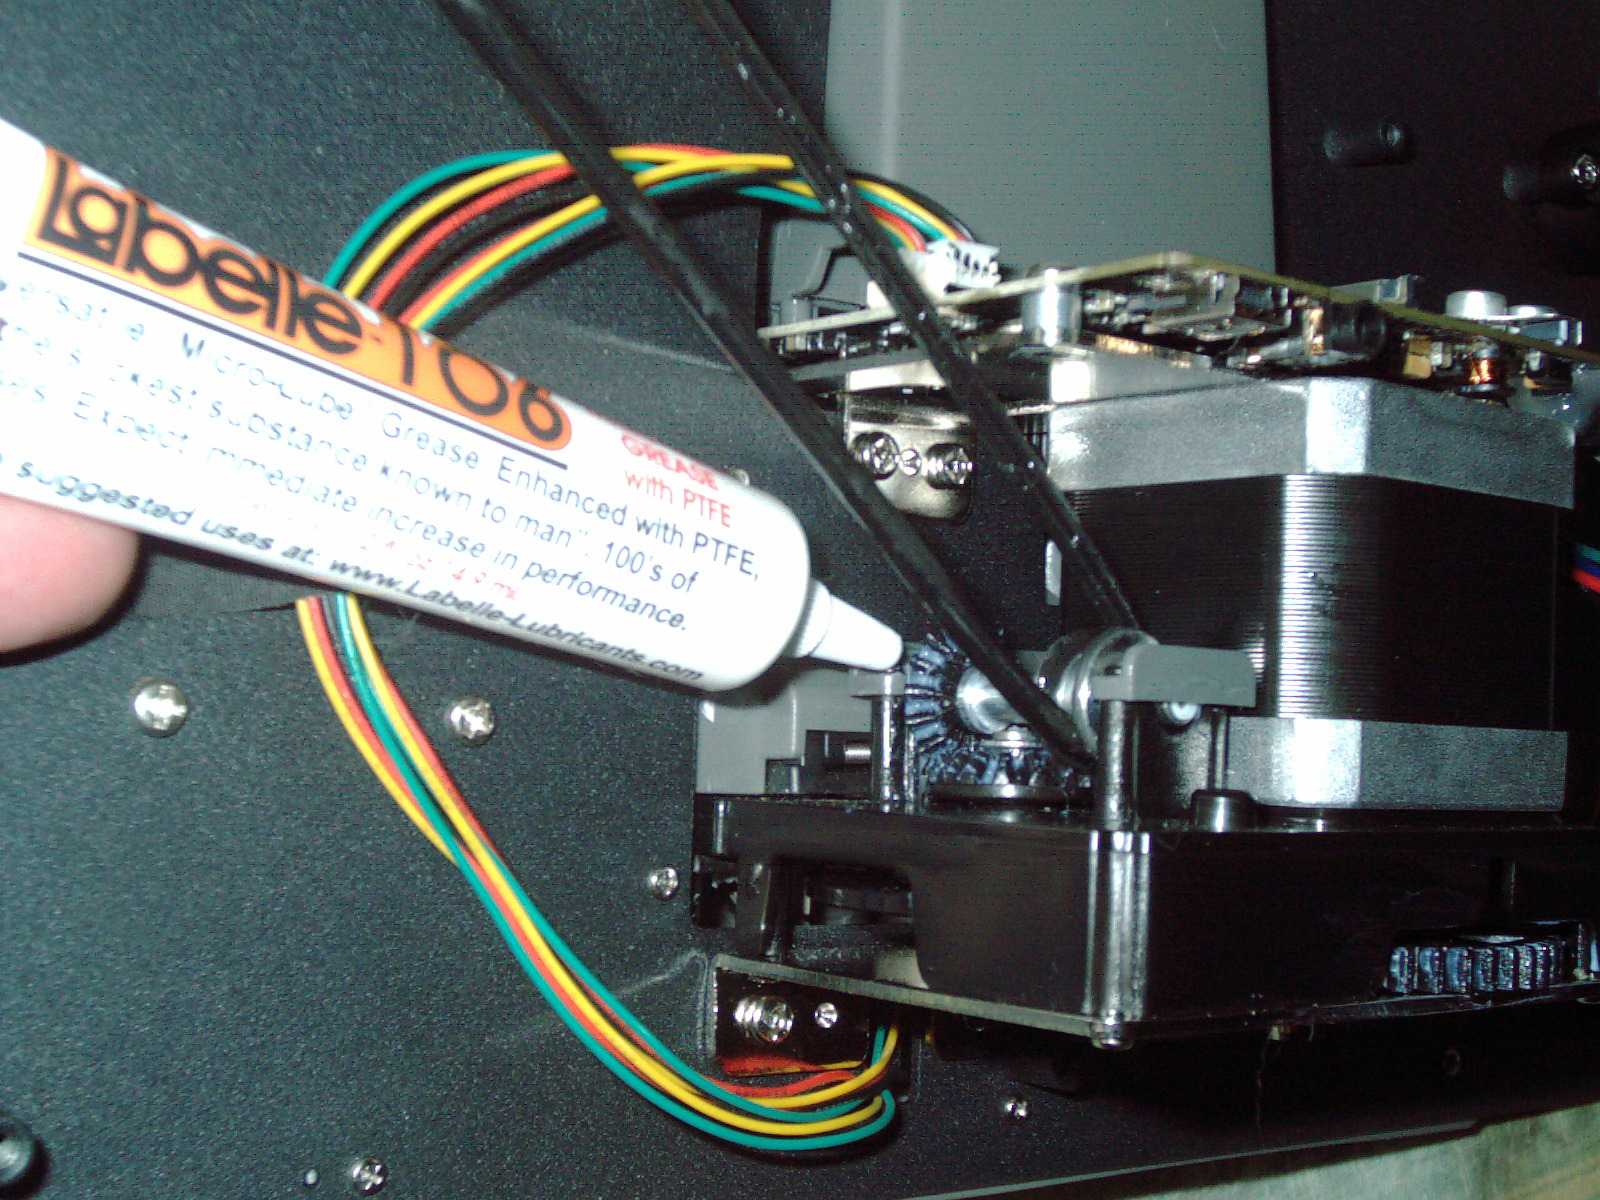
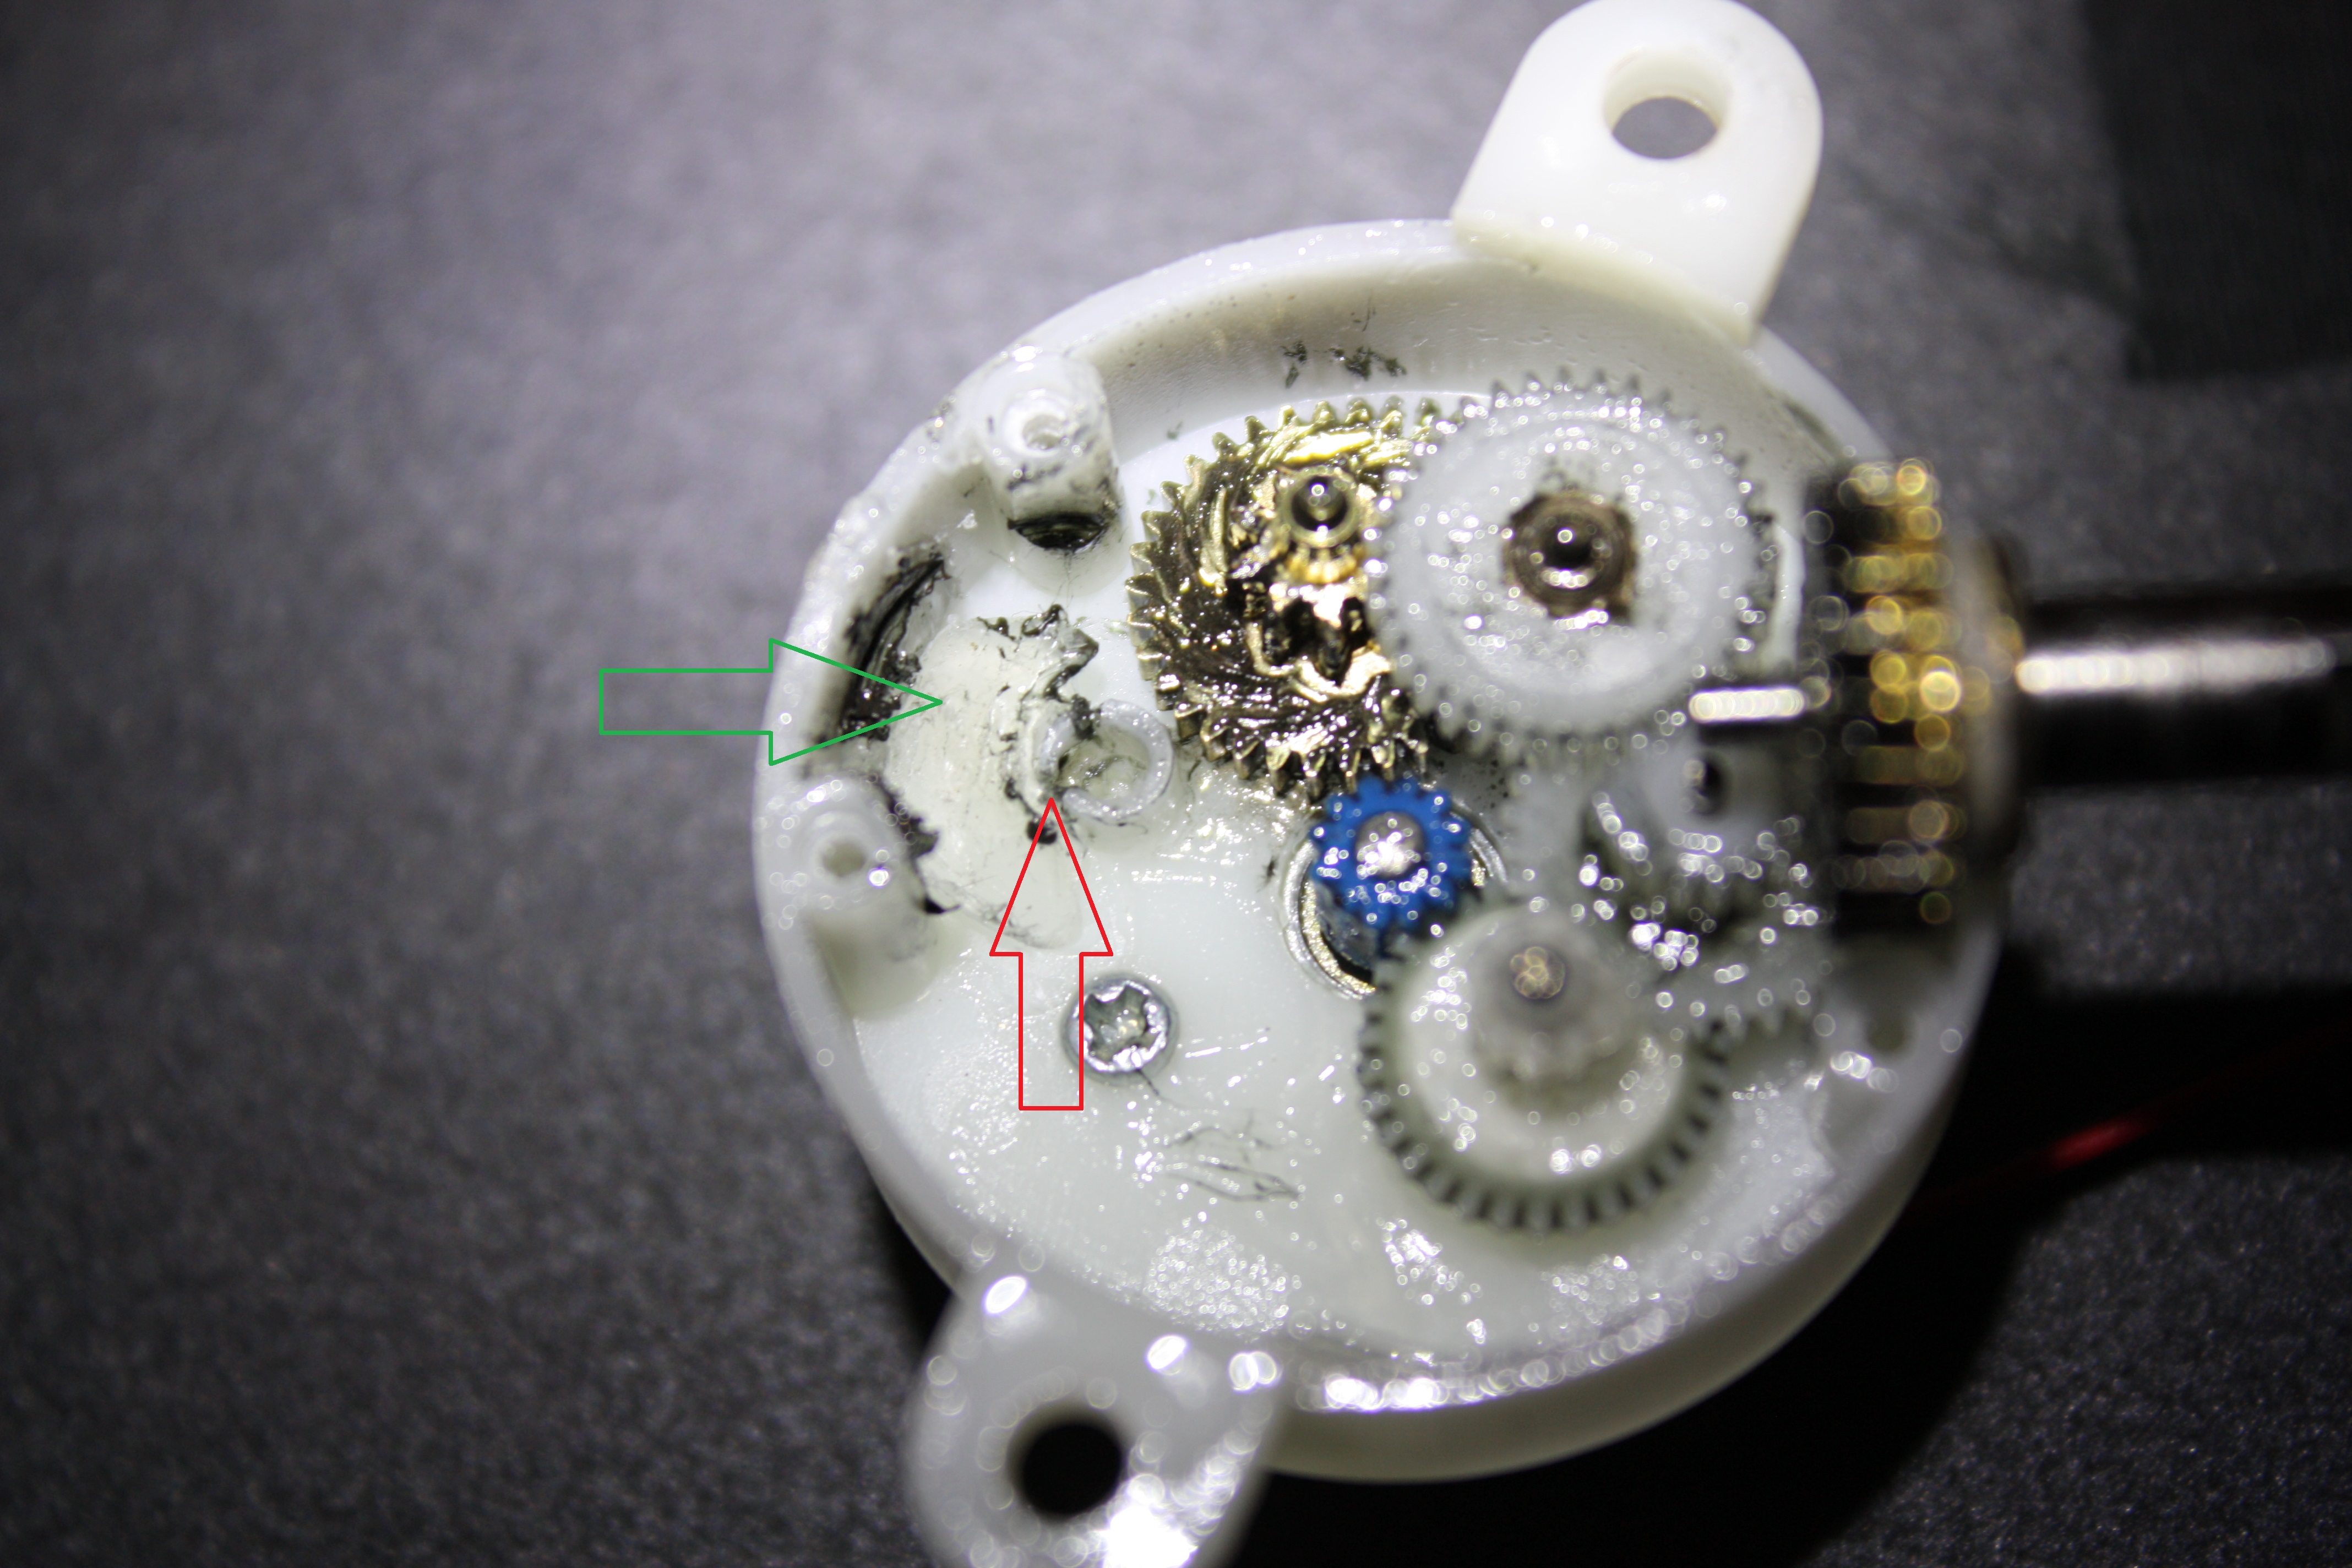
I saw some plastic gears and a very sticky black neoprene belt (looks like sinthetic-petroleum-jelly coated on neoprene belt- my hunch). I thought about what to do after closing it back up fully. Then proceeded to look online for a grease that would not harm the plastic gears.
Update 4/14/17
It is possibly the same grease that is put on o-ring seals on waterproof cameras. I own a vintage Eumig Nautica Super8 camera which is made for underwater use. I also own a Mako Radio Controlled submarine toy. Both of these devices have a sticky clear grease which helps the waterproofing o-rings to seal. At this time I dont know which Namebrand grease it is. But the clue of underwater camera o-ring seal grease is probably what it is. There is a youtube video where the man is complaining about his Wolverine Moviemaker unit's sticky belts and he is claiming that the unit is melting his belts and is a factory defect. Well I opened up my unit with odometer 00025 and had come to the conclusion it was made that way and had a purpose. I dont agree with that youtubers conclusion of a defect. The grease was put there for a reason- it is no defect. Update 4/24/17 On my second unit I opened it up before ever powering it on and had counter number 00005 and I can tell you that it had a sticky internal belt also. The stick belt came that way and I have concluded - it is supposed to be sticky. I lubed the plastic internal gears with plastic compatible grease (see elsewhere on this page)
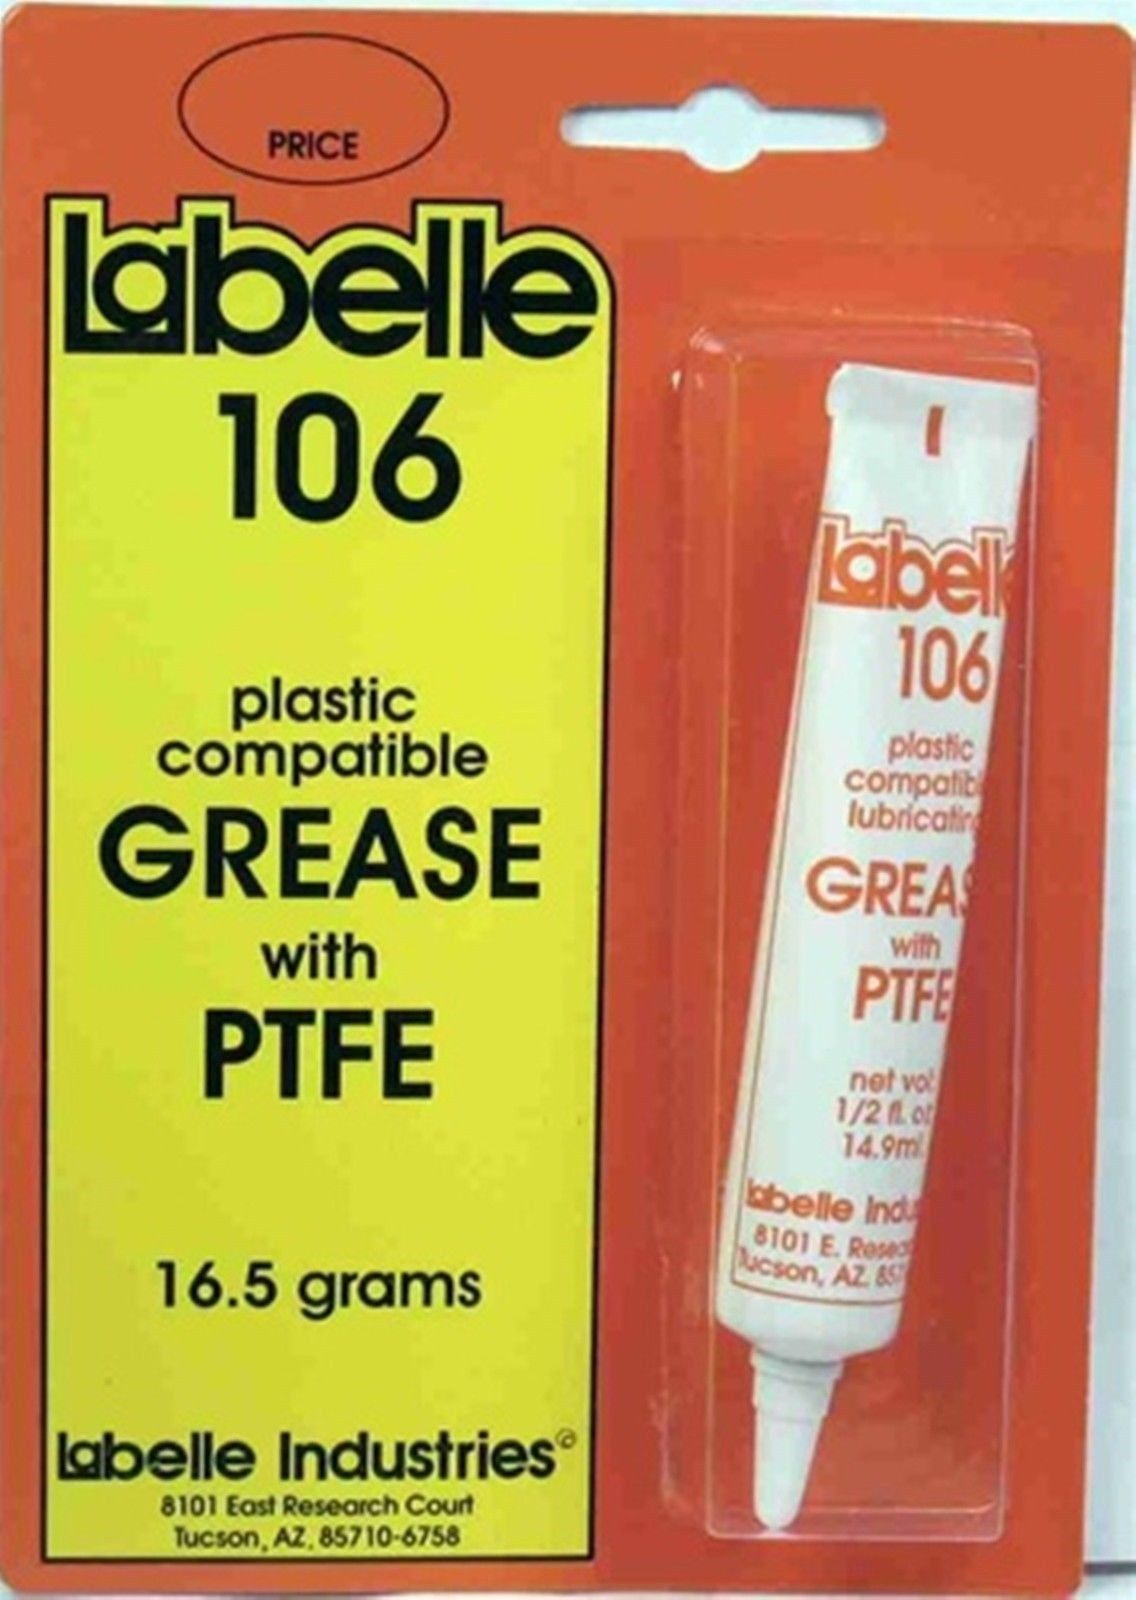
I looked online in forums and performed a thorough search for "plastic grease" "plastic lubricant" ... and all combinations I could find. Some people wrote online about this product and that product ....
What I ended up buying on a Sunday (on big auctionsite) and on Wednesday arrived was Labelle 106 which is a small 1/2 ounce tube of white grease which contains PTFE which is the generic term for the non-stick coatings that are on frying pans.
I reopened up the unit by unscrewing
1. 2ea screws in the handle recess
2. 5ea screws on the backside with long deep holes
I have a collection of screwdrivers of different sizes and found a long deep philips screwdriver that fit the screw perfectly and wouldnt round over the X on the head. This screwdriver was magnetized by me as a DIY by running a refrigerator magnet back and forth along the steel chrome plated shaft. I magnetized it years ago and didnt have to re-magnetize it ever again as it stays magnetized. This magnetic philps screwdriver is handy in retreiving the screws from the deep holes and also reinstalling them later.
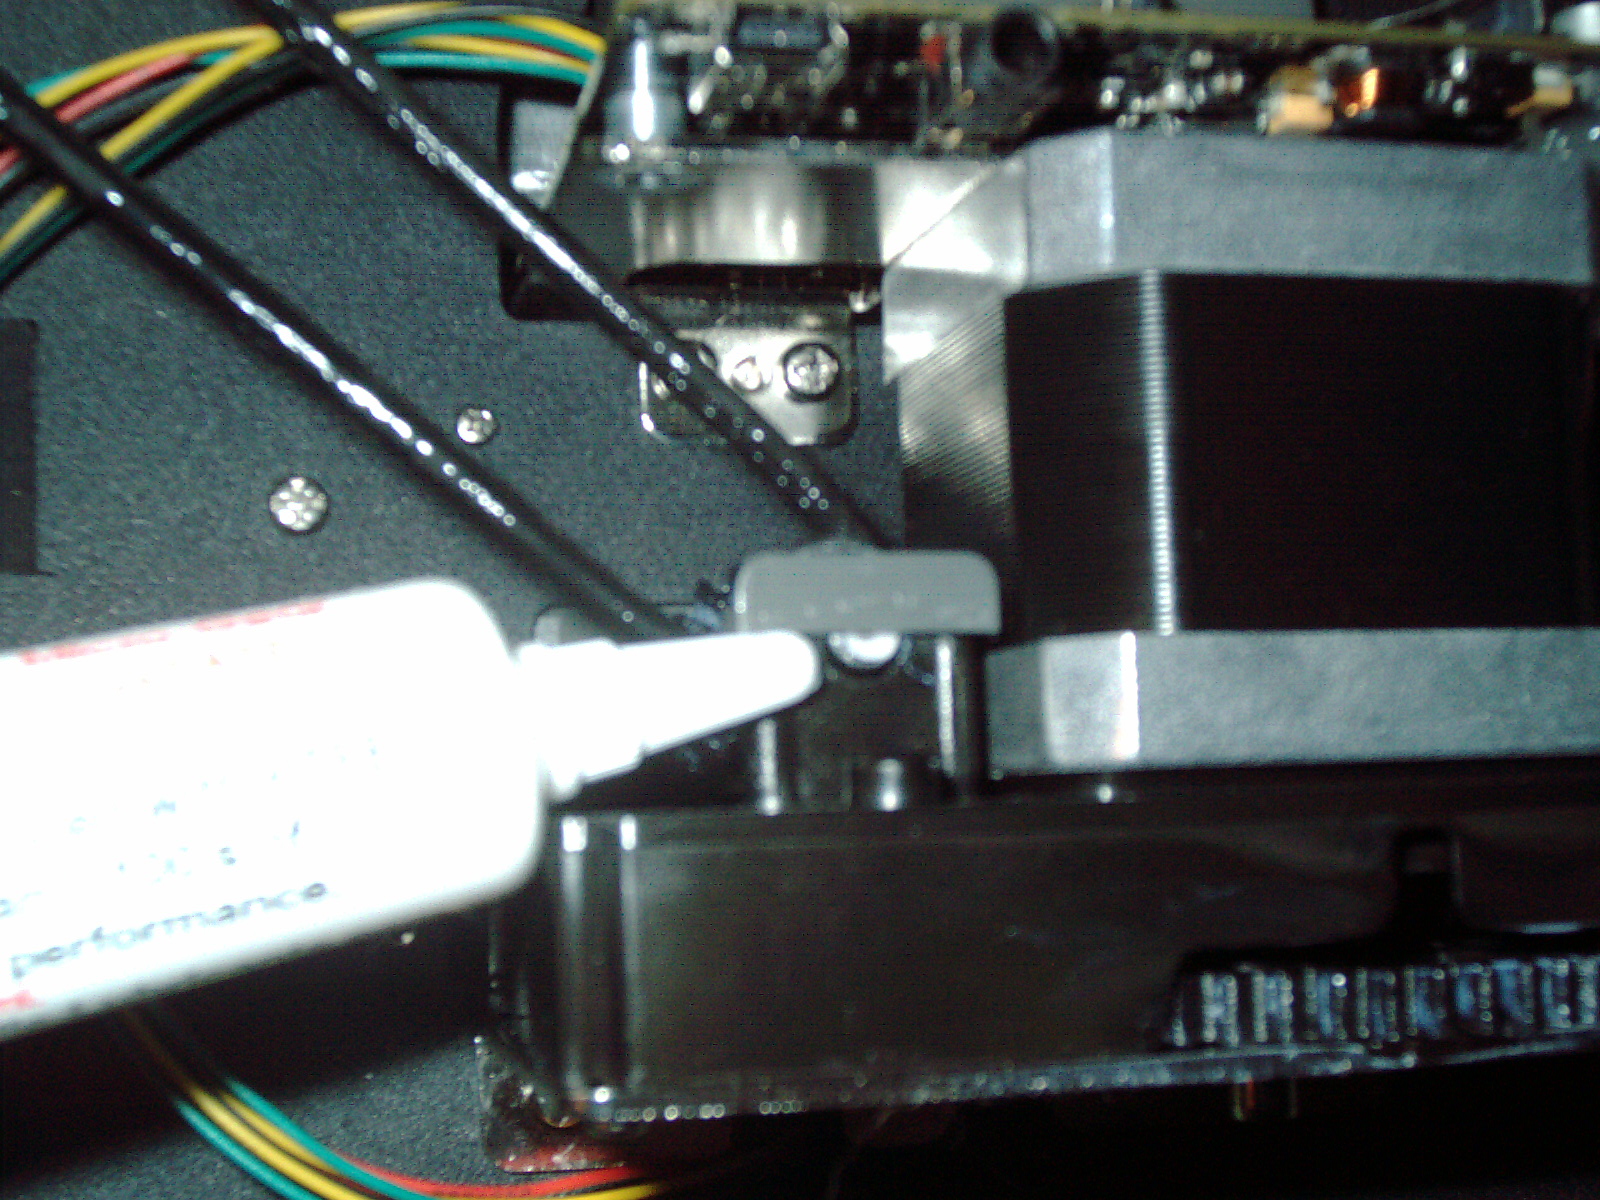
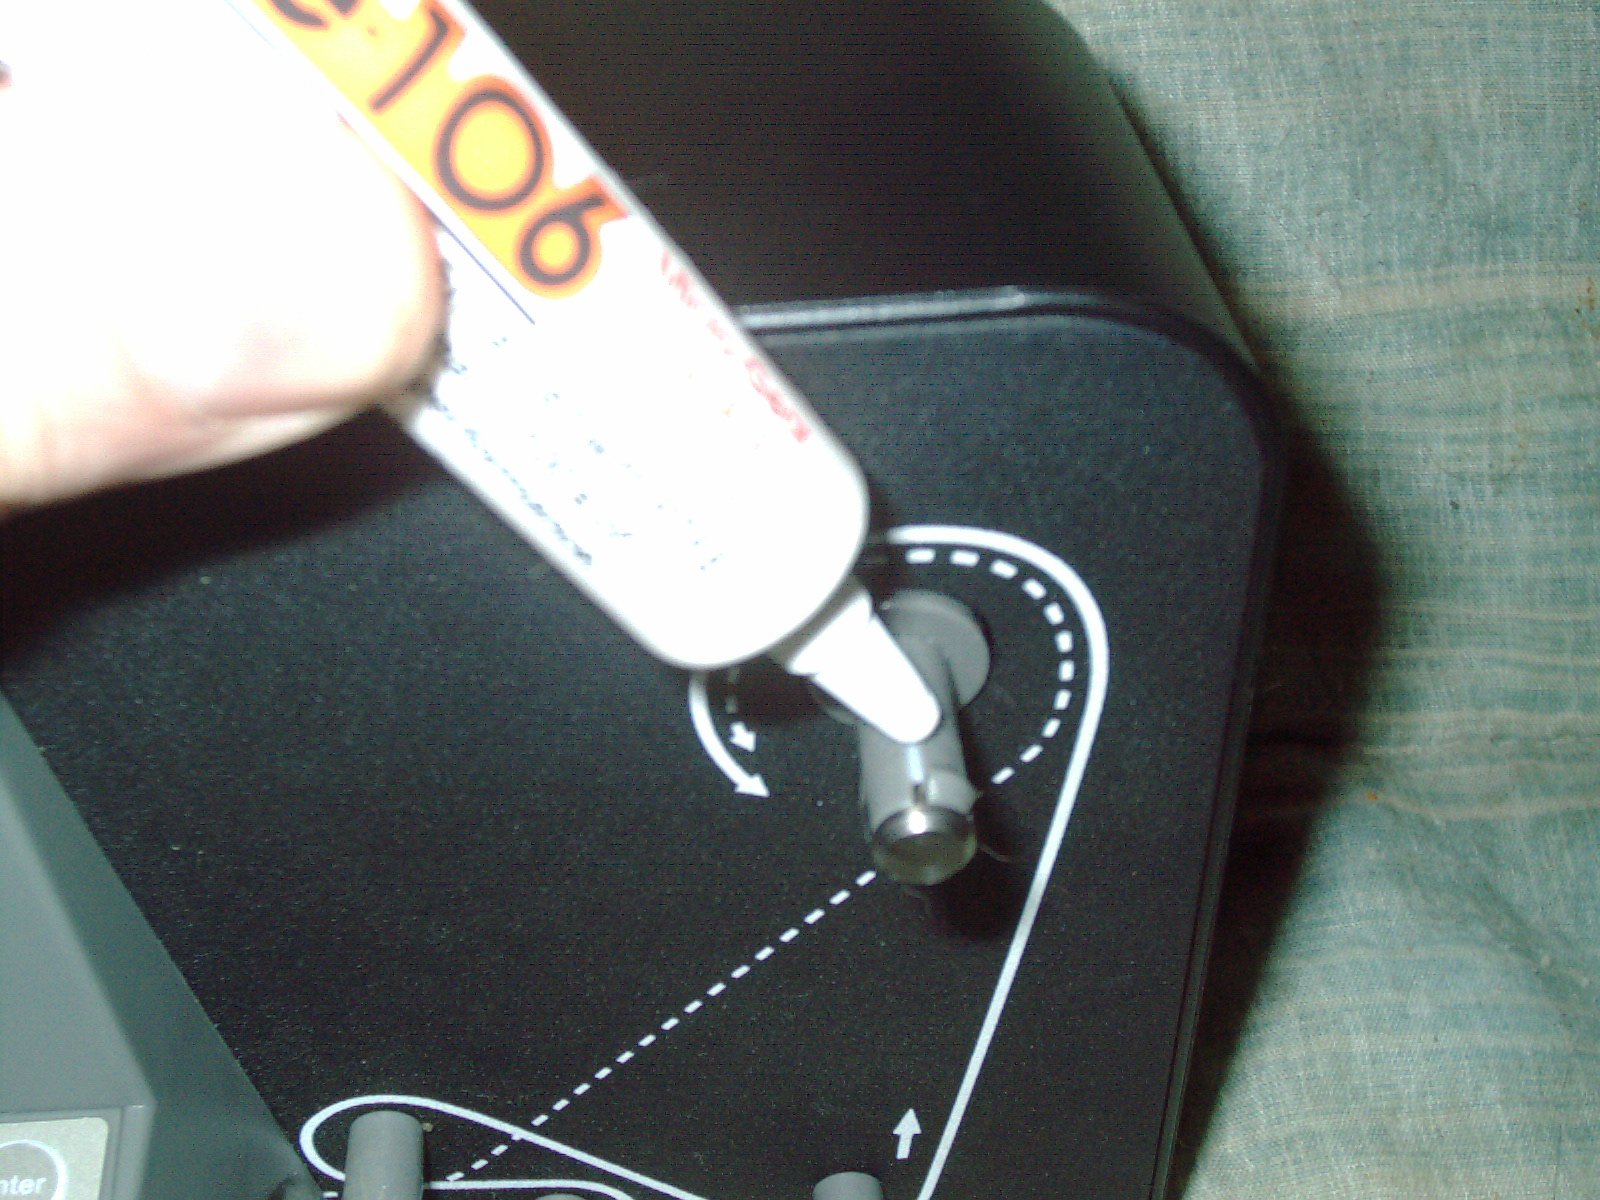
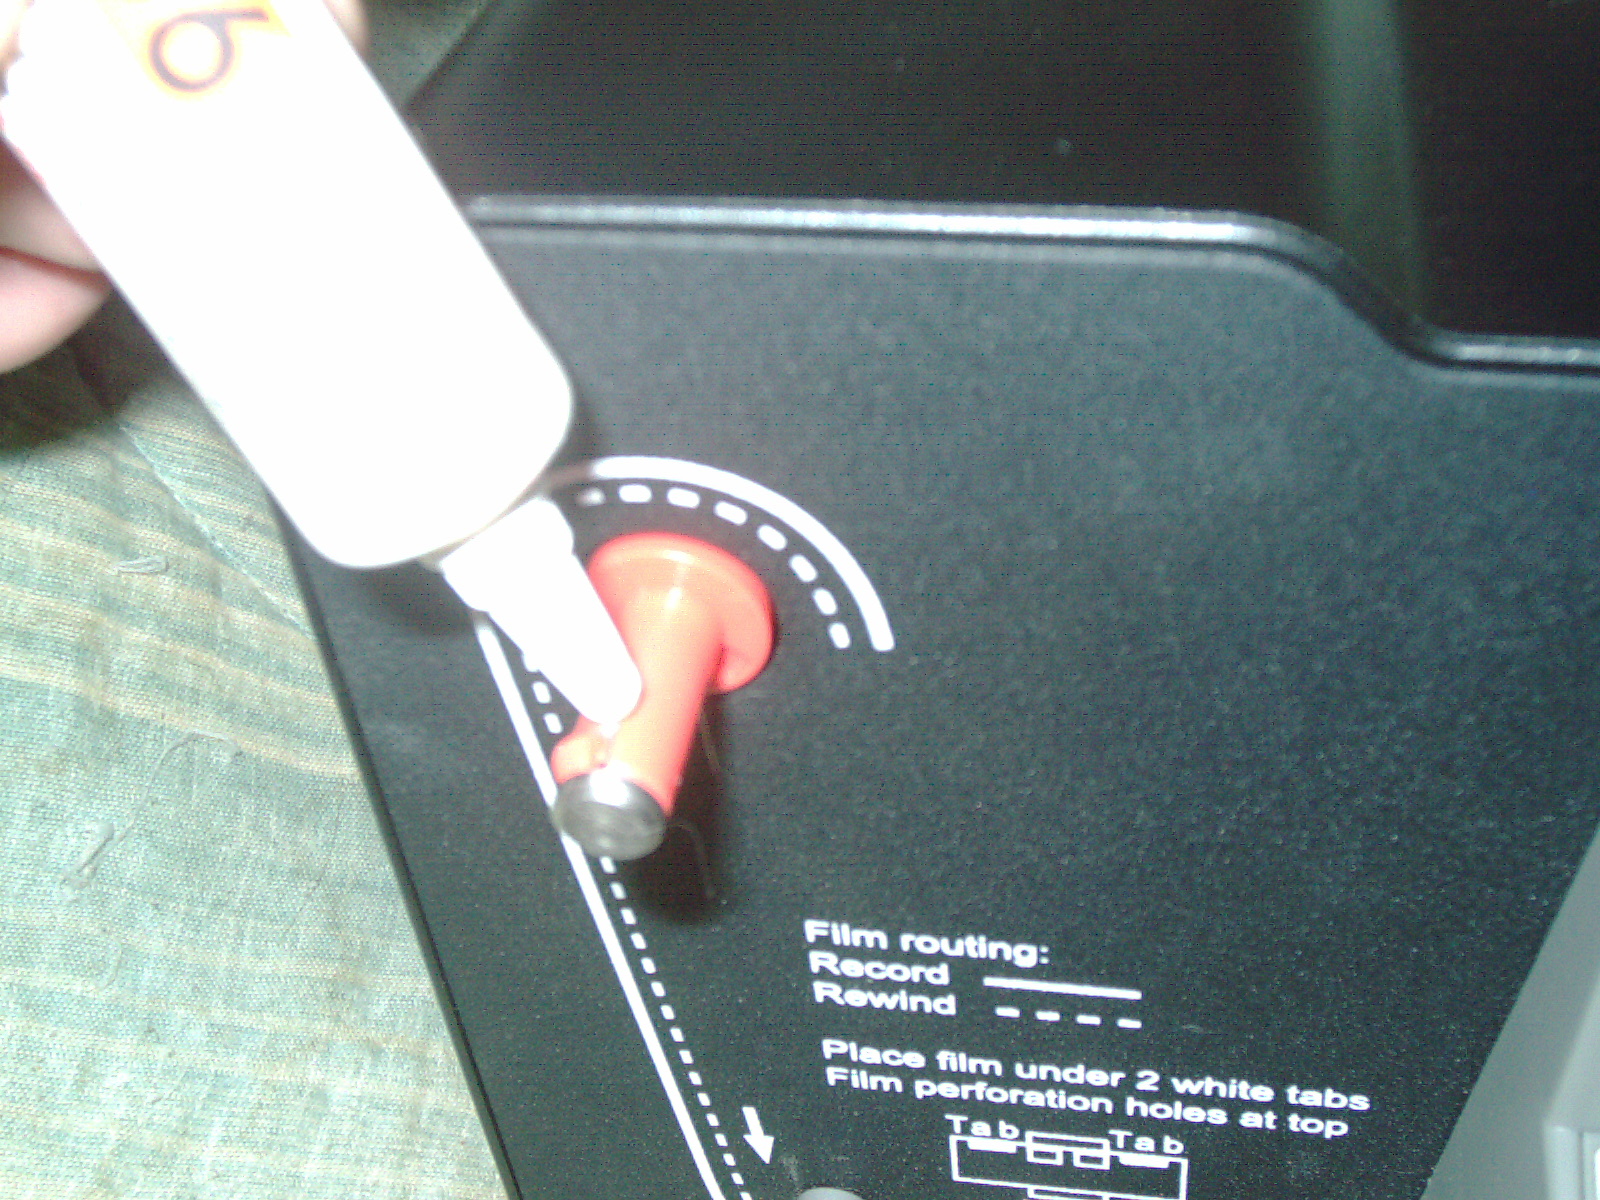
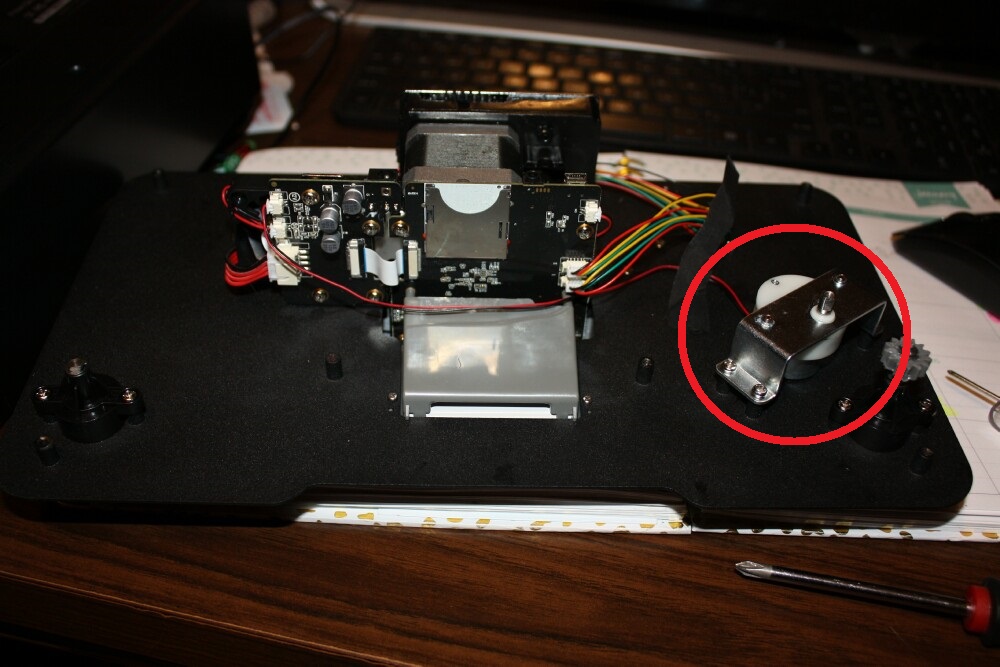
Here is a pictorial of all of the locations where I applied a thin long application of Labelle 106 grease.
1. the 2ea 45degree angled black gears
2. the large black gear (I turned this black gear by hand to get it all lubed 360degrees)
3. the axle for sticky belt pulley
4. the 2ea reel spindles (in between plastic and steel shaft) both takeup reel and drive reel spindles
I studied how the lubricant goes around - as at first I though that lubing a little will make its way all around - but no this strategy didnt work as the gear reduction is an even number not an odd number- so I decided to just grease the whole thing by applying the thin line of grease all the way around every gear mentioned.
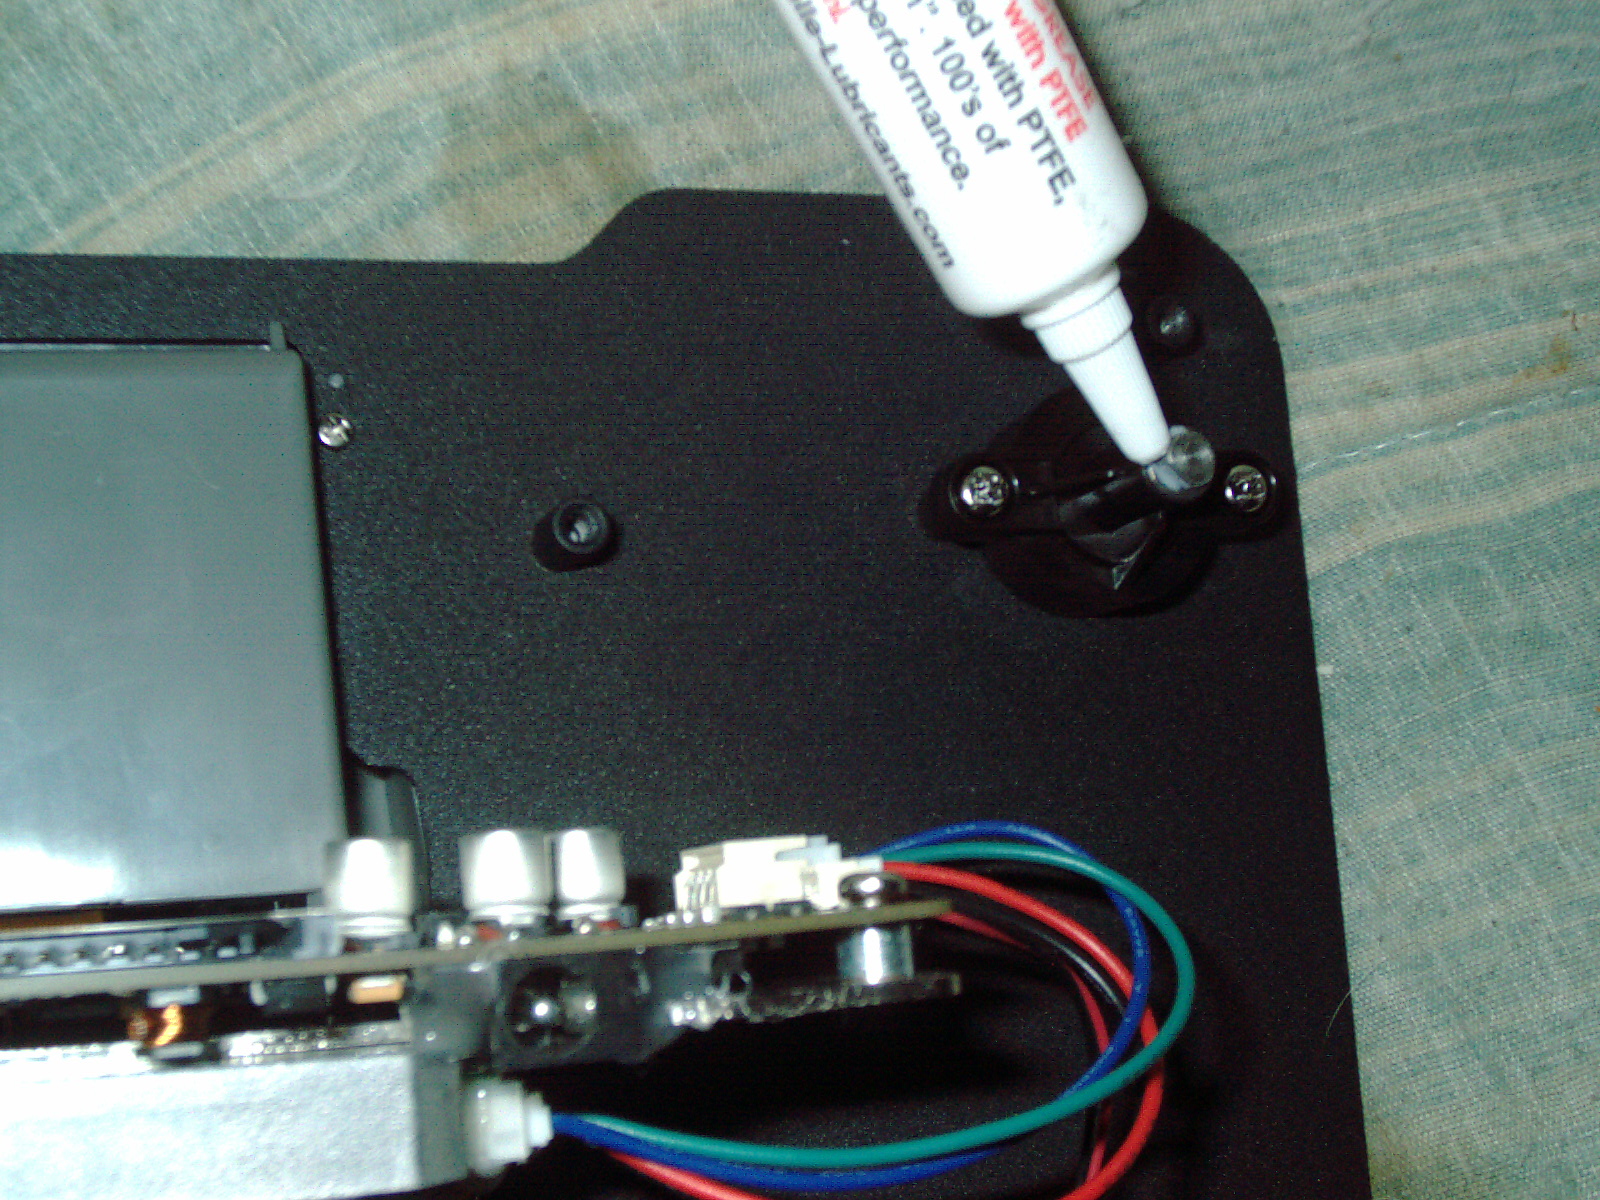
I also noticed (before I lubed) that the takeup reel would TUG TOO MUCH at the film in the gate. It is supposed to pull very lightly and so I applied grease to the reel hub/spindle (access this from the from of the machine)
THERE IS A DANGER TO THIS MAINTENANCE - I CAUTION THE READER
The danger is in the delicate LCD screen- I used a blanket comforter sitting on a soft sofa cushion and layed down the film scanner LCD screen face-down on the soft blanket. I didnt damage it - but it is very very easy to damage the screen. In fact the recessed handhold is where your fingers go and then your thumb naturally goes on top of the face of the LCD - very easy to damage the LCD - USE CAUTION not to break the LCD screen.
I am updating this 1 year approx later after having DIYed applying white grease on the Gray (right side) takeup spindle (SEE PHOTO) This may have been a mistake on my part. When scanning a 5" diameter full reel, the grease may make that slip too much where some drag is necessary. See the film reel (after greasing) turns but weakly. I will try removing the grease to increase the friction. Some friction is necessary. There is a point where too much friction is bad. There is a point where too little friction is bad. Just the right amount of friction is necessary. Maybe I applied grease on the grey spindle in error.
After I lubricated the above parts, I noticed that the sound of the machine was just like it was brand new at an odometer counter of 00000 Right now my odometer is at 75 and I am on my third order with this machine. Mostly 3" reels but about 5 5" reels also.
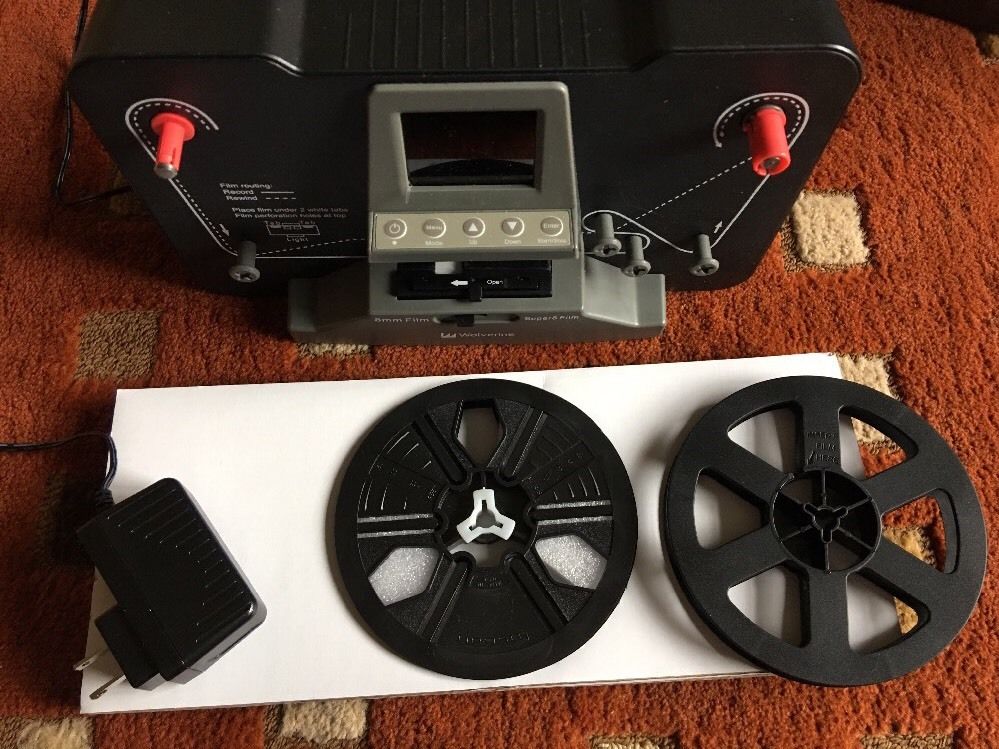
I found that using a vintage film rewinder (Solid metal vintage Craig Master Rewinder) for 16mm and 8mm films works good for some of the metal can reels in which the film scanner hub is slightly too wide for the old steel reels to fit on. This hand crank rewinder is mounted next to my machine and so the film feed from the rewinder with the clutch disengaged on the rewinder so it just freewheels very very easily.
I also use this rewinder to rewind the film when it is done- which saves wear and tear on the film scanner- hand cranking is just fine for rewinding and isnt a chore at all (eliminates the need to go into the menu and select rewind)
So far I have not done any 7" reels but I see 2 boxes ahead of this current order - that future order has a few 7" reels and Ill cross that bridge when I get to it.
Some notes about scanning times
1. Super8 reels Kodachrome - I set my timer to 27minutes after I press the run button on the scanner - which gives me about a minute to spare to watch the last of the reel go through. Sometimes the very end is curled or jagged and I stop it just before that bad-spot reached the film gate - to avoid damaging the machine.
2. Regular8 - Technicolor brand film - about 31 minutes - gives me a minute to watch the last bit of film go in
3. Regular8 - no-name brand 25 to 27 minutes set on timer
On my other film processing units (I own some telecines and some flying spot scanners and some CCD transfer units) with real time playback some films are 3min 12 seconds on up through 4 minutes on some 3" reels. So for an unknown film type I set my timer to 25minutes which means I might sit and watch the last 5 minutes get fed through.
Sometimes I get sent very amateur films with globs and knots of scotch tape homebrew amateur buyer repairs - and some times broken pieces stuffed in the box along with the reel - I find that these small bits of film are scannable also.
As I check the film before scanning I want to avoid
1. Homemade splicing and scotchtape homemade sloppy splices - which would snag in the filmgate and damage the machine
2. Bulb burns and blisters as these bumps interfere with the film passing through the gate and may break the machine
3. Sticky gooey areas of film and mold and mildew.
I make note of blisters and sticky areas and watch those areas and stop the scanning just before it reaches the filmgate- then I manually unload the film ( clean the backlight with the included blower brush - it works good ) and then advance the film just past the BAD SPOT of the film - then continue scanning.
This results in lots of little snippets of film rather than one big long scan - but is safe for my machine which is a big investment of $$$.
It is my hunch that the following brands/models MAY have the same or similar mechanism
1. Wolverine Film2Digital Moviemaker ( I have this )
2. Somikon HD-XL
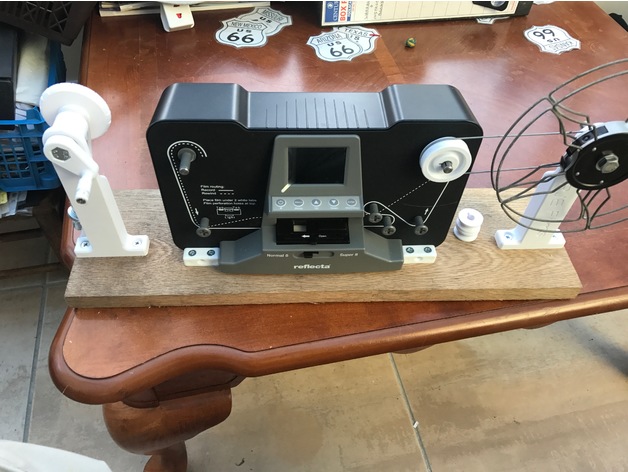
3. Reflecta Normal 8 and Super 8 Scanner
4. 3R Anyty (Japan)
Update 1/12/18
I am adding 2 other similar brands that I have run across since I wrote the above:
5. Winait
6. Hammacher Schlemmer
7. Toshio TLMCV8 (Japan)
(also some brands have expanded their models with swivel supply reel arms, 720p or 1080p resolutions, expanded body to fit 7inch reel, shifted the sensor block to the right/left. Nonetheless the similarities are striking and so I am including these 6 brands as being VERY similar and sharing alot of the same or similar parts on some models. From a repair standpoint - this means that some parts can be scavenged from one unit to repair another unit- but not every part is interchangeable. Also I have noticed some contain 2 smaller circuit boards rather than one larger one. Also some circuit boards have an extra unused connector on it.
Here are some links which show these machines in operation
(copy and paste into your browser to view) -These are not my video demos.
Shows 3R Anyty in operation
https://www.youtube.com/watch?v=Z09sh7Jmq_0
Shows Wolverine Film2Digital Moviemaker testimonial and output demo (This demo and testimonial convinced me to buy this)
https://www.youtube.com/watch?v=RnFZ0rOpdWI
Shows Somikon HD-XL in operation (in a language I do not understand)
https://www.youtube.com/watch?v=Lz9VdvJ2pzY
I could not find an operation demo of Reflecta Super8 and Normal 8 scanner but here is a photo of it and video output demo
https://www.youtube.com/watch?v=Lz9VdvJ2pzY

|
Reflecta Normal 8 and Super 8.JPG Size : 35.878 Kb Type : JPG |
|
|
Toshio TLMCV8.jpg Size : 54.806 Kb Type : jpg |
As I looked at the above photo from Reflecta, I see a poor choice of image appearing on the LCD display screen. If you look close you can see one person bending over and 2 people behind that one. It can be misconstrued into something it is not. I emailed both Wolverine and Reflecta about the poor choice of image displayed and hopefully they will change their ad. I remember back in 1973 Kodak ran an ad that was very unsuccessful due to poor choice of images (showing a black and white clown face on a scanner and ad/article mocking the features and comparing features to non-existent competitor models). I own that film scanner x11 units from Kodak and love it. I also am fond of this new film scanner marketed/made by various vendors/sellers etc (I have 2 units so far) and I hate to see it become a flop due to poor choice in pictures and ads. I offered my email to them- whether they do something to correct it or not - who knows? I bet Kodak would have fared better in their 1973 film scanner - if someone wrote a letter to them back then about their ad and ad photos. I love the machines and hate the ads.
When I boot up my own unit - the title screen shows "Wolverine" so obviously the software is specifically for this unit and the other brands and models may differ in their software and firmware etc.
My own unit shows
Version 1.0 hardware and Firmware version 20161102-P08a (which as of March 31 2017 was the latest version - as I contacted Wolverine by email and was told this is the latest version)
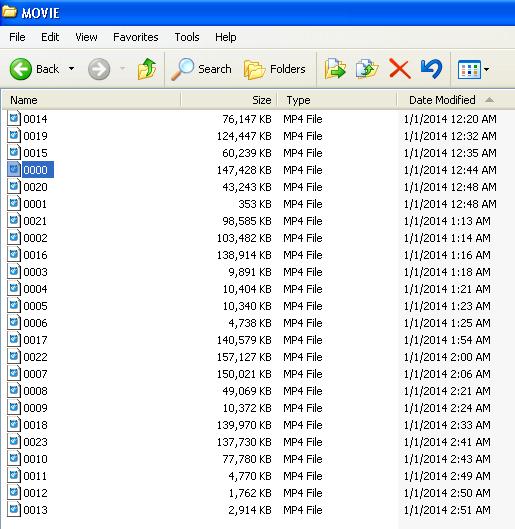
There is a glitch in the firmware where media playback sequence is jumbled as the firmware is arranging the playback sequence by date/time rather than file number. Since the internal clock is lost when you unplug - the date reverts back to 1/1/2014 and then the next recording sequence gets the same date as last session - but the recording time stamp causes it to become inter-weaved between the file numbers of the last recording session.
I was told by Wolverine that they will request a firmware fix from their engineers for this glitch. That was a week ago.
Here is the brand new sealed SD card I use with this unit since odometer 00000. I have not used any other SD card.
Update 4/14/17 I have purchased a second Wolverine Film2Digital Moviemaker (open box discounted perfect condition) and also purchased the very same SD card model for my second unit. Just a week later, I paid $3 more for the very same SD card. And $160 less for my second scanner. I am awaiting the shipments to arrive.

At the time of this writing Im at film odometer 00075 and my machine works fine and quiet (jumbled MP4 sequence present in firmware 20161102-P08a version.) Unit#1
At the time of this writing (4/8/17) Im at film counter 0097 and my machine works fine and quiet (jumbled MP4 sequence present in firmware 20161102-P08a version.) Unit#1
At the time of this writing (4/9/17) Im at film counter 0111 and my machine works fine and quiet (jumbled MP4 sequence present in firmware 20161102-P08a version.) Unit#1
At the time of this writing (4/14/17) Im at film counter 0137 and my machine works fine and quiet (jumbled MP4 sequence present in firmware 20161102-P08a version. Unit#1 (yesterday I purchased a second unit - "open box" from big seller with hundreds of thousands of feedbacks)
At the time of this writing (4/17/17) Im at film counter 0151 and my machine works fine and quiet (jumbled MP4 sequence present in firmware 20161102-P08a version. Unit#1 (last order and this order has alot of medium& large reels so odometer ticks up more slowly)
At the time of this writing (4/21/17) Im at film counter 0171 and my machine works fine and quiet (jumbled MP4 sequence present in firmware 20161102-P08a version.
At the time of this writing 4/21/17 my Unit #2 arrived with film counter 00005 and attempting to test the unit to make sure all functions work. It was "open box" and probably was returned by first owner to the store it was purchased from. It arrived with missing packing material but still considered a brand new unit.
At the time of this writing 4/24/17 Im at film counter 0193 and my machine works fine and quiet (jumbled MP4 sequence present in firmware 20161102-P08a version. My Unit #2 at film counter 00019 works fine and quiet (jumbled MP4 sequence present in firmware 20161106-P08a)
At the time of this writing 4/24/17 Im at film counter 0202 and my machine works fine and quiet (jumbled MP4 sequence present in firmware 20161102-P08a version (This machine is now beyond Warranty even though Ive only scanned 125 due to film counter quirks). My Unit #2 at film counter 00027 works fine and quiet (jumbled MP4 sequence present in firmware 20161106-P08a)
At the time of this writing (5/27/17) Im at film counter 0350 and my unit#1 machine works fine and quiet (jumbled MP4 sequence present in firmware 20161102-P08a version. Unit #2 is at counter 0150 (Im amazed that they both are at an even number). Ive had no additional issues and no strange noises. Works fine and quiet (jumbled MP4 sequence present in firmware 20161106-P08a)
At the time of this writing (12/20/17) Im at film counter 0390 and my unit#1 machine works fine and quiet (jumbled MP4 sequence present in firmware 20161102-P08a version. Unit #2 is at counter 0184 (Im amazed that one is at an even number). Ive had no additional issues and no strange noises. Works fine and quiet (jumbled MP4 sequence present in firmware 20161106-P08a)
I like the following settings for most customer orders so far works well
Exposure -0.5
Sharpness Low
Regular8 / 8mm Wide gate view - image has spasmic tremors right hand side?????
(Too much spasmic/unsteadiness in lower right hand side - on some but not all films - I see some snowflake-like mold and possible warping on customer films - which may be the culprit)
for Super8 Frame Adj (just a few scanned with these settings- still learning)
X20
Y18
Z12 (setting this to 13 on a few reels will give a flickering line at the bottom 12 seems to be more universal)
Super8 Cropping View - similar to a standard projector
A better setting for Super8 films in which the film has signs of mold or mildew or warping is this setting which reduces drastically the spasmic/unsteadiness right hand side (zoom in mimic-ing the typical cropping of a movie camera and film projector)
X18
Y17
W14
A few Regular8 reels containing snowflake-like mold and possible warp - cause the righthand side of screen tremors/spastic- The following is fine for excellent condition films only. Otherwise use the cropped settings typical of a projector (still figuring that one out- will post as I learn.
Regular8 / 8mm Wide Gate View - For excellent condition 8mm films
for Regular8 Frame Adj (most reels so far Reg 8 - very sure of these settings)- good settings to avoid line at top of image)
X20
Y48
Z23
***** I should note***** (Update 4/14/17)
that after I wrote the above, the very next order had zero warps, twists, sprocket damage etc Was in nearly pristine condition and the MP4 file was nice and flat and no distortion or any image problems. I had three bad orders in a row (now done and shipped) which caused me to slant/skew/question my perspective of my perfectly working machine. Even with awful condition film the results were quite respectable. I used the very same settings for good film and bad film (see above)
(update 5/27/17)
Regarding the warping and twisted films - the last two orders were pretty straight with only an occasional reel showing that bending and convolution of image at the right side of image. I would say that most orders so far are in decent condition, mold and dust is the biggest issues with orders, but warpage of film is not the biggest plague. I just so happened 2+ orders ago to have the most warped film and so my comments and thoughts about the machine were skewed because of that horrible condition order. Lately I have been very pleased with the end result files.
As I have viewed some youtube video demonstrations - I see that some of these units have 2ea vent hole grilles (looks like speaker holes in a radio case) but my own unit does not have any vent holes in the rear at all.
I have set a personal rule to ONLY use my unit for 2 hours at a time and then give it a 6 hour rest period. (As of this writing my lab is 65degrees F and early spring - in hot summer months even 2 hours runtime with no vent holes may cause excessive heat inside the unit)
I get about 3ea scanning sessions per day based on my own rule - that means 3ea 5" reels per day or about 12ea 3" reels per day.
I plan on getting more units over time so I can do more scans per day.
My observations about the VISUAL differences between models/brands etc
1. Some advertize 1080P and some advertise 720P (is it possible some units are truly 1080p - I dont know??????)
2. I have observed the youtube film output demos and see no difference between units in quality
3. Some units have a chrome plated plastic front
4. Some units have a non-chrome plated front - gray plastic
5. The unit looks the same but the printing on it differs
a. name brand
b. 8mm or Normal 8 (same function but the printing on it differs)
c. Startup screen shows brand logo
d. possible firmware difference in function???
6. Big difference in prices from vendor to vendor and brand to brand.
7. Some units have no vent holes on the backside (mine has no vent holes)
8. Some units have vent holes on the backside (looks like stereo speaker grilles on a radio - but no speakers or sound)
Of all of the demos and discussion about these units - I have never read any one mentioning the thick heavy metal steel front panel plate. It is a VERY GOOD steel plate and coated with a textured/bumpy OLD STYLE black finish like found on vintage cameras and projectors.
When I ordered mine I was EXPECTING a solid plastic unit and I was PLEASED to see that it has alot of METAL internal and external parts.
I also observed a youtube video where the author was chuckling about this and that and nitpicking everything and saying how the blower brush is useless BLA BLA BLA. I disagree 100% with his views. It is a very good unit and despite its shortcomings it is STILL a very good value and I am PLEASED to own it In the short time Ive owned it - it has made me EXTRA money as people ARE WILLING to pay for frame-by-frame above and beyond my regular price.
It is VERY SLOW but I plan on owning a whole rack of these units so I can do alot of reels simultaneously.
A DRY TIME TO BUY THIS UNIT March/April 2017
I had a buyer - BIG LOT OF FILMS - who would only go with film scanning frame by frame and nothing else would be acceptable. So I decided NOW is a good time to make the investment. When I looked online (BIG photo shops, BIG Retailers, BIG auction sites, Original MFG/Vendors/Resellers etc ALL SOLD OUT of this item. I found ONLY 1 source of a brand new unit (at a reasonable price) on big-auction-site and they wanted a premium $100 over and above the mfg price and I GLADLY paid that as I needed it to begin scanning right away. It arrived a few days later and was everything I hoped it would be. When I viewed the mfg website it said that it was sold out until late April 2017 as an estimate. Whether that means a new model will arrive or possible - no more being made - who knows what that would mean. Pure speculation as of today 4/7/17 none are available and ads pulled or there is a blurb on their ad "SOLD OUT" etc. Now dont get me wrong, there are a few still for sale at a much higher price depending on namebrand - but the price is SO MUCH higher than even even what I paid with a $100 premium attached. I feel like I bought one new- just at the last opportunity.
I plunked down my money and the $100 extra was well worth getting my hands on a brand new one.
AVOID WEAR AND TEAR ON FILM GATE
I have noticed that several videos show how to load the film and they (even the name brands show it this way) just push the lever to the left and WHAM the film gate flips up. Then put the film under the two tabs and CLICK the filmgate closed.
THIS IS BAD IDEA- clicking down the filmgate and WHAM flipping the filmgate up -
WILL WEAR OUT THE SNAPS.
What I do is - to unload film from the filmgate
1. Hold the top portion of the filmgate - with my left hand
2. Gently push the lever to the left
3. With my left hand carefully allow the gate to go up - without slamming
SEE YOU HAVE NOW AVOIDED SNAPPING SLAMMING AND CLICKING which wears out the pins
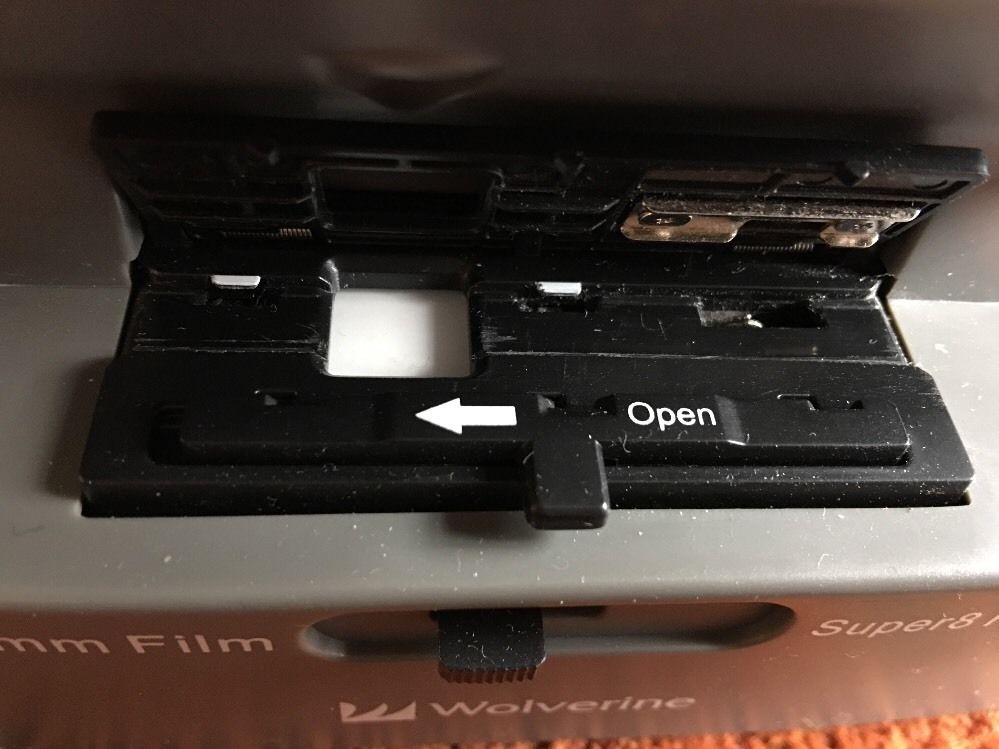
What I do is - to load film in the filmgate
1. clean this area with the included brush
2. load the film under the two tabs (on the first frame after the leader)
3. It takes 2 hands - hold the film in place - gently ALMOST completely close down the filmgate (dont snap closed yet)
4. gently push lever left and hold it there
5. Push down GENTLY on the gate - make sure the film has not moved over one of the tabs
6. release the lever slowly to the right while holding the filmgate closed
SEE YOU HAVE NOW AVOIDED SNAPPING SLAMMING AND CLICKING which wears out the pins
I plunked down the funds for this machine and I plan on buying a ALOT of these. See that is one reason why I dont hire anyone - they wouldnt care about the machine (not as much as I do for my own equipment) - it would be snapped and unsnapped / clicked and unclicked and then worn out very very soon. It is DOUBTFUL there will be ANY spare parts available (possibly someone will make a 3-d printed set of spare parts - who knows) but in the meantime - there is NO POINT in wasting the mechanism or the filmgate UN-necessarily.
Im sure in the future (projecting my experience forward) I may buy some used ones on big-auction-site and then when I received the unit (they will probably say "untested" or works fine etc BLA BLA BLA and then I will observe how the click/snap is SO LOOSE or worn out because the previous owner - abused the plastic snaps. This is MY PREDICTION of the condition of used units in the future.
Also Ive noticed that currently USED units are being sold for FULL price/or more or close to that- the owners are transferring their home movies and then selling the unit - this HAND_ME_DOWN strategy is also common in Nikon scanners on big-auction-site. I would imagine some of these units have been sold OVER_AND_OVER_AND OVER again - through no fault of Nikon. And the sellers still want alot of money for their tired worn units. Ridiculous.
CAREFUL USE for this delicate item will prolong its useful life. Its a moneymaker and makes high quality recordings in file format that buyers want. I like it alot. Im pleased with the end result.
I bought mine brand new in a sealed box, the odometer was 00000 and each and every plastic bag was sealed with factory tape, all styrofoam perfect. I know what a brand new unit sounds like. I have noticed that every batch running through my scanner sounds a little different. I suppose it depends on the condition of film, mold present, warps, thickness of various brands of films etc. The sound varies ... But the smoothness and quietness of the whirring gears is noticeably drastically improved with adding grease.
The unsupported Filmgate
As I receive boxes of customer films, I notice that some films are warped and twisted and others are very flat and straight. The Wolverine Digital2Film Moviemaker has a WIDE open filmgate - what I mean by that is that - the current film frame AND THE ONE BEFORE AND AFTER after just in an open air 4:3 Square cutout in the filmgate. If a film is warped or twisted or curled - this WIDE OPEN unsupported area is enough to cause movement in the actual frame being scanned.
A standard projector supports the current frame on two or more sides- but this unit leaves it hanging at least 3 frames - so curl is more evident. In the MP4 video, it looks like the image is going in/out - STILL IN FOCUS - but moving as the twisted warped film goes through. For the past 3 orders all of them have had some degree of warped or curl or twisted. Some reels played perfect and others had some image slight contortions / convolutions /Expand & Contract in the right hand side of the image.
It is possible that someone with a 3d printer will someday invent some type of plastic snap-in guide system to go in the overly large 4:3 hole to support the film better?? Why was it made so wide- is it possible to Modify for us with 16mm? Is it possible to make 3d printed interchangeable snap-in modules for different film size???
For now the warping and twisted film is best remedied by
1. Using the built-in frame adjustment to ZOOM in the image more which crops the right side of image which tends to have more warping in the films.
2. Use a hand crank rewinder ( I use CRAIG brand vintage Rewind ) instead of the standard left reel mount (clutch fully off and freewheeling) The extra very slight drag helps the film be just a tad straighter going through.
3. In addition to the Craig Rewind, I also use the upper standard guide and "Golf Tee" guide to make a letter "S" before the filmgate. This helps to reduce the film bouncing before it enters the filmgate
4. I keep the super8 RED adapter inserted into the left spindle as it is flat and the "S" of film leaving the CRAIG rewinder and then entering the filmgate - the film slides over the flat RED super8 adapter - better than nothing.
The warped areas are more like the filling of a blow-up balloon with an image or words printed in the balloon. I realize that there are some current software tools like "Deshaker" but that is where the whole image is intact and just bouncing. The warp/twisted makes one side of the image balloon in/out in size where the other part of the image is a-ok. So it is possible a software tool will someday be made -similar to "Deshaker" but to cure portions of the image that balloons in/out. I have no affiliation with these image tools and have no intention in making this. Hopefully the reader will invent this.
Update 4/13/17
I found a large seller on big-auction-site selling 2ea Wolverine Film2Digital Moviemakers and was New Open Box - the ad aid carefully inspected and in perfect condition. So I quickly called/emailed my existing film customers to see if they want to upgrade their order for a few dollars more and a few more said yes. Those additional funds from these upgraded orders (Albeit a very good deal at a bargain price for the amount of time/scanning labor) So I went ahead and purchased my Scanner #2 and will be coming from California and expected to arrive in 1 weeks time. In the meanwhile I am scanning twice daily on a batch of 8ea 5" reels. I should be done in a few days. After that I have 2 more large orders- the additional scanner should come just in time to help with those 2 orders next week sometime.
I have noticed that my current order containing Kodachrome films on metal reels are in really nice straight condition without any warping. I checked the created files so far and I see no wiggle, no convolutions or expand/contract on right side of image. Could it be that the last 3 orders were just awful? This current order is SO DRASTICALLY much easier and is not starting stopping to avoid blisters. This order just runs so smoothly without any hiccups. I get to see what this wonderful scanner can do. I would like to have a whole rack of them. Each one scans slowly and by doing several reels simultaneously - then that slowness is no longer a negative thing. Im glad to have purchased this OPEN BOX unit- there was one more but my small budget didnt allow for multiple purchases at this time. I got a pretty good deal with discount and free shipping. I just hope it is as described and is in wonderful condition.
Takeup Reel Stopped
Yesterday while transferring a 5" reel, my takeup reel stopped (Was 75% full) and was starting to spillover the film onto the table (I was right there babysitting and reel only stopped for 20 seconds- I saw it and then quickly wound the takeup reel by hand (less than a couple of feet only) I put alot of thought into this since yesterday- I have concluded that it is not a machine fault.
1. Using reel where the inside hub is recessed- outside of reel scraping against the black steel front panel
and reel has mold flashing from a bad injection mold- which catches on the textured black steel front panel
2. As the film on the reel grows larger - the pull tension lessens
3. The weight of the 5" reel when full causes the film reel to angle down- which further makes the reel even closer to the steel textured front panel
My solution for now is to simply pull the reel slightly forward on the 8mm to Super8 adapter. The small nub that holds the reel from falling off is no longer just past the reel - now that little nub is under the actual reel's hole. By pulling the reel out slightly- this avoids any chance of scraping.
A better solution is to 3d print a custom reel adapter which holds the takeup reel further away from the steel body. Or possibly to make a small washer which fits in between the reel and the 8mm to Super8 adapter. I actually have several of these small adapters (the machine is provided with a red one and a grey one) I have a few vintage beige colored ones. I can also glue one of these to my takeup reel ( I use a non original 5" reel which has auto-loading )
Since I use my CRAIG REWIND for the supply reel - I havent had any supply reel issue so far.
It isnt the fault of the machine that the Reel I use has a recessed middle portion. There are hundred of used/new reels available online - so Im sure the reader can find an alternative reel to use.
Exceptionally good job at Overexposed Films "Polar Bear in a snowstorm"
The LED backlight is very very good. It does a much better job than an incandescent lightbulb or lamp for OVEREXPOSED film
in which the amateur camera person let in TOO MUCH LIGHT while filming.
For these very very white scenes
1. Snow
2. Filming against the sun
3. Sky and clouds on a bright sunny day
4. Camera has wrong setting and has almost transparent "ghost-like" faint images
Compared to a bulb/lightbulb/lamp - the LED is safe for film and CCD camera. Trying to record with a camera and projection lamp/hot lamp RUINS the Camera CCD and makes dead pixels in the CCD because lightbulbs are too bright and hot. The LED backlight is a nice even light and evenly lights the film and is safe for the built-in scanner even in the "polar bear in the snowstorm" shots. Using an expensive CCD camera and filming "polar bear in a snowstorm" from a projector with a hot lightbulb/lamp is basically like aiming your camera at the sun - bad idea for your cameras health AND doesnt make a good shot. Since the lamp is not a pure white light source - it is yellowish reddish, your snow and polar bear now look orange-ish and loses whatever is left of the color. THE LED is much better and captures whatever is left of the faded image - including the residual color.
The Wolverine Moviemaker is good at scavenging faded overexposed film with very light images. Normal films have dark/light/full spectrum images - the scanner is the best Ive seen at capturing the worst faded and discolored horrible photography. Almost every order Ive seen has a few BAD SHOTs and this machine makes even the bad shots viewable.
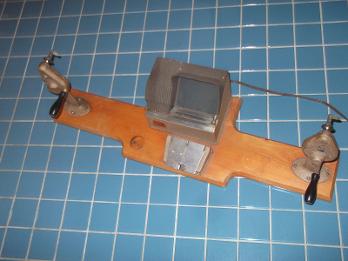
Here is a photo of Craig Master Rewind Editor which I have purchased from a local Craigslist seller about 8 years ago. I never used the editor but I have used the 2ea rewinders for my Super8 Regular8 and 16mm orders as checking the film before running a transfer is important to fix bad splices, clean etc.
Most recently I have removed the editor box (which I never once used) and simply place my Wolverine Moviemaker exactly where the removed editor (was held in place by 2 screws under the board) was. I didnt secure the Wolverine unit in place at all. I mostly use the left rewinder. The right hand rewinder I just ignore. The film splicer is there too and makes good clean splices for 8mm or 16mm but is not for super8.
This wooden Craig rewind editor looks home-made but it CAME THIS WAY from the factory. You can find ones just like it on big-auction-site. Some people sell just the rewind separately.
Update 4/17/17
As I gain more and more experience with my Wolverine Film2Digital Moviemaker, I run into the same glitches here and there and try different things. The current order has some 5" metal reels/cans and some larger reels - which will be done last. The 5" reels have been stopping (but I am closeby babysitting) and I have tried pulling the reel forward next-time on the spindle slightly over the nub/bump on the spindle so the reel doesnt snag on the black textured steel front panel. But still stalled occasionally. So I tried only threading the film on 2ea golf tee guides rather than 3ea - but still stalled occasionally. I would say that it stalled less often for higher-than-normal-friction films. Although I see no issues with the film splices somehow it is snagging on the 3ea or 2ea golf tees due simply to friction.
I dont have a solution - and Im still going to use 3ea golf tee guides for most film orders. This one Im going to use 2ea golf tee guides as it seems to reduce the number of take-up reel stalls - which reduces the number of times I have to intervene and pull the film just-past-the-gate just slightly beyond where it is not feeding. I find it is happening 2-3 times per 5" reel on this order. Last order - no stalls. So that tells me it is the film condition which is causing this. The films are nice and straight but the age of films is 1950s and Kodachrome mostly.
I havent checked to see if the stalled areas have OVER/Under splices or UNDER/over chemical splices. It is my hunch that it could be the sharp bend at the Golf Tee Guides versus the splice point - causing a snag there. I still havent figured it out. I hurry to move the film beyond the snag - so there isnt a whole of of dwell time or dilly-dallying while I make an observation. My main point is to get the film going as quickly as possible.
Hairs and Dust and Mold Specks
As I use the factory stock blower brush I get the LED backlight clean at every reel change and also if I see some debris snuck in there during the transfer. As clean as you try to get the film before the transfer - sometimes it sneaks in...
I ordered a LINT roller from China and will try to adapt one as a homebrew PTR (Particle Transfer Roller) which has been used on large TV Station telecines for the last 50 years. Those typically have a Silicone material which picks up dust and hairs. The current China-made lint rollers are probably slightly sticky and dont leave any residue on clothes as a lint brush. I ordered one and plan on cutting it like a salami LOL and making an adaptation for my Wolverine Moviemaker unit(s) as I have one here and another Moviemaker which should arrive this week sometime.
Here is a photo of the mini Lint Roller

I purchased it from big-auction-site and will probably take a month to arrive but was less than $1 including shipping. I have a 3d printer. And plan on cutting the mini roller into a film-size roller and replace one or more of the golf tee guides with a sticky roller - to collect dust and hairs and lint which sneaks into the filmgate - even after a good careful gentle cleaning sometimes. The photo shows washing the material under a running sink and even over-stretching the material. TV station Telecines with Cleaning Rollers are not as stretchy- so it may be a different material then what they use on those full sized machines. The amount of dust Im trying to avoid is just one speck. It should work for that. Hopefully it is not so sticky as to add film drag. Who knows what color they will send me? Red, Blue, Green. Any color is fine.
update 5/2/17
I received the blue roller with white case - looks exactly like the photo above. The roller is wrapped in a square clear plastic - looks like an American cheese slice wrapper. After taking off the plastic wrapper - I proceeded to clean up my jacket which my cat slept on and was full of hairs. Well, that brush made a nice clean spot - and became clogged and would not pickup any more- absolutely coated with hairs. I was expecting to just run it under the sink water - and the hairs would just slide off easily - but instead - Oh My Gosh - it took me 10 minutes to get it as clean as I could - it is just as sticky as new but it became permanently ugly and looks dirty now. I can see why they put a protective American Cheese -slice looking wrap around it - so it arrives clean and pretty.
I will let it dry and then test my own film to see how it does. It doesnt seem to leave any residue. I like the construction - a tube wrapped with sticky layer - 2 end caps. This makes modification easier. Im happy with what I got. Sticky like pancake syrup - but leaves no residue. Very mushy soft roller layer- much softer than a pencil eraser. Reminds me of the softness of bicycle gel cushion seats- almost fleshlike - soft like meat before you cook it.
Im thinking about using the machines textured black steel plate- as a surface to stick a magnet to. That way- nothing needs to be unscrewed for installation - and allows experimentation with placement along the film path.
A handheld PVC pipe cutter or utility knife may slice the plastic tube cleanly?
Update 5/4/17
I have determined that the roller is WAY TOO STICKY for this purpose and I can hear it bog down the motor trying to peal the film away from the sticky roller. Good application - but the product's stickiness is excessive. Maybe there is another brand or mfg which has one which is less sticky?
I received my second Wolverine Film2Digital Moviemaker from big-auction-site and was "open box" and most likely a returned item. Missing cardboard packing materials and damaged box. Nothing was sealed in plastic bags except for the 2ea spindle adapters from 8mm to Super8. All accessories were included power adapter, tv-out cable, 5" reel, 2ea spindle adapters 8mm to Super8, manual ver 2.0, blower brush and had factory tape across the film gate and clear screen protector on the LCD display.
It doesnt appear that any film was ran though it - or maximum 4 reels. When I powered it on the film counter said 00005 and that counter increments each time you power it on and every time you stop scanning. So the seller had counter of 00004 the last time it was powered off.
I immediately greased everywhere outlined above. I scanned 1ea 5" dia film and was nice and quiet- about half of the noise of my first unit. As the 2 hours of scanning time went by - the sound increased in volume and the clicking became increasingly crisp. Initially the clicks were very muted in volume. The whirring of the gears is much less pronouced. This unit makes a continuous Whir sound - compared to my first unit which makes a double-syllable sound Whir-Whir.
The lcd viewing angle is much different on this second unit as I have it on a top shelf of a 5-shelf rack. In the exact spot my other one was. I replaced the unit temporarily to give the newly puchased on access to my Craig Rewind. I find that it is just above my eye leve by a few inches. The LCD viewing angle is like "photo negative" and when I stand on my tipie toes then the viewing angle of the LCD changes and becomes "photo-positive". This tells me that there is probably some adjustment pot on the PCB that I will need to locate and adjust?
I now see why they parted with this unit as the LCD viewing angle is not quite right. Also as I scanned the 5" reel I was wondering if the focus was off as it does have the razor sharp image of the first unit.
I also see that adjustment numbers between the 2 units differs slightly. When I put the same number in the newly acquired unit- I see a film border at the bottom of the image. Also it seems like the image is darker than the first unit. So my setting it to exposure -0.5 may be wrong for this unit. I may leave it at 0 exposure on this newly purchased unit.
As I have only scanned 1ea film and the film itself is questionable quality/focus/brightness etc I will not jump to conclusions about whether adjustments are needed or not. Its too early to tell.
I will also check to make sure functions like rewind and tv-out etc function properly.
Interestingly there was an extra thing in the box - a Micro SD to SD card converter was in the SD card slot. However there was no microSD memory card included. I remember reading online that this unit is not compatible with MicroSD cards or adapters. Is it possible the seller had a previous buyer who returned it- and forgot to take out the microSD adapter. They may have tried to record unsuccessfully and then returned it.
I doublechecked my 1st recording on a brand new SD card (same model as before) I used a utility knife to open this brand new SD card Sandisk Ultra 32GB and it went straight from the package to the back of this newly acquired fim scanner. I successfully played back the recording and viewed it on the built-in LCD. So that worked fine. I just tilted the scanner so I could easily see the display as it was sbove eye level. The playback was nice and straight and all colors present. A tad out-of-focus (which I havent determined if it was the machine or the film)
Right now it is cooling off as I only use machines for 2 hours at a time. It doesnt have rear vents - just like my other unit.
Non-Vented enclosure is probably best as it keeps the dust out of internals
and gears and LCD backlight. It wouldnt take long for a blower fan to suck in a
speck of dust and go into some crevice which would interfere with picture quality
or get attached to the sticky coated take-up reel drive belt (located internally).
As I have completed the warped/moldy film order and now onto the large order - the main purpose in my buying 2 of these units was the upcoming large order. I find that there is alot of "Almost black" footage in the customers first ziplock bag of Kodachrome Super8 film. I spent 2 hours scanning these reels after sorting them by approx date and numbering them. The first half of numbers on one scanner and the second half of numbers on the second unit.
I noticed somethings when running 2 units simultaneously.
1. LCD Screen is different on both units
A. My #1 unit was more expensive & I paid a "scalpers" price for it - has an ULTRA HIGH RESOLUTION LCD - WOW!!!!
a. "Grid Style" pixels - every line of pixels directly above the next row
b. As I count the onscreen "e" I see approximately 12 pixels across
c. The pixels appear a clean defined crisp color - not requiring the combination of adjacent pixels to make a color
B. My #2 unit was discounted "OPEN BOX" & counter of 00005 when I received - LOW RESOLUTION LCD - good enough!!!
a. "Brick Style" pixels - like a brick wall - where a line of pixels is staggered - not directly below the previous row
b. As I count the onscreen white "e" - I see 8 pixels across
c. Color separation - resembling a CRT monitor which takes several adjacent primary color pixels to make white
2. Tic Whir Tic Whir Tic... sound is exactly in-time throughout the scan and doesnt deviate on both units
3. I can use the same CRAIG rewind for both units - no need to buy another one
4. I find myself loading both units FIRST so I can press the scanning start on both units simultaneously
A. That way I can use one stopwatch timer to know when both units will end
B. Some film reels have a longer length than other reels
C. 2 units are not twice as loud - the volume seems to be approx the same as before even with 2 units going simultaneous
The scanning quality is the same on both units. But the second unit has a drastically lower LCD screen image quality that I mistook for "out-of-focus" in m above paragraphs. No it is NOT out of focus. I used a jewelers loupe (a projector lens that I have had for years for this purpose) and I observed the screens from very closeup- too look at the LCD screen pixels. The low resolution LCD reminds me of old camcorder eye viewing CRT tube images - as I look through the jewelers loupe.
The high resolution LCD screen is very much like a laptop's screen - as I write this I am typing on a Dell Inspiron 2650.
When using the Low resolution screen from a distance of even a few inches - the pixels combine into an image and I dont see dots anymore. However, when a really in-focus sharp image is scanned - having the 2 units so close together - I see a drastically better LCD image on the high resolution LCD.
My conclusion is that there are at least TWO VERSIONS of LCD screen - the better one is about 1/3 better resolution. The body of the unit looks the same, the menu system looks the same, the firmware version is very similar. I dont think there is ANY WAY to request which version of LCD you get.
Even so, it scans in the same quality as my other unit. From across the room, The LOW RESOLUTION screen is not viewable as it looks "photo negative" from far away. The High resolution screen has a much better viewing angle and you can see the image from across the room. This is important as babysitting is required - in case the film gets stuck or the unit stops on its own due to "overly white image" or "overly black image" - which on this order with "mostly black footage" means that every 2-1/2 minutes the film scanning stops and I have to push the button to start the scanning again - which creates an enormous number of small files- approx 8ea files for 1ea 3" reel which has all black or all white, increments the counter falsely (what warranty anyways? Exceed 200 counter and ends warranty) and having to resume every 2-1/2 min is a nuissance.
I see a demo of another brand and model and version of this scanner- on youtube. The UK scanning firm shows the menu (possibly an older version of the firmware) and you can select 5" or 3" reel from the menu - which may be some sort of timer which mine doesnt have. The Artificial Intelligence built into my units shuts it off after 2-1/2 minutes of scanning just black film - I have no way to turn this feature off. I would prefer to have it just scan black and whatever slight images may be there occasionally. It scans well - but turns off the scanning - it would be better (for my needs - this feature may be fine for someone else) if it just continued without stopping.
Both the Low Resolution LCD and High Resolution LCD are Good/Excellent and the main thing is to monitor where the edge of the frame is, exposure, dust and specks - important for cleaning. Both versions of built-in LCD are acceptable and enable the user to see what is going on. Having a standalone (no PC required) unit with built-in LCD display is GREAT and very handy.
I was festering for a few days about the Low Resolution LCD and missing a remote control. I emailed the seller of my "Open Box" item because I saw that there were 2ea for sale and immediately after I purchased - the seller lowered the price by $65 for the next buyer - but not for me. I felt like I got the wrong box - you know the box without the remote control - but paid the higher of two prices. I made a nice polite email to the seller and got back an answer "no discount ... the unit didnt come with a remote and is brand new"
That email response from my seller left me puzzled. I doubted my own recollection and hunted through all of the materials in both original boxes. I found manuals, usb cords, dust blower brushes, spindle adapters, extra SD to microSD adapter, ... but I didnt find a remote. How could that be??? Makes no sense??? I looked through the manuals (both version 2.0) and I also looked through the online PDF file manual (version 2.2) which I downloaded from Wolverine website - I looked through the packing list of items - doesnt say any remote - at all. How could that be?
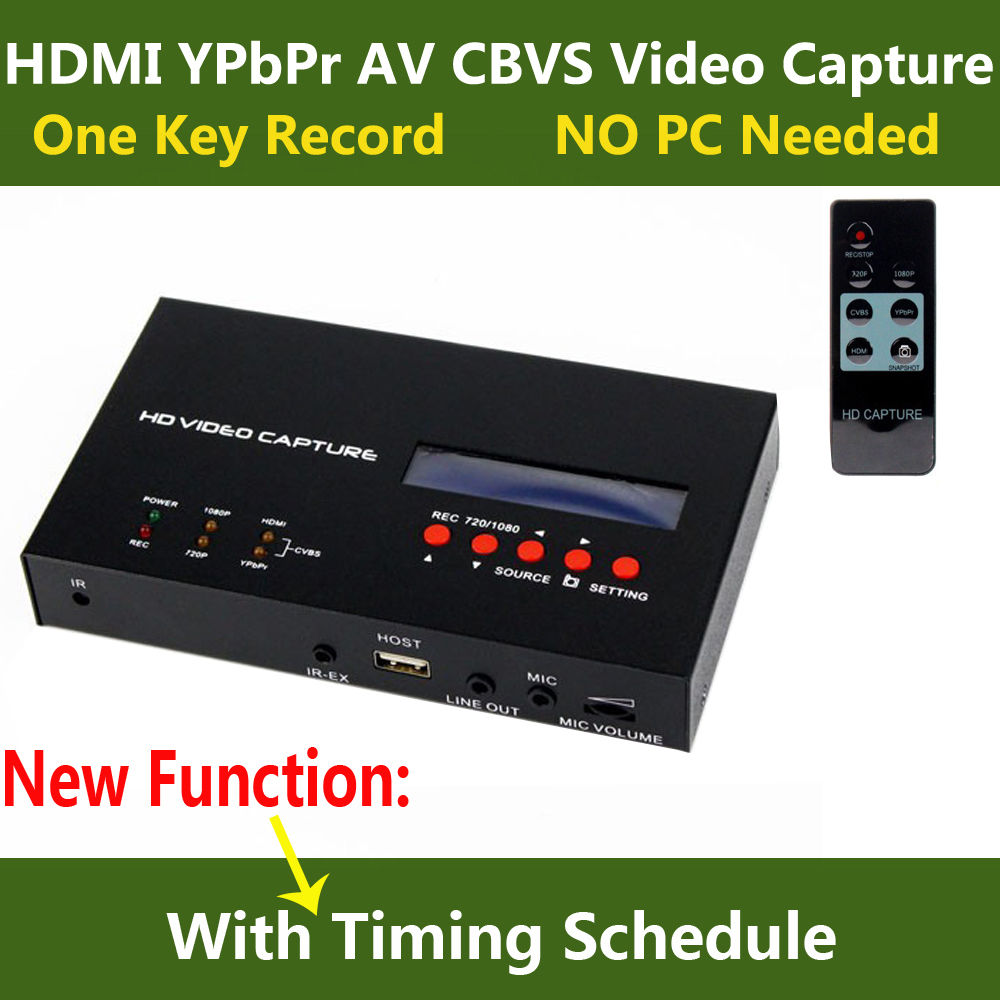
I figured it out ...
At the same time as I ordered the film scanner unit#1 ... I simultaneously received an MP4 recorder for YPBPR and HDMI and Composite from China which records to a flashdrive. So I GOT CONFUSED ... the remote I was thinking about is for my brand new MP4 recorder. There is no remote for the Wolverine Moviemaker. OOOPS my mistake.
I actually went back and deleted a whole section on this very page about a non-existent remote cntrol. Unbelievable that for a few days I was festering about something non-existent. To the point where I felt gypped.
It was an honest mistake on my part. Here is the photo of my new MP4 recorder and the remote I had in mind.
|
|
remote missing Wolverine OOPS my error 042417.jpg Size : 112.494 Kb Type : jpg |
What is the Extra Wide Unsupported FILMGATE for?
I figured it out. It took me 3-1/2 orders to figure out why the film is unsupported. It really ISNT a flaw at all. The nuissance I have fighting Dust, Debris, Hair, bits of mold, etc in the middle of the scanning process - the LCD shows a blob or other debris which is now clinging to the backlight.
The blower dust brush worked very well - but I received such a horrendous order from my SECOND order ran through this machine that my dust brush became infested with microscopic stickiness and I tried cleaning it in the sink, letting it dry, using cotton ear swabs to clean it. But it is ruined as it deposits just as much dust as it cleans off. The fault is NOT THE BRUSH. The fault is the AWFUL condition films that people store in their moldy crawlspaces and basements- they are totally unaware of the condition.
I havent tried this yet - but blowing off the dust brush with a shop air compressor with a strong air tip nozzle (do this in your shop - not in your filmlab) may remove all of the bits of dust and debris now microscopically infesting the blower dustbrush making it useless. I remember a youtuber chuckling over how useless the included dustbrush is. Well my own dustbrush became useless to after the second order - as the film was moldy and even water damaged and I was endlessly trying to keep that backlight cleaned- stopping and starting the scans. My hunch is the youtubers films were all moldy. There is an old saying, "When you point your finger at someone - you have three fingers point back at yourself." (That applies to me too as it is easy to jump to conclusions - falsely)
So what is the solution - buying a new brush for each and every order - not feasible (these same dust blower brushes are available for sale on big-auction-site for not much money). I have used ear cleaning cotton swabs which I manually bend the tip at a right angle- gleaning both the backlight and entire black plastic film gate. That helps alot. Even so - a cotton swab is required for EACH AND EVERY film - because even the fibers of a cotton swap trap and release that dust back where it came from- if you try to use it multiple times.
Back to the extra wide filmgate ...
The solution is a CAN OF AIR - the extra wide filmgate and unsupported film hanging in mid-air - it allows the user to dust the film and underneath it and the backlight WHILE THE FILM IS SCANNING. See I have been through three mid-sized orders and stopping the scan and restarting after it is cleaned - this unloading and loading of film - creates un-necessary wear on the filmgate. I wrote a whole section above on how to OPEN CLOSE the filmgate without SLAMMING or WHAM or CLICKING the filmgate open and closed. Furthermore, I can reduce the wear and reduce the number of file snippets - by using a can of air to clean dust and debris which - no matter how well you clean that film there is always a chance for dust to sneak in there.
Being vigilent and watching the LCD screen with a can of air nearby is important - while your film is running. Give a tactical spurt of air if you see a bit of dust sneak in. Cleaning with a cotton swab ear cleaner (paper stick type) bent to a 90degee angle before loading your next film.
The awfulness of some peoples films is apparent in the number of just filthy/dirty cotton swabs as I clean the filmgate between reels. Other films (from well stored films) leave zero crud on the filmgate. Unfortunately I made the mistake of using my blower brush on a grimy film order and ruined the blower brush. I realized that too late after seeing the growing pile of dirty ear cleaning swabs as I scanned each customer reel. As I finished that order and started the next customers order with a nice clean machine- I felt a BIG RELIEF and saw a great reduction in babysitting required.
I have never bought a can of air and will continue to use the blower bulb separated from the brush and ear cleaning swabs. Can of air adds expense and contributes to the landfill mess.
Big-Auction-Site Disaster Modified Filmgate by Amateur - YIKES
As I try to increase the number of these film scanners in my lab, I often check big-auction-site for deals, and bargains etc. I search for "Wolverine Moviemaker" "Wolverine Film2Digital Super8 Super 8 Regular8 Regular 8 Normal8 Normal 8" you know, all combinations of the words in my search.
Well I found a JUNKER as the modifications that the amateur seller posted in his/her HONEST AD was that the filmgate was widened - the stated reason is that the film wouldnt fit. That doesnt make sense as I have run probably 100 films at this time and they all fit - Regular 8 and Super 8. This widening of the filmgate - makes no sense.
Even worse is the horrendous craftsmanship where it looks like either sandpaper or a file was used. The filmgate is JUNK NOW as it will scratch the film as it is going through.
Just look at this AWFUL PHOTO - it is NOT MY SCANNER - I DIDNT DO THIS. Im showing you so you DONT DO THIS to your unit.
And the worst part is that I see 6 bidders on that hacked up unit and they will ruin their priceless film on someone taking sandpaper and putting those rough surface against a precious vintage home movie is just asking for severe scratching of the image.
YIKES- makes me cringe to see this hackjob amateur mod photo (seller user name not devulged)
Dont Do This to your FRAME-BY-FRAME scanner:
Update 5/4/17 I used a lens from a filmstrip film projector - which I used to magnify very small objects - I use it as a jewelers loupe. This lens was used in front of the 2ea Wolverine Film2Digital Moviemaker units which I own at this time. The first unit I bought on big-auction-site -I paid a premium for and got the high resolution screen YAY. The second one I got at a slight discount - and I see that this discount unit has a drastically lower resolution screen - but the files it creates are equal in quality and detail (I had no idea at the time that I would receive a Low resolution version LCD screen).
Here are some photos of the 2 screens and observe how the pixels are arranged
(from left to right ... Low Resolution, High Resolution, Low Resolution, High Resolution)
I have noticed several new videos on youtube regarding this style of frame-by-frame scanner. Wolverine has a new model of Film2Digital scanner called the "Moviemaker Pro" or is also written as "Moviemaker-Pro" and has a swing up left arm and 1080P scanning as compared to the previous generation model.
The MoviemakerPro seems to have the same outter shell/case - but the "guts" have been shifted over to the left - which makes more room for the right-hand takeup reel. The ad states that it can handle up to a 9" reel. This is compared to the previous model which can handle up to a 5" dia reel. By shifting the guts over to the left - this newer model has more room for a larger reel. The swing-up left arm allows for the 9" left reel to be mounted there.
As I looked at the demo video - I see the exact same menu as on my 2ea 5" models. So I think fundamentally they are the same or similar mechanism????
I also viewed some youtube videos where someone is complaining about their scanner (possibly a different model/brand??? which has scanned over 10,000 feet is not working and making a cracking noise. They disassembled it and showed internally- I dont know the exact brand or model but looks similar to my own -BUT it has no sticky belt. Instead the noisey cracking noise model with 10,000 scanned reel unit - that one has a plastic gearbox and small DC motor. That youtuber complained to the seller and got a new plastic gearbox but it still makes noises and youtube demo has an unstable scanned jittery image. My hunch is that the plastic red or grey snap plastic piece where the reel snaps into place is either worn or broken. It is my opinion that the sticky belt is better than the gearbox from a longevity/repairability standpoint.
Im pleased with my 5" sticky belt model. In my experiments- I find that the larger diameter reels weigh more than the 5" dia. As it fills up during scanning - the weight of the reel increases and adds drag. Also scanning for more than 2 hours at a time makes the internals heat up (see youtube video where "chronic complainer" uses a non-contact thermometer to measure heat) I have come to the conclusion a few months ago that I will limit my own scanning to 5"and 2 hours and then let the unit rest/cool off.
It is my opinion that having a larger reel and scanning for longer than 2 hours - is not the way I want to go as I have a large $$$ investment in my machines and want to make them last as long as possible. I currently split big reels into two smaller reels. I suppose large reels will be more prone to binding and stalls etc issues/problems due to the weight of the reel filling up.
Update 12/20/17
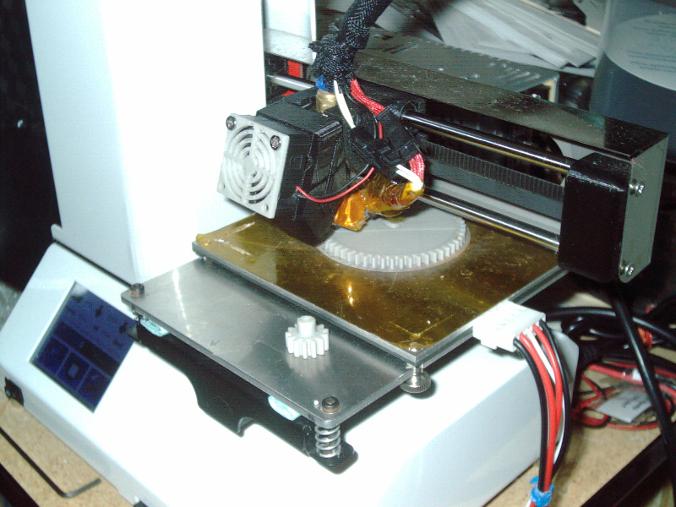
I have recently purchased a 3d printer and am learning how to use it. I had purchased a smaller 3d printer prior - so that makes 2ea 3d printers I own. I am not finished adding a heated bed to the first one. The dreaded things of 2017 like putting on a new roof etc have interferred with my 3d printer progress and I hope next year will be a better year for my time and income. I hope to make some add-ons for the 2ea film scanners - which I have been thinking about.
Update 1/7/18
I was emailed some pics and request to repair a Hammacher Schlemmer Super8/Regular8 film scanner and have included the pics of the broken gear? Broken gearcase? Pictures are not very clear and description is very vague. The buyer renigged as he first wanted a quote and then contacted Hammacher Schlemmer for a part request and Hammacher Schlemmer referred the buyer to Wolverine to buy this part. It is interesting that the vendors/resellers/mfg know of each other and this is a hearsay-sort-of acknowledgement that these units are very similar and or share some or all parts in common - possibly?
I am willing to repair these film scanners and gear issues. I will do my best effort.
Well I have not heard back from the buyer about the gearbox - this is what he wrote me by email ...
Click on the following file to read that owners "censored" emails and see the following pics (note do not try to hotglue like he did- that is not a professional way to fix and probably just made things worse)

|
Jan2018 Emails from owner Hammacher SchlemmerBroken Gear.txt Size : 2.405 Kb Type : txt |
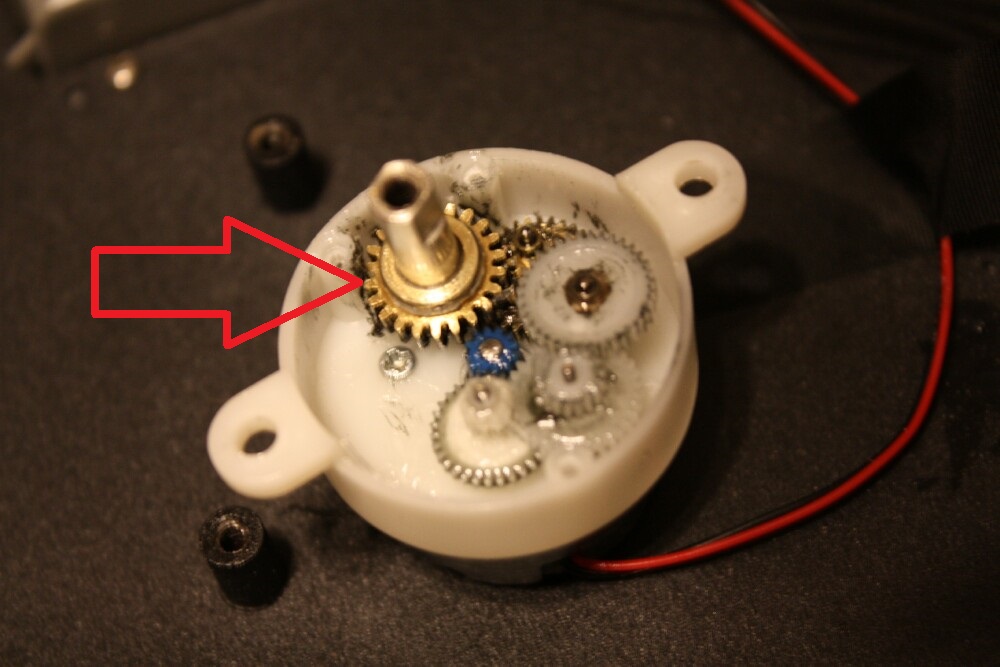
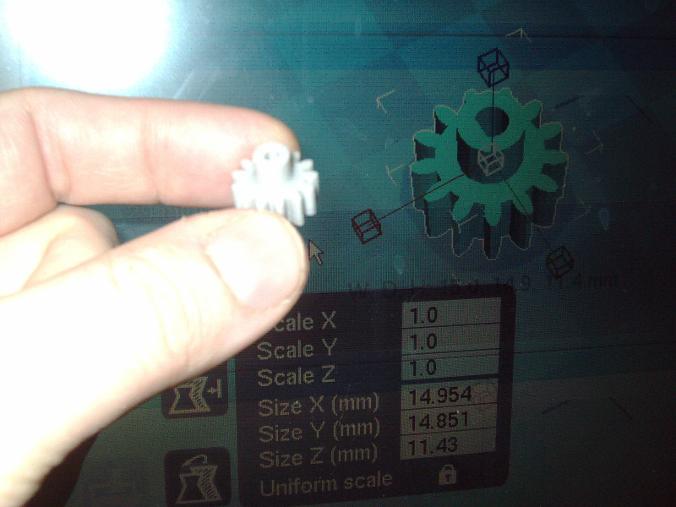
I have been adjusting and refining and modifying my small 3d printer for nearly 2 years and while other people are printing frivolous toys/gadgets - I have been working on refining my machine to print very fine detailed accurate gears. Here is a photo of a gear that I made that Im very proud of. I made this in 3 hours and it turns out perfect every time with just a tad of a razor blade to clean each tooth. My gear looks VERY SIMILAR to the gear I see in the pics of the new 3rd gen takeup reel motor design. So I believe I can also produce this.
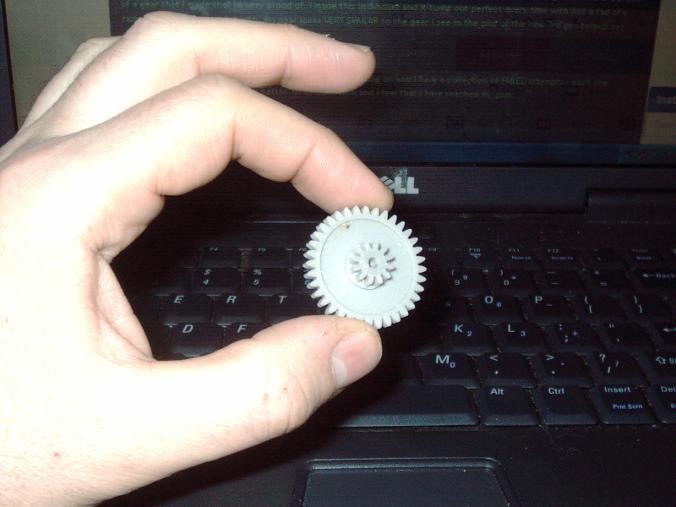
Here is an unrelated "practice gear" that I have been working on and I have a collection of FAILED attempts - each one progressively getting better and better. Im all done now and I feel that I have reached my goal.
Here is my "Practice Gear" ALL DONE made of light grey ABS plastic with 100% infill and looks perfect and is straight and clean with sharp teeth. This was a proof of concept that YES I CAN PRODUCE quality gear like magic from just a spool of ABS filament which looks like weed wacker string. I marked the gear with a magic marker black dot to show the front of the gear as it was printing. That black dot is visible in the photo. I am creating this very page you see now on my Laptop DELL Inspiron 3650 running Windows XP.
Update 1/11/18
I have drawn this suitable 52 tooth gear and due to my very basic skills in gear creating (Im the only one who even attempts to make useable gears in CAD that I know of) - the gear dimensions are ONLY proportions - and before I 3D Print using CURA software
1. Item is upside down and must be Rotated to be flat side down
2. Lay flat button must be clicked
3. Resized to be 60mm wide by click Resize button and fill in "60mm"
4. Now the part will print correctly as intended.
5. Brim of at least 5 or more is recommended so all teeth are sharp/clean on the print surface
6. I have excellent results using ABS .175mm with .4 print nozzle and heated bed to 90deg C and extrude at 145deg C
7. Aluminum printed with Kapton tape with 1-2 layers of fresh Elmers Gluestick (purple color change type)
8. If first 3 layers is botched - dont continue - scrap it and try again as first layers are critical.
I have test printed this at 50% size and printed fine. The full size 3d print would take my machine at slowest finest speed 20 hours hours 40 minutes.
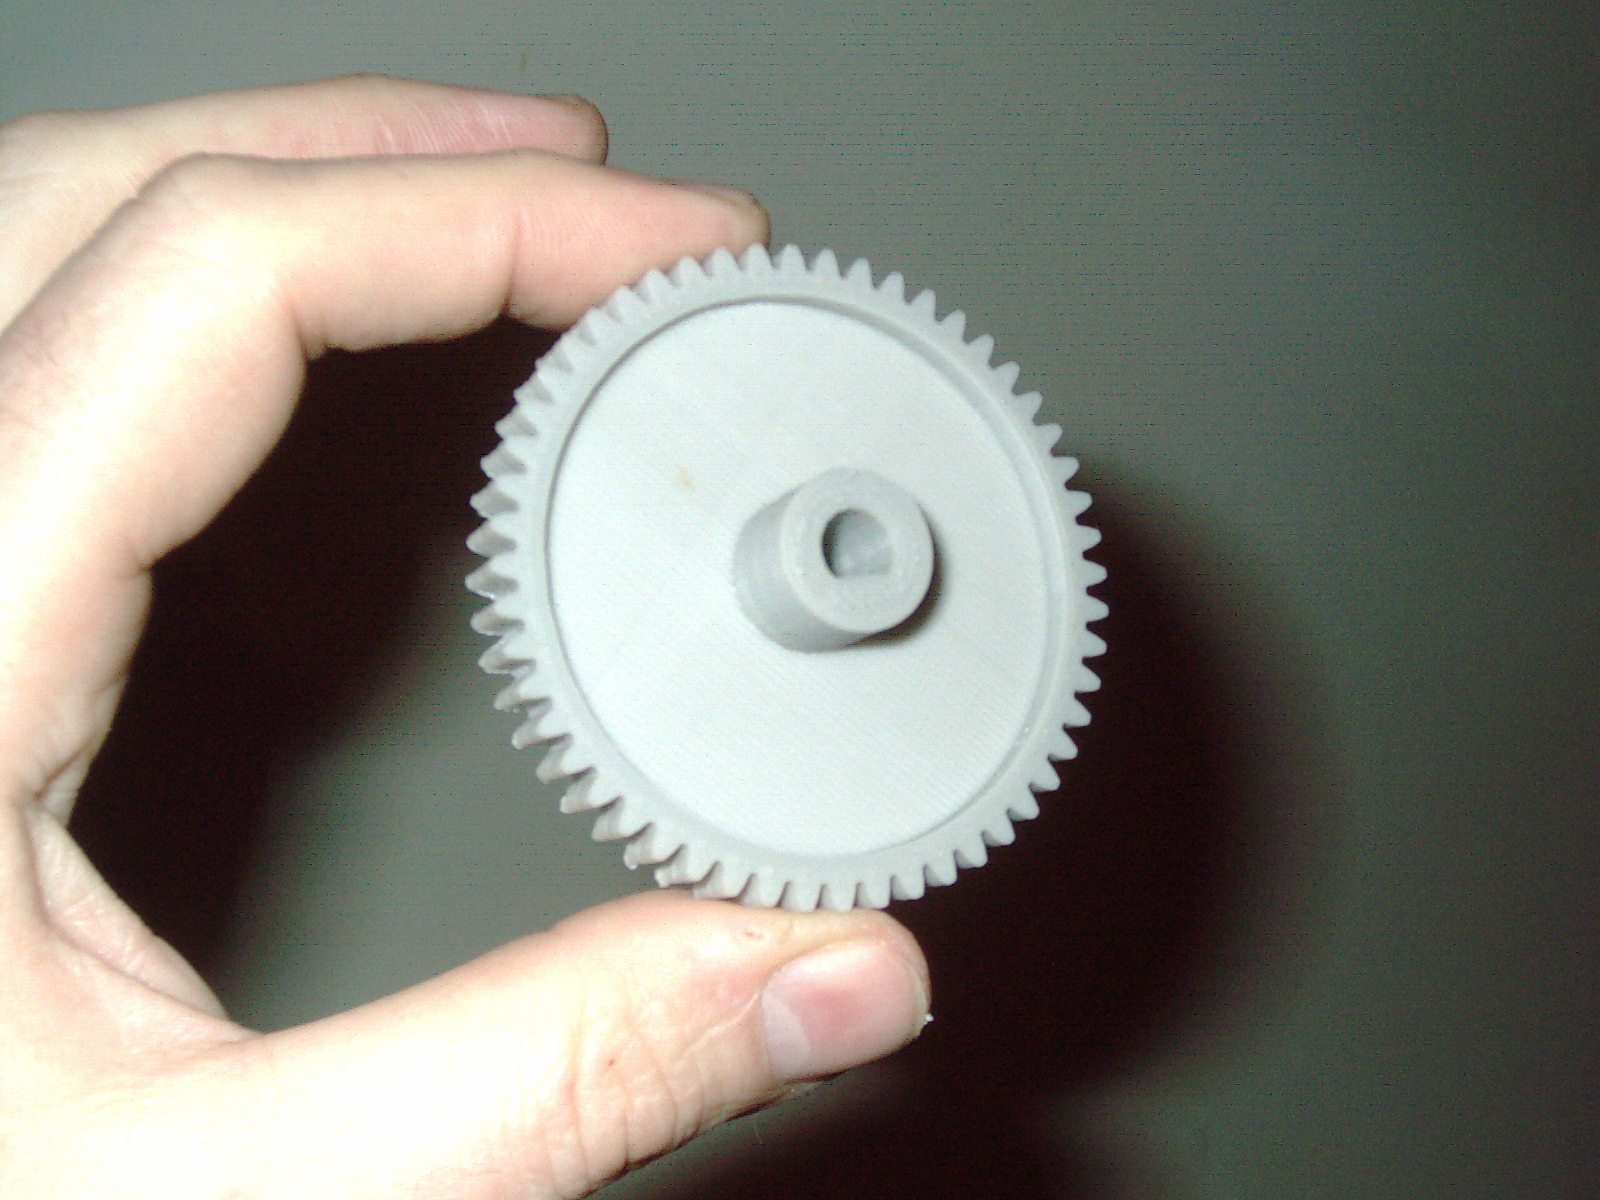
60mm BIG GEAR IS DONE - The above picture is a CAD screenshot showing its creation.
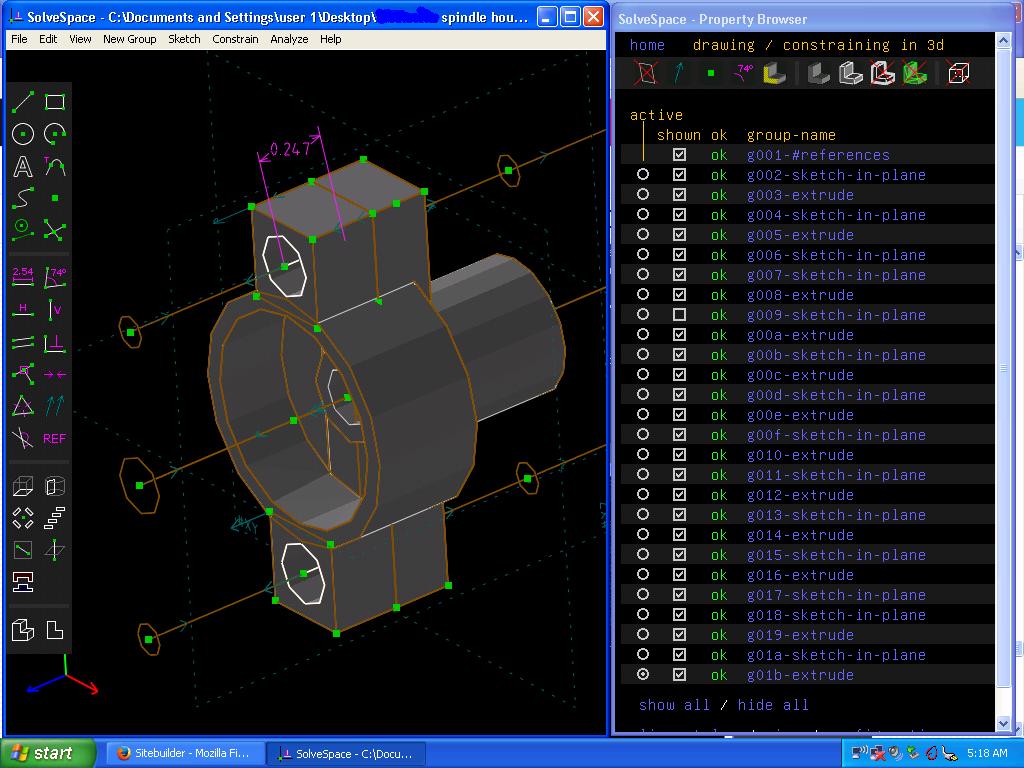
As I have perfected my 3d Printer to the point where I know it is working with ABS very well for gears. I am focusing my attention on gear making software to create STL file which I can printout. The software I choose to use on my older laptop is "Solvespace" and is freeware. It is the only stable software which I have gotten to work on Windows XP on my DELL Inspiron 2650. Every other software I downloaded either was unstable or refused to load/run.
Solvespace seems to work good but has certain quirks which I am learning and becoming accustomed to. So far it has helped me create a few simple objects. Sometimes the software throws a tantrum and I reload the saved file and then works as it should. It is useable free software so I cant complain and is good-enough-what-more-do-you-want-for-free.
Here is a very good demonstration of making a 20 tooth gear in Solvespace (not my video) in a language I dont understand
https://www.youtube.com/watch?v=AqonV6XqrV8
Here is a good video demonstration of making a rudimentary spur gear in Solvespace
https://www.youtube.com/watch?v=19XLvZtN27w

Update 1/11/18
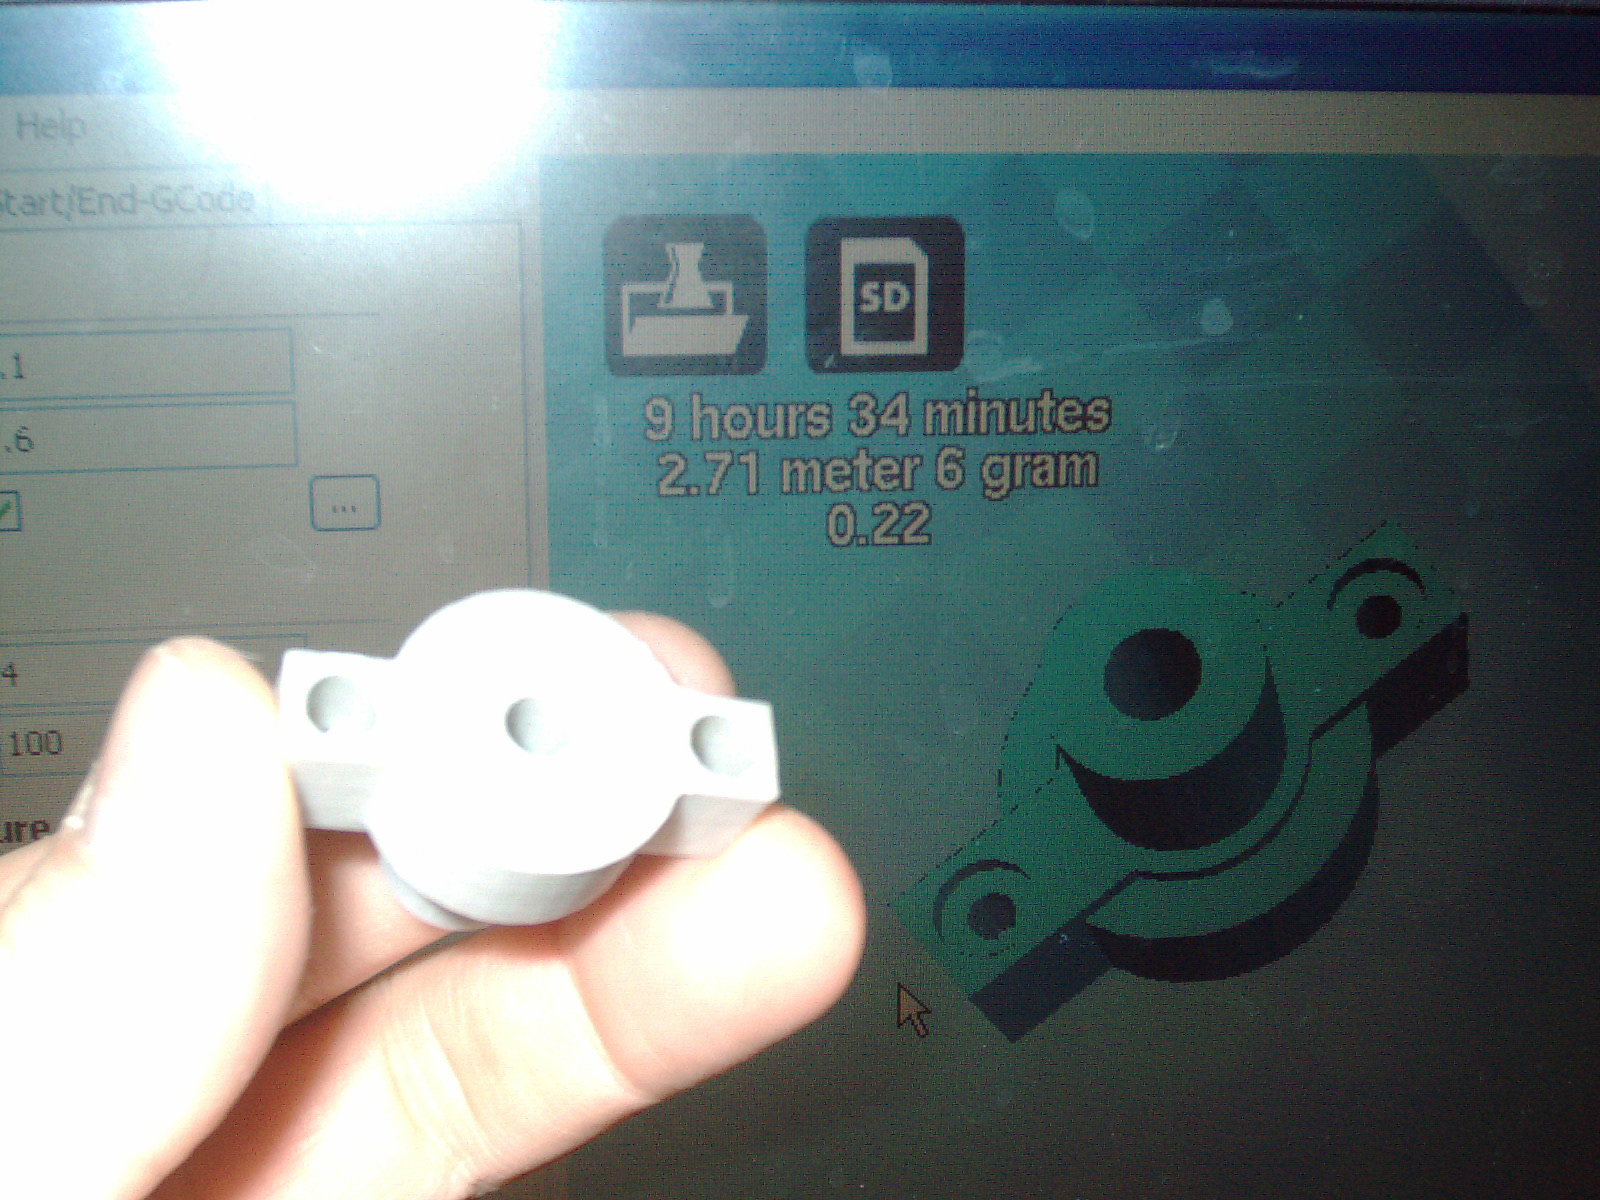
I have drawn today a 13 tooth small gear and made a test print. It is not exactly proportioned - but serves as a basic test to make sure there are no errors in the file and Cura software reads it just fine. This test print took 30 minutes at .3 setting. It has a .125" D-Shaped hole and is .25" thick. It printed nice and straight and clean. This basic design is applicable to this project and just needs to be proportioned to fit.
The above photo shows the big 60mm gear 15hours into a 20 hour printing run. This is the largest/longest gear I have attempted to make. This is printed at finest .1mm resolution with 5 line brim and running it very very slowly. I see no curling and it stuck down onto the Kapton tape and Elmers gluestick very well- I tried printing it at .3 and faster printspeed without success. The slowest setting and fine-est setting are my tried and true - always works for me setting. Waiting 20+ hours is taxing my machine - but worth the effort. I will need to add a cooling fan for the internals of my machine so it doesnt shorten the life of my 3d printer as it takes a long time to print/gets hot inside the machine- most likely as the stepper motors are right next to the pcb mainboard. 20+ hours is a long time and Im sure everything inside is hot. The printout looks wonderful and Ive been checking on it every couple of hours - every layer is nice and solid without gaps or blemishes. Really nice looking gear.
A few hours passed ...
Yes the big 60mm gear turned out very well here are 2 photos of it finished and cleaned up with a utility knife to make sure all brim edges are clean and sharp.
Update 1/22/18
A man phoned me today to tell me about an issue with his unmodified factory stock gearbox for takeup reel and said that his shaft connected to the large gear on his Wolverine scanner is wiggly and takeup reel doesnt function correctly.
Update 1/29/18
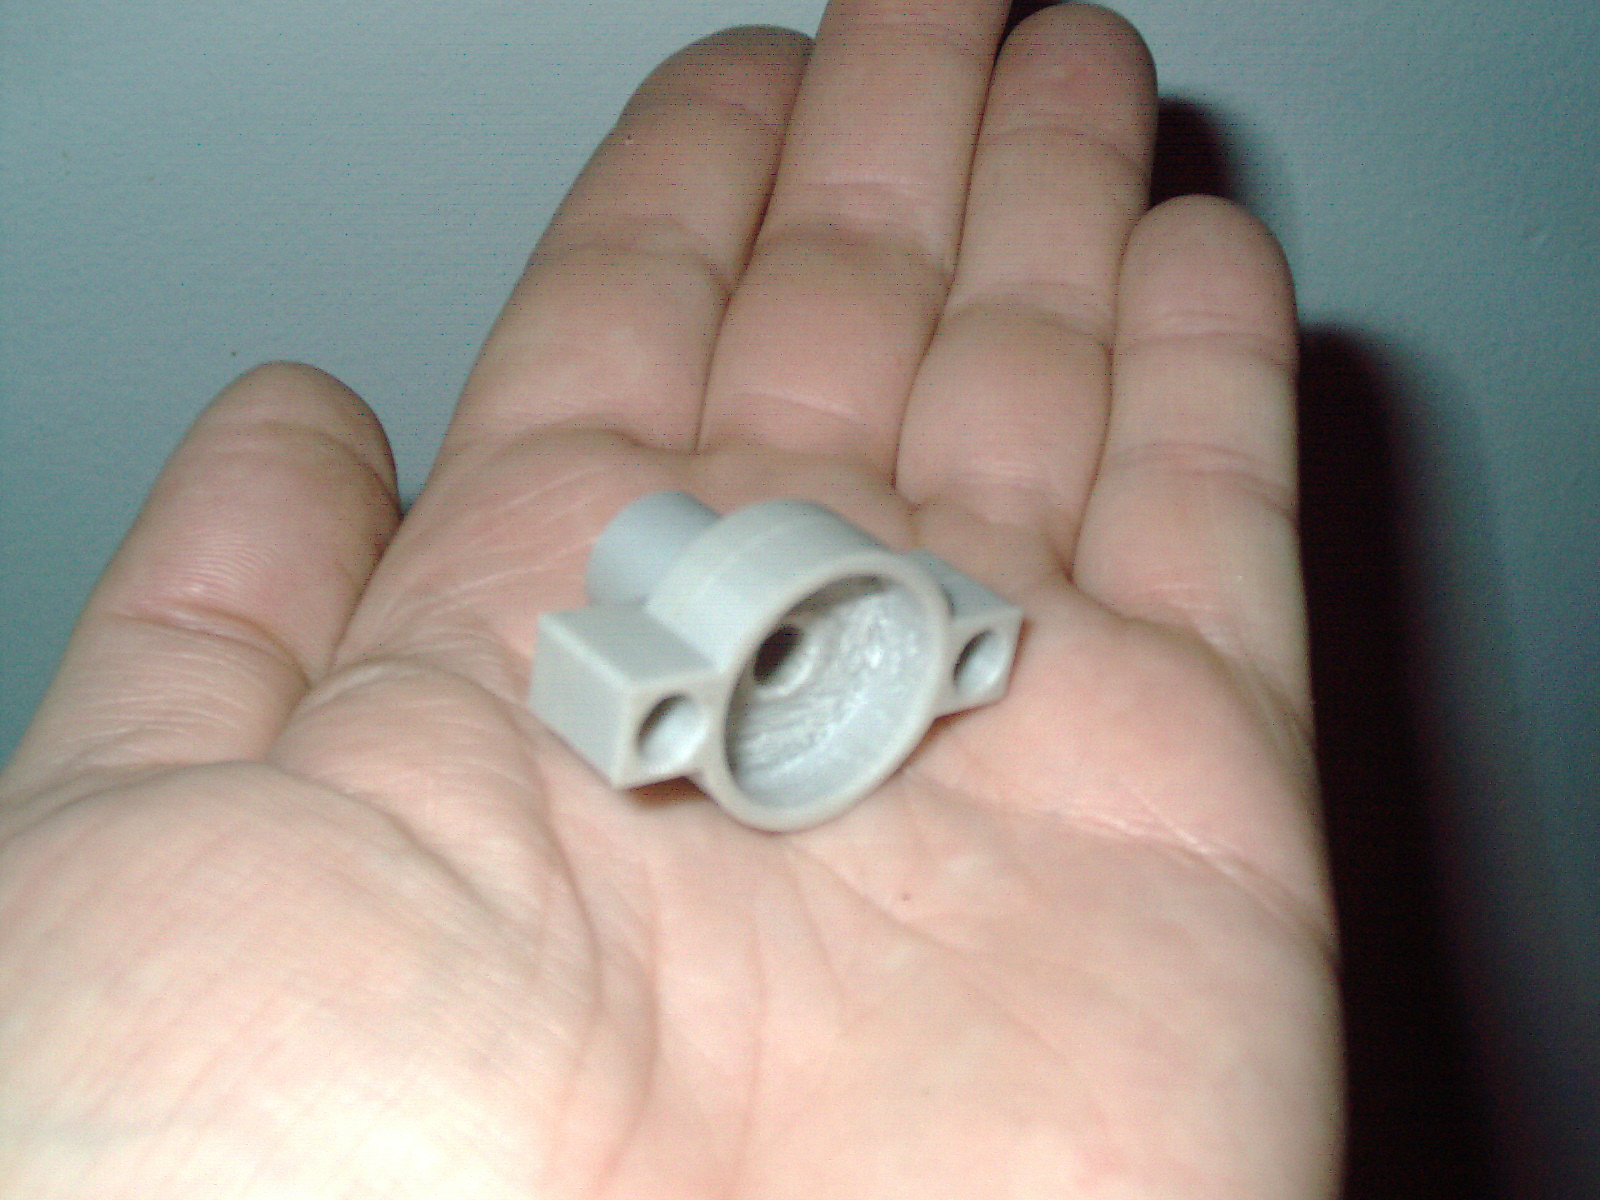
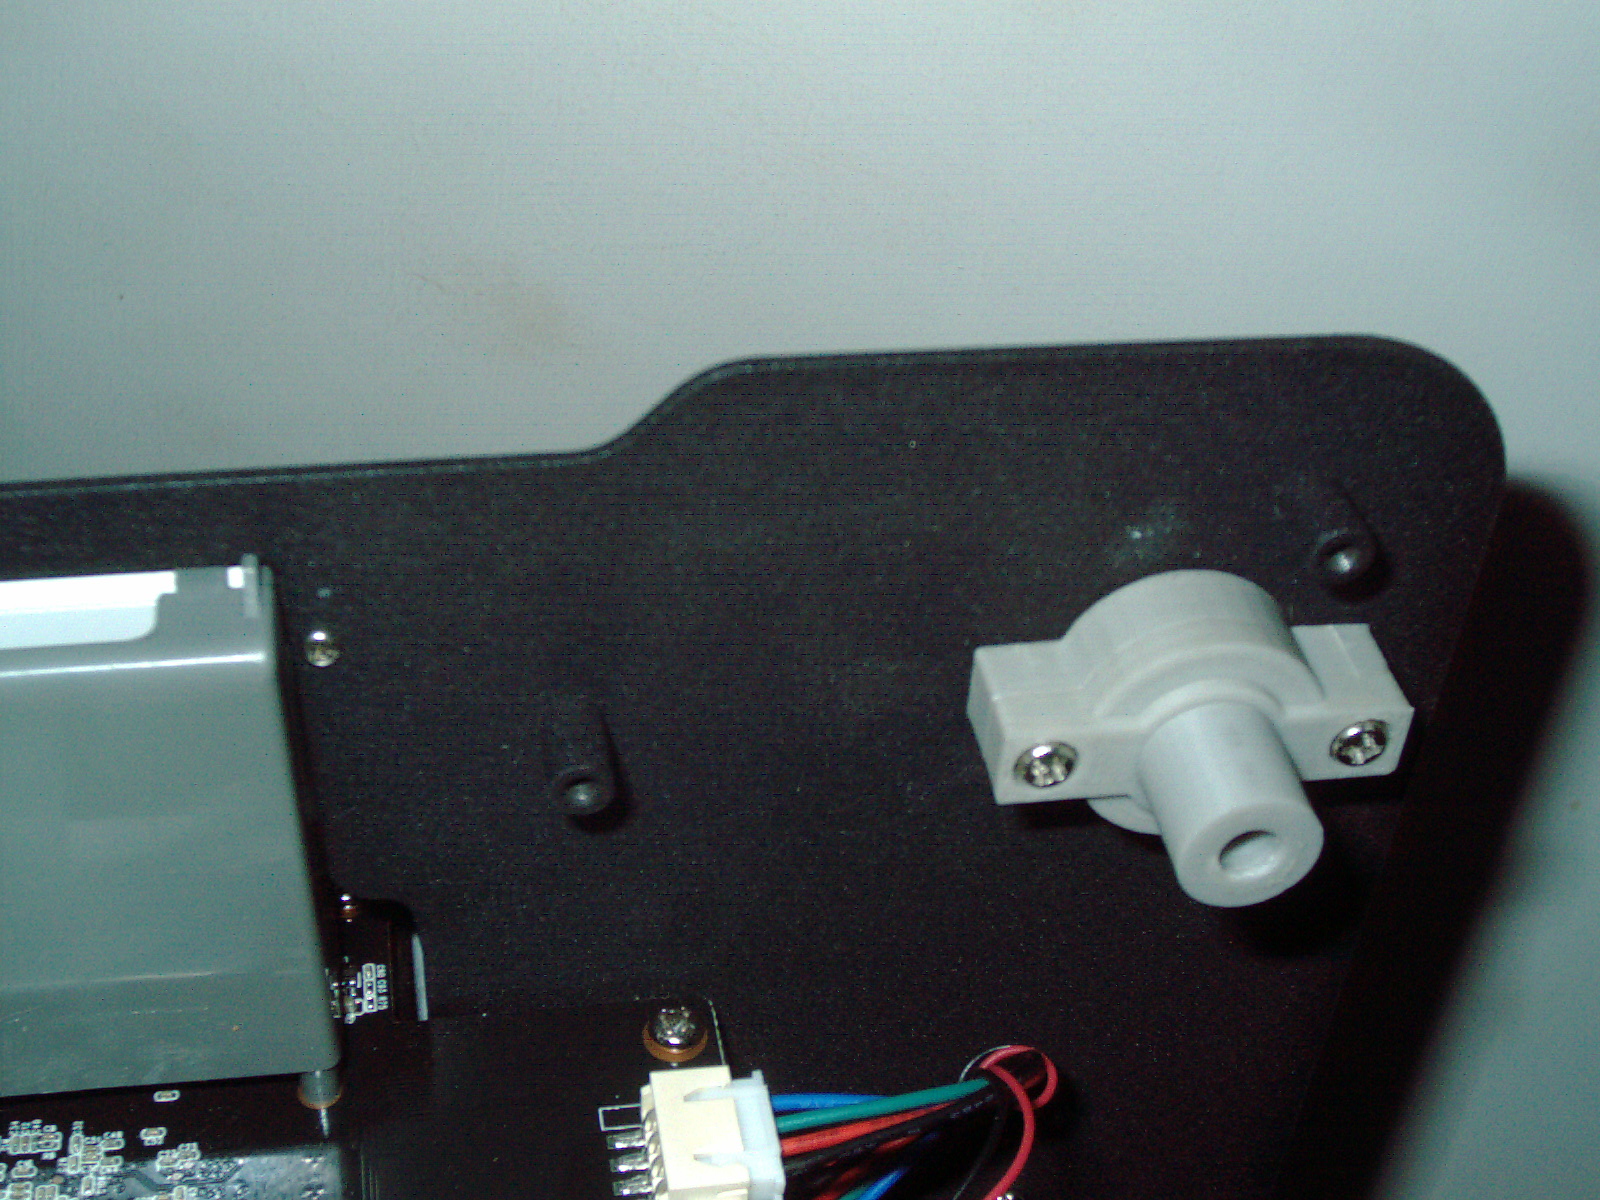
I have completed my drawing of the Takeup Reel/Supply Reel Spindle housing. This is revision 3 and after several test prints and improvements to the design - I think this is a robust and best-print-results version. The print layers are very fine at .1mm and took 7hours and 47 min to print. The drawing was made in Solvespace and as I improve my CAD skills, the task is getting better. I have figured out how to get rid off redlines in Solvespace (click on "triangles ...nurbs" option as the software flags back-to-back parts/pieces as an trapped part error - but they are one-piece/complex shape design. By clicking on "triangles ... nurbs" on that layer - then the redlines disappear and the software is satisfied that there is no error.
Here is the done part (2 pics) and I cleaned up the inside of the Spindle Housing with my Harbor Freight 7x10 Mini Lathe - somewhat with a custom bit I made 20+ years ago. I need to make another custom bit in order to fully clean up this micro-miniature piece - as my 20+ year old custom bit was too large for the task and wouldnt fit all the way in to clean up the belly from all of the support fragments. Nonetheless the part looks good. The shaft hole is undersize by about .004" and so I will need to ream it for use as a replacement part. Or I can leave it alone as a standalone MOD for the 3rd Gen gear version upgrade or fully-standard rewind upgrade - which is a possible future modification.
As I used my lathe to trim the support structure off - I was impressed once again that my custom modded and upgraded 3d printer prints nice and solid in ABS without gaps or voids.
One of the major differences from the original part is the 2ea long shaft holes - which slide over the entire length of the 2ea metal posts. This adds alot of strength to this part over the original. Again these holes will need to be reamed as the placement of the 2ea beams could vary in the factory mfg from one unit to the next. I like this longer version as it 3d Prints better than making "floating in air" airplane-wing style. Also if someone's metal post broke off - this style could be used to replace that too- as it goes down fully to the steel plate/base of post - so it is pretty versatile. It can also be shortened manually - to produce airplane-wing-style with a Dremel rotary tool - that is also do-able. But I like this beefier slip-over-both-posts design. Reusing the original screws to secure it in place over the original 2ea posts.
The following pics how Spindle Housing with hollow underbelly Version 3
Update 1/30/18
One of the things that is noticeable during film transfer of 5" dia reels is that some vintage reels are crooked. Especially the metal ones are sometimes bent by the customer- even though stored in a metal can usually. Some plastic reels are also warped or the center hole is larger than it should be and the reel wiggles - as it turns. The solution is to make the takeup/supply reel stick out further from the steel front panel. As the reels wiggle - this makes the reel further away and less likely to drag against the black textured finish. Ultimately, this has not been addressed by anyone and my solution is to make the metal shaft longer OR adjust the parameters of this plastic part so it shifts the same shaft a bit further out. My V3 does not incorporate this. I am also considering removing the hollow underbelly of this part completely or partially - I am still thinking about this.
The only good use I can think of for the hollow underbelly of the takeup/supply reel spindle housing - is to put a sensor there that monitors whether the reel is actually turning 1) turning 2) stuck 3) end of film. There is enough space there for a pcb or round or other shape plate with sensor details/features.
Removing that hollow area gives more support bushing area for the shaft which is advantagious for a longer lifetime of use. I havent decided which avenue to take- just thinking about it. For now just adding a normal rewind without having to flip over the reels - is on my mind. As my belt drive works just fine.
Things I may do in the future (some or most may be just wishful thinking)
1. True Rewind (eliminate the need to flip reels over)
2. Clicking BRRRRRR noise motor fix (the original goopy-belt-drive-type doesnt exibit this defect)
3. Spindles protrude further out - less prone to reel scratching against black textured steel panel
4. RGB LED conversion
5. Insert to existing plastic guide upper and lower- which adds support for warped film
6. 16mm upgrade??? may be possible
7. 7" reel adapters
8. 16mm square spindle adapters
9. Plexiglass clear plastic window which goes over the LCD to protect from cracks/thumb damage while moving unit.
10. Dust cover for scanner module
11. Vacuum cleaner attachment to remove dust while scan in progress
12. Air Dust Can attachment
13. Buzzer/Beep to announce Supply Reel stopped.
14. Roller to clean hairs and dust from film
15. Widen spindles' "top hat style" base to support reel - less wiggle for some reels
As my CAD drawing and 3d printing skills increase, I may venture into the above areas. I would like to have some extra unit(s) to take apart- but my funds are low. I dont want to accidently damage my 2ea perfectly-good units as the film transfer business is my livelihood and I have quit a bit of money spent to buy these 2ea units that I own.
As I delve into making parts for one upgrade -I see that the same parts/drawings can be re-used for a totally different upgrade. So, the same parts are/will be applicable to more than one upgrade.
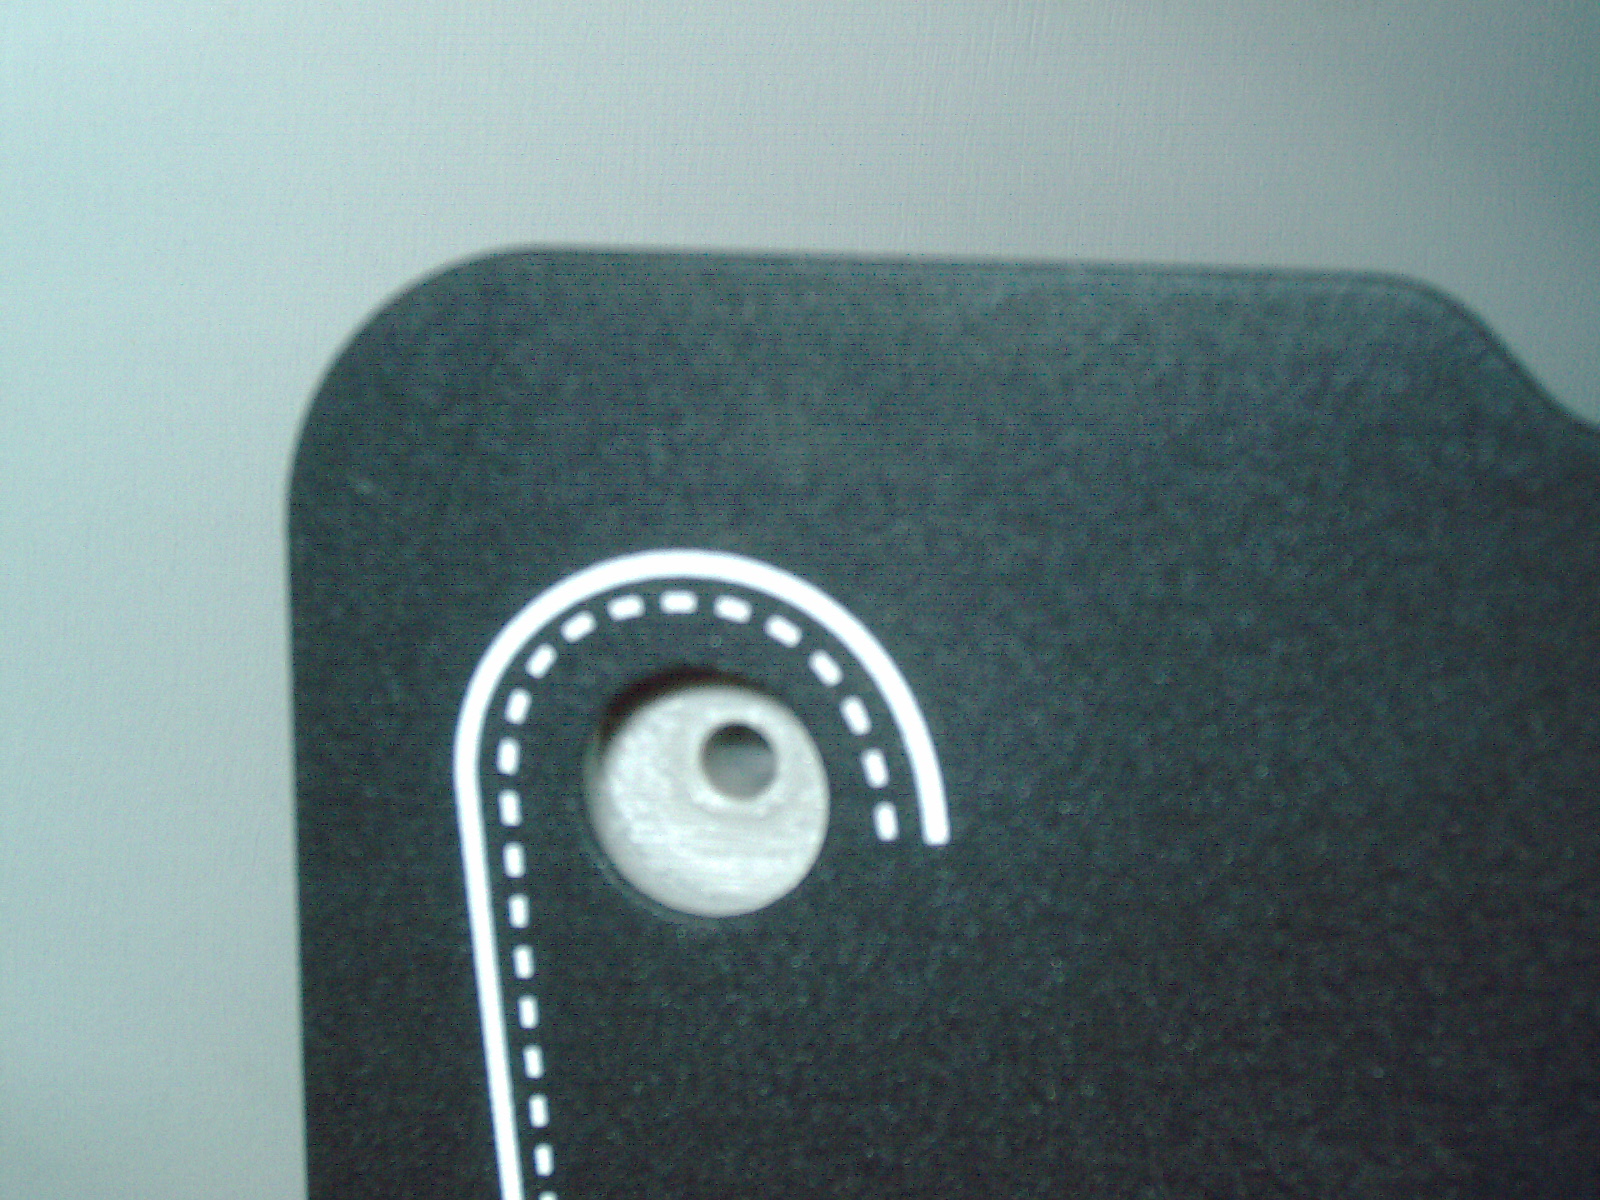
As I write this I am Printing a Spindle Housing Version 4 which I have removed the hollow underbelly and adjusted the hole sizes in the drawing - so that reaming and lathe work are not needed. It is designed to print ready-to-work. This 3d print (in progreess now at approx 9 hours) will take 9 hours and 47 minutes. This solid part will give more support to the shaft and much stronger than original part.
two hours later ...
Having 2ea versions (one with a hollow underbelly and one without a hollow underbelly) will allow me to tackle various repair or modification tasks.
I have added the 1ea photo of the non-hollow V4 to my above picture gallery. As the print completed and I cleaned it up after completion- I see that the holes still need reaming - even with the tweaks to hole sizes. The print is nice and solid and straight. One change over the hollow part is - removing the part from the aluminum printbed with kapton tape and Elmers gluestick - this solid part held on so well (too well) that my kapton tape has torn. It is possible that I put too much glue this time or it may be that the non-hollow base has more holding strength because of additional surface area. It is still my original kapton tape that came with the heated printbed- so after many prints and print attempts - its going to wear out eventually. For the last 2 prints I filled in the gaps in kapton tape with glue to make a level print surface.
Update 2/1/2018
I see on Thingiverse website. Someone has posted a DIY adapter system to make the original Moviemaker and other similar brands compatible with larger reels. It looks very similar in design to the youtube video series. The contributions this new designer has made 1. using a large steel spring or belt, custom drive spools, and 2 screw in tabs which hold the film scanner from moving.
My thoughts on this - I wonder about the durability of the white plastic gearcase on some models- I myself do not have that version- I have the sticky goop belt - which I like alot. I am wondering which version that designer has? It is possible that putting extra stress on the units with the plastic gear case - may be the cause of failures? I dont know that for sure- only a hunch.
Here is a link to the DIY plastic parts that this author/designer has posted (Im not affiliated with that author or parts)
https://www.thingiverse.com/thing:2608936
The rewind reels that I use are sometimes available on big-auction-site for a few dollars. The machine hold-down tabs and printed spools are a new idea and show alot of ingenuity by the author. Whether it is safe for a machine to use this longterm? I dont know. Use at your own risk. It is not my design and I am not the author of this. Im just showing this as it is part of the history of this film scanner.
I have a successful design and successful prints for a wide-base Regular8 Spindle. The notch was difficult to get right and after many design changes and attempts - this design prints very well and is the right proportions to fit well with the original red Regular8 to Super8 adapter. So this extra-wide one is the replacement for my left side factory stock red spindle (some factory models have a red leftside spindle and some have grey leftside spindle).
The advantage of the wide base is the 3" reel, 5" reel etc will be less prone to wiggle and scrape against the textured steel front panel. The extra wide base will give the reel more lateral support. Also, the non-hollow spindle housing will make this spindle with extra wide base stick further out from the steel body just a little bit further than original. The original one was too close to the steel front panel; So, I redesigned these parts to protrude out further. This removes or reduces the scraping- (which which can stress other parts) and removes or reduces the drag/scraping of the reel against the steel textured panel during scanning. I consider this part and file done. I was working on this design for months and finally have a good repeatable/3d printable object and file.
Here is a photo of what it looks like.
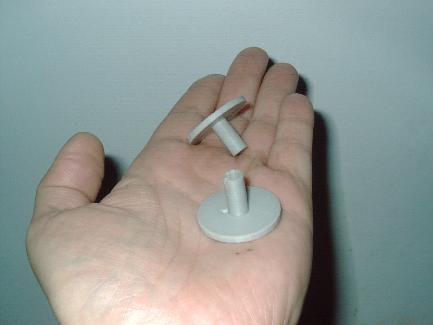
I have also been working on making a replacement Regular8 to Super8 adapter to replace the leftside original red one as it is easy to lose. I have drawn the part but it has more work in prototyping to get all the details just right. One of the struggles is that the 3d printing software Cura (abruptly on its own) changes the printing approach as it nears completion. I would like it to make concentic circles while building the adapter - but suddenly the software starts printing criss-cross rather than concentric. I tried Slic3r software and it goes wacko creating a nonsense part. I have to figure out why this software is having a conniption fit with my drawing- 3/4 of my object prints well and then the last 1/4 flares out due to the wild-change criss-cross approach. Thats where Im at on the Regular8 to Super8 adapter- the software is misinterpreting my drawing file. I made that drawing using CAD and mostly with arcs - which the software is really bogging down calculating. I may have to simplify my drawing and not use too many arcs.
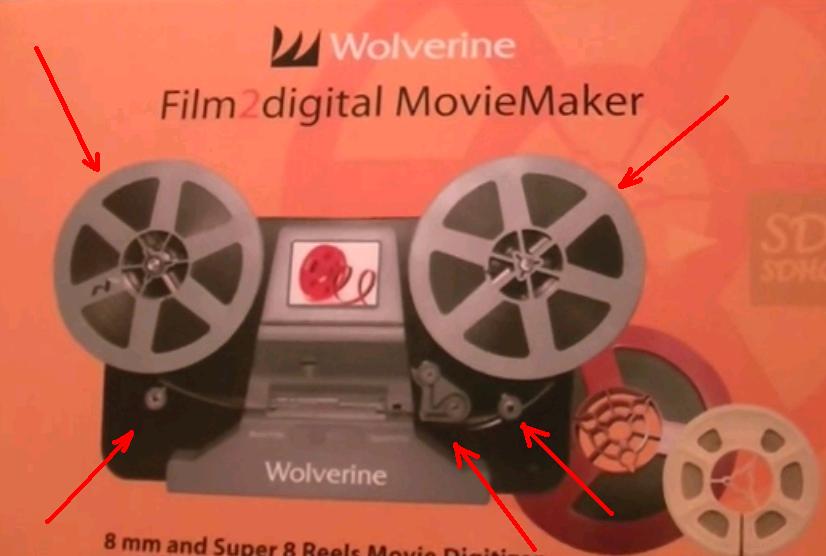
I have seen the following box which shows some things that are different than my own 2ea machines.
1. Grey plastic 5" reels - not black plastic
2. Golf Tee Shaped guides look different
3. The film gate looks grey color - not black color
4. The Chunky film guide looks VERY different than my own unit
5. It looks like the film may go through a thin channel over and around the golf tee shaped guides and chunky film guide?
6. The word Wolverine is very prominent as it is printed in much larger letters.
I have never seen a unit that looks like this - Only the box. The unit that came out of the box - looked quite different. Leftover box? The wrong box shipped with the unit? Who knows.
The most notable is what Im naming the "Chunky Film Guide" which may have a spring clamp system- reminds me of a 3d printer filament extruder feed lever???? I have no idea why this is implemented like this. Is it possible that there is a sprocket roller which is motorized which pulls the film out of the gate? If yes, then this sprocket drive would have an intermittant motion - my hunch.
The LCD display does not show any on screen information and looks like a non-working prototype display unit as the LCD display looks like a sticker rather than a real live image. This is only a hunch on my part.
Also different is the Super8 to Regular8 switch looks different.
I dont know if this is an early encarnation of the Moviemaker or if it is a future encarnation. It is interesting to see the differences. It is possible this box shows an early prototype? Unknown.
I wonder if this is something from the past or something from a future model. I have no idea.
I like my own "belt drive" unit with 3 golf tees and 1 golf tee style which works pretty good. I would rather the MFG come up with a better way of keeping dust off the backlight than waste time fixing what doesnt need to be fixed. The belt drive was never an issue for me. The chunky film guide is un-necessary in my opinion. Removing the onscreen display is a GOOD IDEA as the onscreen display obstructs the view of dust and debris which collects on the backlight and needs to be cleaned ASAP if a speck of dust gets stuck there (quite often).
I have been experimenting with my own dust collection roller- of my own design. It kinda works, but needs more refining. Im not at liberty to show a photo of my roller. But it replaces the Golf Tee on the left completely. The roller held in the very same spot with the original screw. As the film goes by, the sticky surface kinda sorta gets dust off the film (not very well yet) as it is scanning and rewinding. I 3d printed my prototype roller and it doesnt roll as well as I would like. I need to figure out a better sticky surface. Im still cleaning WAY TOO MUCH with a cotton ear swab. I would like to find a remedy for all of the dust and debris that drops onto the backlight. I have been thinking about rotating the entire unit clockwise so Gravity is NOT pulling the dust down ONTO the backlight. If the unit was vertical and the filmgate vertical then the dust would not be pulled by gravity towards the backlight. I have not tried yet to implement the vertical scanning.
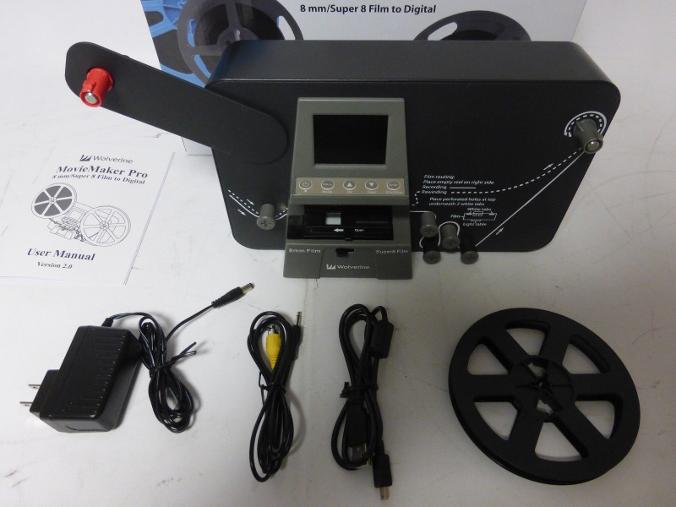
I have been getting more film transfer orders and find myself with 2 boxes of big reels to transfer- so I decided to buy my 3rd machine. I made an offer on an original style Moviemaker but they refused my fair offer.
Instead I purchased an open box MovieMaker Pro and was about $100 off new in price. It may have been a returned item. I hope it works good. I will pay for it tomorrow and will ship from USA seller
This model accepts 7" and 9" reels ( Ive never personally seen a 9" reel but I have seen 10" reels - maybe metric??? ) and scans in 1080P- larger reel size and higher resolution than my 2 other units.
I remember phoning Wolverine and speaking to a man who I got mad at because he said they dont make 1080P units as they made a decision to go with only 720P because the image quality was no better - only the file size was greater. That was a long time ago and I remember getting the BS FLAG and made me so mad. Well now Im getting a 1080P made by Wolverine and well see if it is any better in resolution. I paid good money for my other 2 units and paid the same good money for this open box one. Thats enough money to buy a used car or motorcycle and isnt peanuts. I work hard for my money and hopefully is a good one. My other 2 units I was very satisfied with and did a good job for many customers so far.
From the above photo - it looks to be complete and new.
Im not sure why it was $100 off but it comes at a good time. I need another unit. The old style belt-drive units were just fine too. This one will have the gear driven system - which I have not personally seen yet. My ability to make any plastic part puts me at ease with this purchase.
I never did hear back from the caller with the Hammacher Schlemmer unit - he was waiting for them to send parts and I told him they werent going to because they already sent him a whole new unit. Maybe that guy wants to have me fix his or I can buy his 2 units- will see. I need more units because these units are VERY SLOW but worth the wait. The solution is to have ALOT of them and scan simultaneously on multiple units. That is my strategy. I want to have 10 units.
The big reel size - you cant just leave it scan for 4 hours straight non-stop NO WAY- I stop and let the machine rest and cool off. Plus there is always a speck of dust that needs to be cleaned. My point is you are NEVER going to make it all the way through a 7" reel without stopping. Otherwise IF YOU DO then there will be a pesky hair or dust interfering with a good mp4 file. You cant just let it run overnight. The machine will be working hard for nothing - as the file will have that one sneaky hair or dust particle - that creeps in unexpectedly. I am constantly vigilant - looking for a dust particle while I scan. I dont leave it unattended. Nothing good comes from leaving it unattended - the file will have to be redone anyways (due to dust/hair) - if you do.
I want my machines to last long and I only run for a max of 2 hours. I baby my machines and NEVER slam the filmgate and I treat them delicately.
I have had ZERO problems so far.

I ordered the very same SD card for my Moviemaker Pro as for my other 2ea units. The SD card and the scanner should arrive late next week sometime (2ea different USA sellers). I figure that if the SD card doesnt work, then I can use it for future used units I plan on buying. This is a Class 10 card at 48mb/s and is not pokey slow. There was a Class 10 80mb/s card for just a few pennies more. My reasoning was that at some point SD cards become obsolete and I might as well buy another one - for a future scanner or the scanner which is on its way. I know this SD card model works flawlessly for 720P units. In regards to working with 1080P units - I will let you know.
Also the way I use SD card is by "format" before use & then in between jobs, in between reel groups, sometimes in between reels with multiple stop-to-clean-dust breaks. I then take the card to the computer to rename files. When I insert the SD card into the 720P moviemaker units- the first thing I do is "format" I liike to have a fresh clean sd card - so I know exactly which file I just scanned.
My point is that SD cards have a finite number of times they can be used and reused. Somewhere I read that this number is approximately 2000 times and then the card starts to get data errors. I dont know if the Moviemaker units have error correction or the smarts to eliminate bad spots on SD cards. My point is that having an extra SD card to replace a faulty one is a good idea- as SD cards of this model are plentiful in 2018 - but how about 5 10 20 years from now? Thats my reasoning for getting another SD card same as before. I know it works for 720P units and that is good enough of a reason to buy another one.
One of my 720P moviemakers has a counter approximately 500 and the other one has an approximate counter of 300. Neither one shows actual reels scanned because of stop/starts dust/hair cleans etc. Neither SD card is anywhere near 2000 so my SD cards are just fine and work perfectly. When my film counters are nearer to 2000 I may choose to retire the SD cards and replace with a new SD card. Hopeully the scanners work for many years to come. So far it has been 1 year approximate use for customer orders. In 1 year I have incremented the film counter approximately 700 - adding up both belt-drive 720P units.
Im curious regarding LOW FOCUS and HIGH FOCUS which I have seen a youtube video showing a film scanned in each mode. I wonder if my unit will have that? From the video I see just a very very small difference in the "car license plate" of a car passing by and also a very small difference in a store window sign. The contrast seems just a little higher in HIGH FOCUS which affect white gradients ever so slightly. Almost imperceptible in the video comparison. After I viewed the video - I thought to myself LOW FOCUS is the better one. I will see if my unit has this choice in the MENU. I thing "FOCUS is probably the wrong word as it is not the Focus of the lens or the focal length. Or is it? maybe the youtube video author has somehow given me the wrong impression.
Is it possible the LOW FOCUS versus HIGH FOCUS is about which side of the film actually has the emulsion? Ill figure it out, if mine has that feature.
(Note after I received my unit - I see no High Focus or Low Focus - I may have a different unit/firmware than that author did)
Update 5/2/18
I received Moviemaker Pro today and got the original box, manual, 1ea usb cord, 1ea AC adapter, 1ea tv cord, ad 5" dia reel. However the 2ea pictured plastic spindle reel hubs were missing. I emailed the seller and drew arrows on the ad photo showing that it was pictured but not received. These 2ea original plastic pieces are important to me. I have not tested the unit as I have been running 2 shifts today on my 720P units. I only have enough spindles, takeup reels and memory card or those 2ea units. So I have not risked all of my hard work in inserting these work-in-progress SD cards etc on an untested open box machine- which could possibly spoil all of my work. If the seller sent me a defective unit. Some of these online sellers play games that way. Those 2ea missing plastic pieces may be the tip of the iceberg- so to speak.
I hope it is a working new open box item. When my SD card arrives, in 1-3 days then I will give it a good thorough test run.
I have noticed a couple of blemished areas - a unpainted scar on the top of the unit (possibly a factory defect but very minor think - looks like someone rubbed their finger across a wet painted plastic back panel) And the 8mm/Super8 switch feels sloppy and loose. Compared to my other 2ea units which have a solid feel to both positions of this switch.
The plastic protective sheet over the LCD was missing. The AC adapter had some mud-like brown stuff on the label which I cleaned. The original box was packed inside a larger brown box. The original box is slightly "Accordian" crumpled on one end. The top styrofoam piece was missing - but the bottom styrofoam piece is present.
............A few hours later.......
I testes the Moviemaker Pro and found a few things wrong
#1 I was expecting a new open box item - instead I got a VERY USED unit with a counter of 216 which tells me it was used commercially. That explains the loose switch.
Also the display is WORSE than either one of my other units as it is VERY LOW RESOLUTION and even flickers. Im not speaking about the scanning frame displaying on screen. Im speaking about maybe a 25-50 HZ scanning which is noticeable. The image is fine but my other two units do not have that flicker. I have not yet decided if it is supposed to be like that or if it is a defect.
Also the motor pulls alot - the film is tight and my other units dont pull as hard. I dont know whether that is good or bad. \
Rewind is SLOW and alot slower than the belt drive units.
I counted the rewind revolutions on a Full 7" reel rewinding to a 7" reel. It made 45 revolutions per minute with actual film being rewound. Also it took 7 minutes to rewind a 90% full reel. It is very very slow.
I have seen the output of 1080P and I expected to see something drastically better than my 720P units provide. I see larger file but the image is not any more detailed. It is just a larger file and the image is upscaled but no better resolution at 1080P than 720P.
What I do like - is the little black square piece of cloth that drags on your film - just before it reaches the filmgate. That little piece of cloth catches ALOT of schmutz and is quite dirty after just 1/10 of a reel.
The flip up arm hold quite well and has a good locking detent - no problems there.
The built-in handle on the back was designed-out and is not present in this unit.
The firmware/menu system looks/feels the same as my other 2 units. The onscreen display looks the same too. The screen resolution is about 1/2 of my high resolution screen unit which I bough brand new. My 2ea used units have LOW RES screens and my MOVIEMAKER PRO has the WORST screen of them all (by worst I mean lowest resolution and even has flicker).
It seems like I got a fully functional unit. I feel swindled on the price- Someone used this unit for an entire year (judging by the film counter and my own experience in how many films I do based on the counter) and only got a $100 reduction in price.
BEWARE OF #$@#%$&!!! SELLING THEIR USED UNITS FOR NEARLY FULLY PRICE
And not only that but I got shorted 2 plastic pieces- which I have emailed them about these shortcomings and Im not happy with this seller who upscaled the condition and downscaled the use- price was not commesurate with condition/price.
Im not mad at the manufacturer BUT I am mad at the seller/dealer and what they pulled over on me.
At least it works - I see it provides a good file and doesnt seem to have any issues other than pulling too hard. I will apply some white grease on the takeup spindle- that will reduce the clutch friction. After scanning for 1/2 hour, I decided to shut it down because of a rainstorm (I never power expensive equipment during storms) and I noticed the spindle plastic was warmer than I would like- means there was alot of friction there.
I feel that
1. The motor turns TOO fast while scanning (plastic splindle gets warm after 1/2 hour - too much friction needs white grease)
2. The motor turns TOO slow while rewinding (rewinding a 90% full 7" reel took a little over 7 minutes)
These may not be defects due to a used unit. It was probably designed that way.
The issue that I have been plagued with is the takeup reel stopping and film spilling over and having to be manually babysitted and watched in case it does that (with my belt drive units) I dont think the MOvieMaker Pro has that issue because the reel pulls so hard.
My issue with the takeup reels stopping - may be because I greased the plastic spindle? More friction makes it pull harder but the plastic getting warm means the plastic itself is wearing. I wanted a long term scanner so I greased my 720P belt drive units with plastic compatible white grease on the spindles (see my above pictorial from a year ago)
I may try cleaning off the DIY-application-of-white-grease on the takeup spindle of my 720P units in order to increase the amount of pull on the takeup reel. The DIY grease works possibly too well. This gives me the opposite problem - instead of pulling too much - now it pulls too little. I have used these 720P units for over a year and suffered with a problem that I myself could have created by DIY greasing the takeup spindle.
Update 5/3/18
I have received my SD card and am currently testing the MovieMaker Pro to make sure it works properly. In the meanwhile I was communicating by email with the seller. First they looed and couldnt find the 2ea plastic spindle hubs and offered me a measely $20 for all of the issues. I looked at their other lisings on big-auction-site and saw that they had a Wolverine 5"dia model and in the ad I saw 2ea spindle hubs on a table. I replied to that BAD seller that I see those 2ea plastic pieces in your other ad title and then the seller replied that they would take those 2 plastic pieces out of the other box and send to me. I dont believe that story at all.
SHEEESH!!!
AND THE KICKER is .... that at the same time there was 50ea Hammacher Schlemmer BETTER UNITS for sale for $175 less than refurbished units - which I didnt see that ad. I could bought one of those and had money left over. or I could have bought 2ea of those better units for just a tad more.
I could kick myself right now.
I see lots of used units and refurbished units and new units. A basic model 5" 720P with mechanical drive (probably not belt drive unit) is approx $269 to $300 new from reputable vendors. And used ones are around $210 to $250 - where they are probably VERY used and hand-me-downs from one cheapskate buyer to the next. Reminds me of how Nikon 35mm slide scanners on big-auction-site change hands over and over and over.
I also see one BAD seller selling 3ea "untested" 5"dia 720P Wolverine units for the price of 2ea brand new units. Get a load of that character!!!! No adapters, no cord, nothing just the units. I bet they DONT work at all. Ive seen some sellers with units that dont power up all- and they want big bucks for it- that makes no sense. My point is people want to sell their junk for just a little bit less than a brand new unit. And that is not a fair price. The market is getting saturated, the selling price is going lower and lower, the market has more and more defective and abused units. Sellers are freeloading on buyers by lying about the condition of their used film transfer equipment in order to have their films basically scanned for free.
Update 5/7/18
Judging by my own counter movement on the Pro unit, It takes about 5-8 counter movements to get through a relatively clean 7" reel of film with minimal bad splices/sprocket hole issues. Amazingly this film set is much cleaner than the last buyers order. I worry that the low resolution screen is cammoflauging the dust which I am looking for on the backlight. So my USED or DEMO or REFURBISHED units (who knows) has probably scanned the equivalent of 30-50 full size 7" reels with a counter of 216 when it arrived.
I feel DUPED that some company tricked me into buying a used unit when a new unit was the same price. Thats what people do on big-auction-site with alot of things. For example people selling blujeans new with tags - often they have washed their jeans and DUMBLY used hot water cycle and now has shrunken- then they sell it as new by putting the tags back on. I feel that the previous owner used the unit or was a broken fixed unit and then sold as new. So I got CHEATED out of a new unit which I paid for.
I have noticed some firmware differences in this unit from the other two units.
1. Date stamp on files is 2017 and other units with a date stamp of 2014.
2. Pro handles black areas of film without stopping while other two units stop every couple of minutes on black areas
3. Pro handles totally white areas of film by stopping - same as other two units
I accidently left the Pro unit running for 1/2 hour without watching it and was surprised to see that the black area didnt stop the recording and at the end of film - this particular film customer had a leader before and after the reel- and the machine stopped after a short length of white leader or possibly with no film - end of roll.
I CAN SEE WHY MOTORS BROKE FOR THE GEAR DRIVEN MODELS
1. On older units I have, when the machine senses the same image over and over and over it will stop
2. On the Pro unit I have with mechanical gear/motor takeup reel - the machine will not stop on black
3. On older belt driven units, the takeup reel is pulling weakly
4. On Pro unit, the takeup reel is pulling strongly
5. Machine turns off automatically after roll is done (on all of my units) - senses pure white/bright for x amount of time
In an effort to try and increase the pulling action on the takeup reel, I removed all of the white grease which I applied- very carefully to only leave bare metal and bare plastic. BUT I SEE NO DIFFERENCE - so that is not it.
I think the motor drive units were breaking (never happened to me personally) because the machine will repeatedly try to scan BLACK film (films that "forgot to remove lenscap") and that combine with #2 and #4 - a person could possibly come back after an overnight scan to find the machine still running as the internal software never reached step#5 end of roll condition. The new machine pulls SO HARD that the film is taught. My other two units pull so weakly that often the reel drag against the metal front sheetmetal textured finish that it halts the rotation- I need to watch for this and gently nudge the reel to continue to turn. Not so much for 3" reel but especially for 5" reels which tend to stop somewhere in that 2 hour scanning time. This has NEVER happened to me on the PRO unit.
It isnt because of the belt drive, as the metal center of the spindle pulls REALLY well and is unstoppable with my hand. It is something to do with the friction of spindle plastic. Im curious to see why the Pro pulls so well. The plastic grey spindle looks the same.
When I took apart my belt drive unit to clean the grease off- I noticed a plastic washer which goes between the spring and the grey spindle- this friction needs to increase at that point. I will figure out the solution. Not right now because I have to finish this current order.
Update 6/18/18
I have received 1ea broken motor assembly and 1ea perfect motor assembly from a kind emailer from awhile back. He had ordered 1ea Hammacher unit and the motor broke - then the company sent him a complete replacement Hammacher scanner. He said that they would send him 2ea new style motors in "8 weeks" which those 2ea motors arrived and he installed the new style motors in his 2ea scanners. He sent me an email that they arrived and he wanted to send me these 2ea old motors for no charge.
At this time, I am swamped with my workload or orders and is unbearably hut, humid, stormy days, sunny days, heatwave extreme temperature warnings of 96deg to 106deg on the news. So my point is Im behind on my workload and this problem of the projector motors - will have to wait until I have an opportunity to recreate the broken parts. Im glad to now have an actual broken motor and one ea perfect motor. I believe that some people would like to fix their motor assembly with replacement parts. Right now the mfg solution is to send out an entirely different motor design. I dont know how long they will honor that for. Im sure that sooner or later they will cease doing that and they will either run out of money or discontinue that motor replacement practice. That is my hunch. Maybe they will keep doing that for years- who knows?
Who would have guessed the person who sent me the 2ea motors would get 1 free scanner plus 2ea free motors? Who would have thunk it? Makes no sense to me. Im glad to have the motors and will try to make my own versions of the replacement parts.
And - I still have not opened up my own Moviemaker Pro - Im wondering if it has the new style or old style motor? The motor and scanner havent given me any issues and Im several orders into using this scanner for customer work. Unfortunately I git a used unit- but it is very reliable and works good. The issue of flickering display - I dont see any of that any more- I dont know what that was. It doesnt flicker anymore at this time.
The weather is too hot/humid to scan films and for the safety of my machines, Im just not scanning right now until temps and weather cools down drastically which usually happens one more week into June.
-----------------------------
Update 9/12/18
I have contracted alot of film transfer and videotape transfer orders and this all-of-a-sudden rush where I have 5ea BIG orders arriving in a few days- I realize my 3ea units will not be sufficient unless I work day/night and that is not good for the machines since I can feel the heat from the backside after only an hour. Especially on the SD card slot area - I choose to only run these for 1 hour and then give a long rest period. Maybe 2 sessions per day is best - one in the morning and one at night. That means 1ea 7" reel takes 2 days and consists of 4ea files. With 3ea machines that means I can do 600 ft per day - as I feel it is safe on cooler days. On hot days I dont run at all as I want these expensive machines to last for many years.
Ive been seriously looking at the Hammacher Schlemmer machines due to the big reel capability and 1080P. This seems to be the best of the series. I dont have this unit and only have two plastic type gearbox motors from a kind reader who gifted to me. I have contacted this same person by email to see if he will sell me one or two units - as it already has the upgraded motor with metal gearbox.
I will be purchasing a unit or possibly 2 units in the next day or two as my incoming orders will swamp me with my current inventory of 3ea machines. It is definitely time to buy another machine.
I have purchased today 2ea SD cards brand new from big-auction-site for $10.75 each and I looked for the EXACT same SD card as I already have.
I have purchased 4ea red and 4ea gray spindle adapters ($5 per pair) directly from Wolverine from their website. At the same time I purchased 2ea 5" dia film reels ($15 for a pair - the same ones that come with the wolverine units) I spent $35 and I dont know if there will be shipping added to that as the website had a promo code W___9 (something like that but I forgot the exact code now as it has been a few hours ago.
That way I have some spares on hand. My homemade DIY 3d printed spindle adapters work pretty darn well but having the original is always preferable. Maybe there will come a time when those are no longer avail from mfg/vendor.
Here is a photo and video demo from the seller showing the used and repaired unit. The seller told me by telephone conversation that this unit scanned approximately 3 reels and then the plastic motor went bad. Hammacher solved this by sending out a whole new unit at no charge. Later on the seller bought for $20ea from Winait a replacement motor (and another one for his other Hammacher unit) and installed it. He then sent me the plastic broken motor and one good one as a courtesy a few months ago. I kept his emails and when the right opportunity came up - I offered to buy both units but the seller said only one was for sale at this time -still has more films left to do. The sellers second unit was used quite a bit for scanning. I look forward to receiving this used unit with only approximately 3 reels of use. It was shipped out the same day I purchased and will put it to use when arrives (and when my SD card arrives from a different seller)
I was willing to spend $60 less than a big-auction-site Wolverine Moviemaker Pro and $10 more than big-auction-site open box but new Hammacher unit - those were the three units I was considering. I wanted a Hammacher unit due to its full size and to add to my collection of various units- and I knew that this one was already repaired and contained the metal motor and was ready for service/work. If I bought the other Hammacher - maybe it would have died after only 3 reels just like this one did for the seller- and that does me no good right now when I have big orders to do. The big film transfer orders funded this purchase. I will have dozens of big reels to scan as boxes arrive.
The demo video shows there are obvious differences in the firmware of Hammacher unit versus my Wolverine units
1. While scanning, Hammacher shows a timer - Wolverine does not
2. Shows no onscreen films scanned counter (for example with three scanned films, counter doesnt display 00003)
3. Film reel size is displayed - 3" diameter is the onscreen display in the demo video (it may be possible that the unit shuts itself off after scan is done - based on film reel size selected by user.) The Wolverine units sense when the frame doesnt change for a certain period of time and then shuts off - applicable to when stuck film not advancing and at the end when no film the all-white is shut off after a certain period of time.
I look forward to receiving this unit. It more closely resembles the firmware on older no-name 720p unit I saw demos of from a UK youtuber a few years ago. I remember that long ago youtube demo had an onscreen film reel size also.
The Wolverine method can be problematic on all black "forgot to remove the lenscap films" where the unit keeps shutting down and senses all black - whereas I would just rather it just continue and make my life easier. Maybe the Hammacher will be better for those all black films. The entire reel is usually is not all black but large portions in the middle may be. It sucks when I get a whole batch of those forgot-to-remove-the-lenscap reels for various reasons.
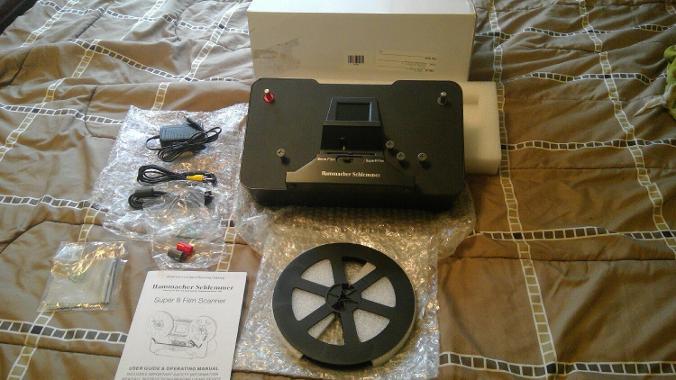

|
My Hammacher Schlemmer purch 091318 demo video from seller.mp4 Size : 3367.249 Kb Type : mp4 |
I have been using my newly purchased USED HEAVILY BY PREVIOUS OWNER Hammacher Schlemmer Super8/Regular8 film scanner. I was told that they only scanned 3ea films with it. But I see that the film counter showed 140.mp4 and so I realize that 3ea is not the truth.
Also in the 1000ft approximately that I have scanned with it so far (2ea 7" reels and a few small reels) I noticed at 3ea times lasting for less than 5 minutes each time - that I hear a scraping/teeth grinding type noise coming from the metal gearbox motor. The noise didnt hinder the scanning but nonetheless I see the two reasons that the seller chose to sell me this unit. Remember they said they had 2ea and would pick one to sell me. They (in hinsight I realize) that they have not sold me the better of the two units.
Here are a few photos of the inside of my Moviemaker Pro and Hammacher Schlemmer units. I compared them and mostly to make sure I did get a metal motor gearbox before I left feedback. I see that the 2ea units have identical takeup reel motors with upgraded ALL-metal-motor-and-gearbox.
I prefer the Hammacher unit because of its larger size and the firmware is better for me in the following way
1. It doesnt stop when I have an all-black film
2. It doesnt stop when I have an all-black film
See I said it twice. Stopping on an all black film like all of the Wolverine units I own do - that creates alot of hassle for me as I come back and see that the reel is not one and has been stopped for a while and then broke the scan into segments rather than one continuous scan.
From a functional standpoint - both units are nearly identical. But I like the firmware better on the Hammacher and is more basic. Basic is better for my needs as I scan boxes in volume an prefer it just to continue through the whole reel.
I have only run my unit for 2 hours at a time as I want longlife. I do this with all of my units and sometime I only run for 1 hour at a time when I feel the room temp is not cool.
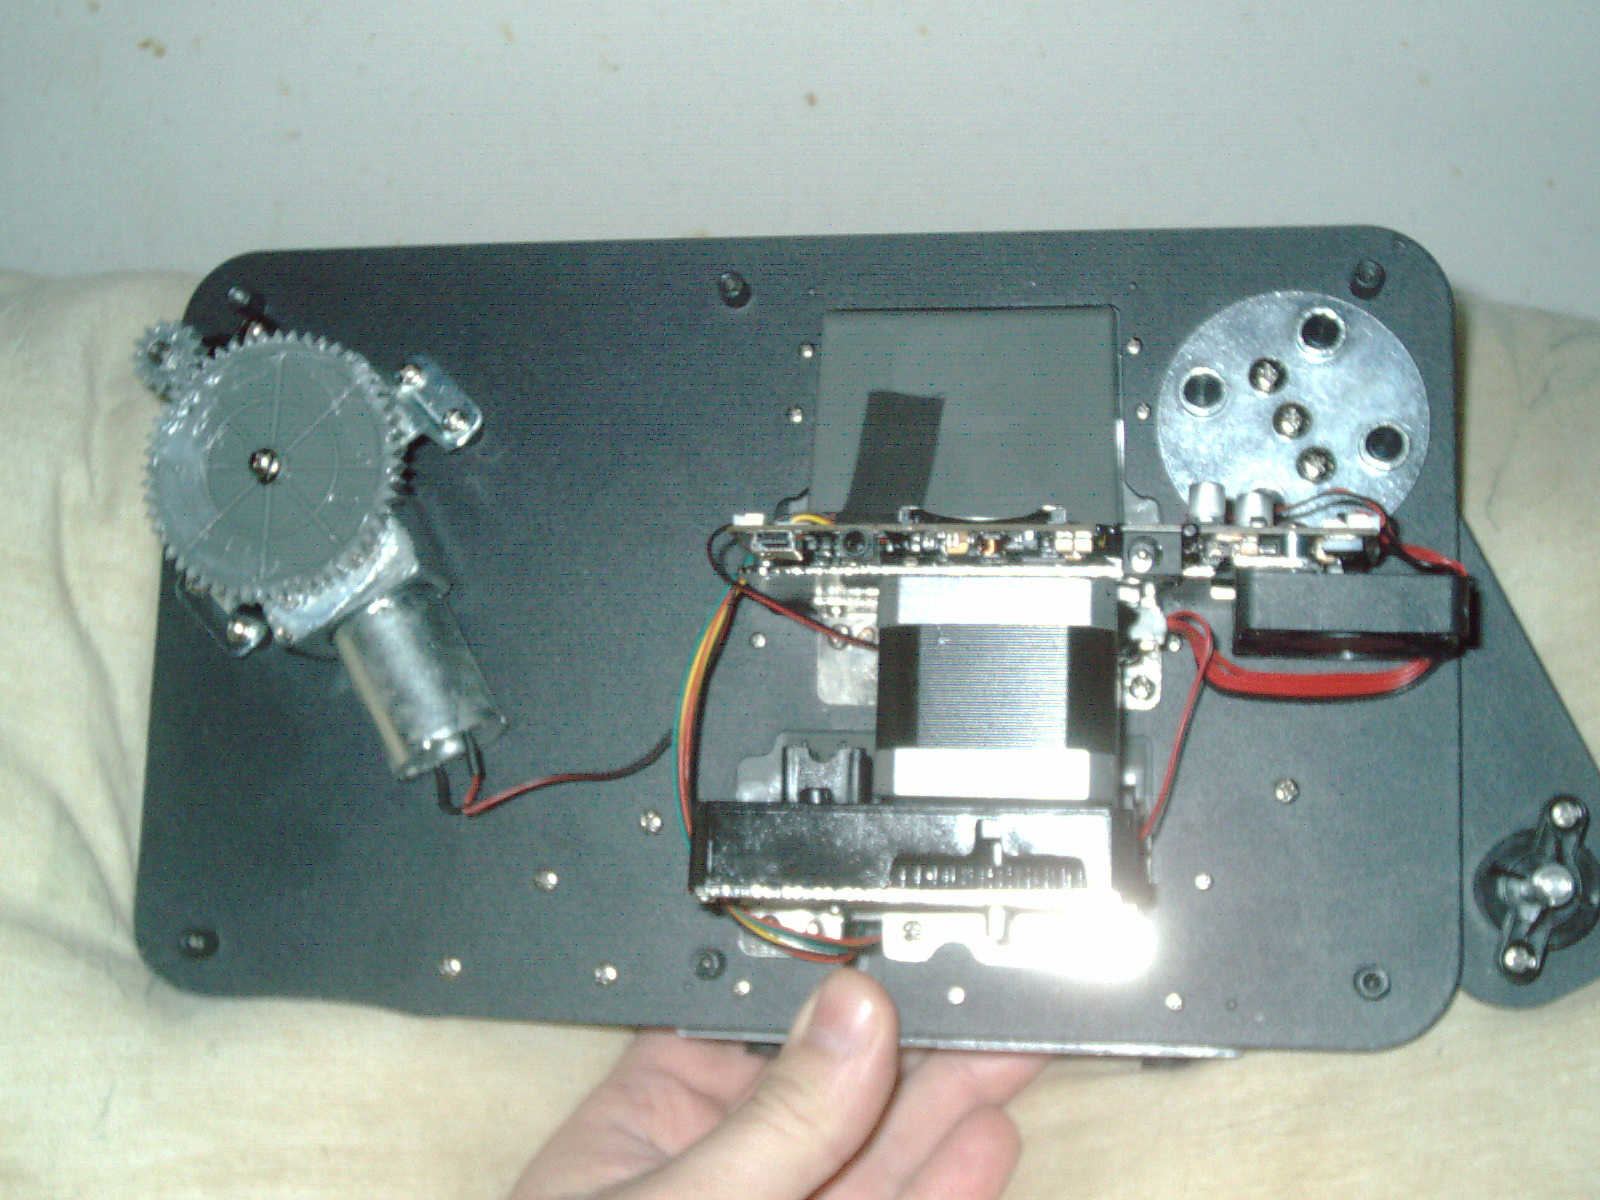
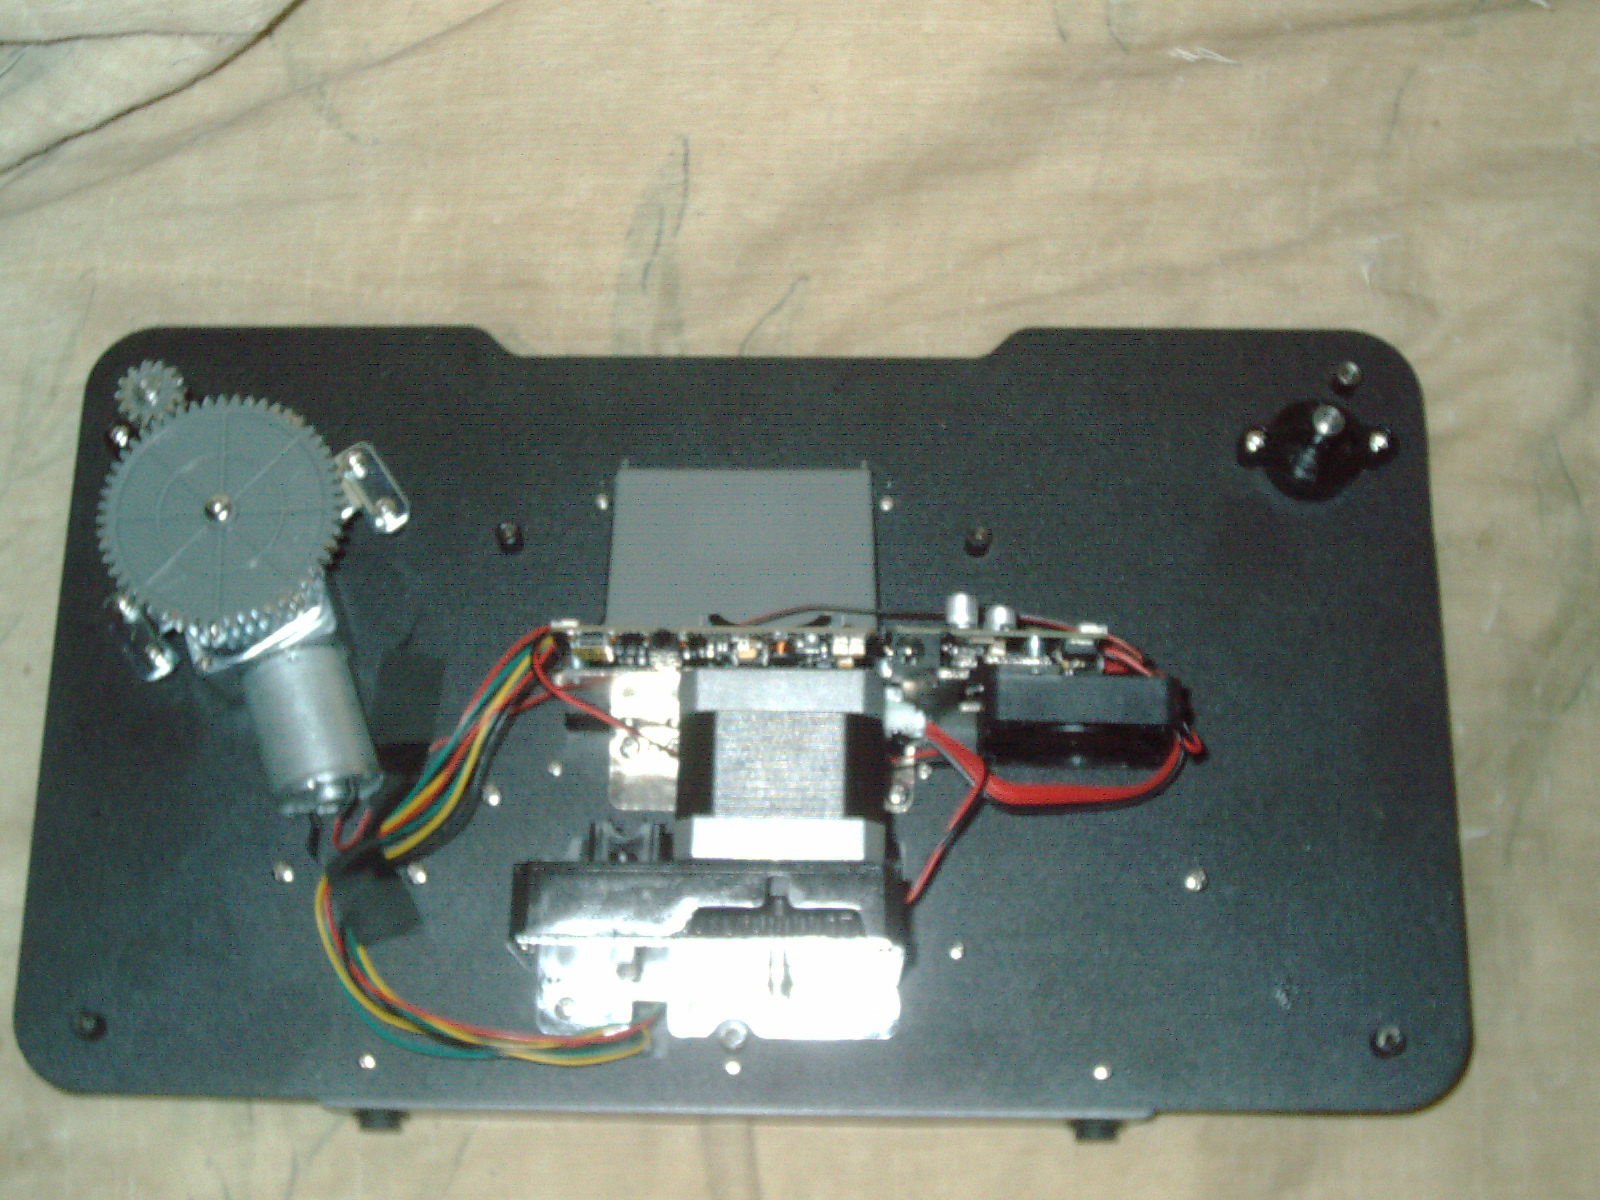
A few days ago I ordered more of the red/grey spindle adapters to have on hand. I plan on scanning film for many years and the most used part is the constant removing/reinstalling of these click-in-place adapters and I forsee them becoming worn and needing spares/replacement. I ordered 10 extra pairs to have on hand from Wolverine. These same adapters fit Hammacher also.
Update 10/23/18
I ran into my first BIG ISSUE yesterday as I was commencing a 1500ft order. I have 4 scanners setup and running orders almost daily.
My Wolverine MovieMaker Pro has a pesky problem which showed up twice before but I forgot about it as it had been awhile. But yesterday I tried several times and has me worried about the health of this machiine which is newer to me. I purchased it off a dishonest big-auction-site seller who sold it as brand new open box - but actually had substantial mileage on its film counter- probably all of it scanning huge reels non-stop and now Im having issues with it.
Description of the issue:
When I load a reel - any size reel - after a few minutes (approx 5 minutes) the screen locks up and ddisplays a static image of the frame with vertical lines. The mechanism keeps on scanning. The light stays lit. The buttons are unresponsive. When I unplug it and plug it back in - then it operates normally. When I try to play back scan - no files are found on the SD card. I tried to look on a PC to see any files - none - but the folders are there. I tried swapping SD cards with my other units. I tried reformatting SD card on PC. Whatever I try the results are always the same- after a few minutes the scanner locs up and becomes unresponsive.
What seems to do the trick - not quite sure as Im still playing with it trying todetermine what is wrong?
Im trying to figure out if it is a software/firmware issue or hardware problem. I was able to get it to wor after many tries. My hunch was that my SD Card had a defect - but I ruled that out. My next hunch is that there is a firmware issue. My hunch is that the firmware needs to see a small scan attempt on the SD Card before it will scan for a full scan.
My theory
1. Scan for a few seconds and then stop the scan
2. Now future scans work.
I am still testing my theory as I normally do a test scan to make sure framing is correct and then I scan the full reel. In hindsight, that is what I didnt do yesterday - a small test scan.
My indoor temp was 55deg F and humiity 68% and it could also be a temperature issue which would be a sign of thermal issue- I have not begun to test that theory. My film counter on this unit is approx 390 (When I bought it - it had counter of 216) and I have babied it only running 1 hour mostly with a few 2 hour max sessions and half a day or more in between as a cool-off period.
My hunch is the previous owner (a big seller who unscupulously sold me a used unit as brand new open box) ran 216 full reels non-stop? Who knows?
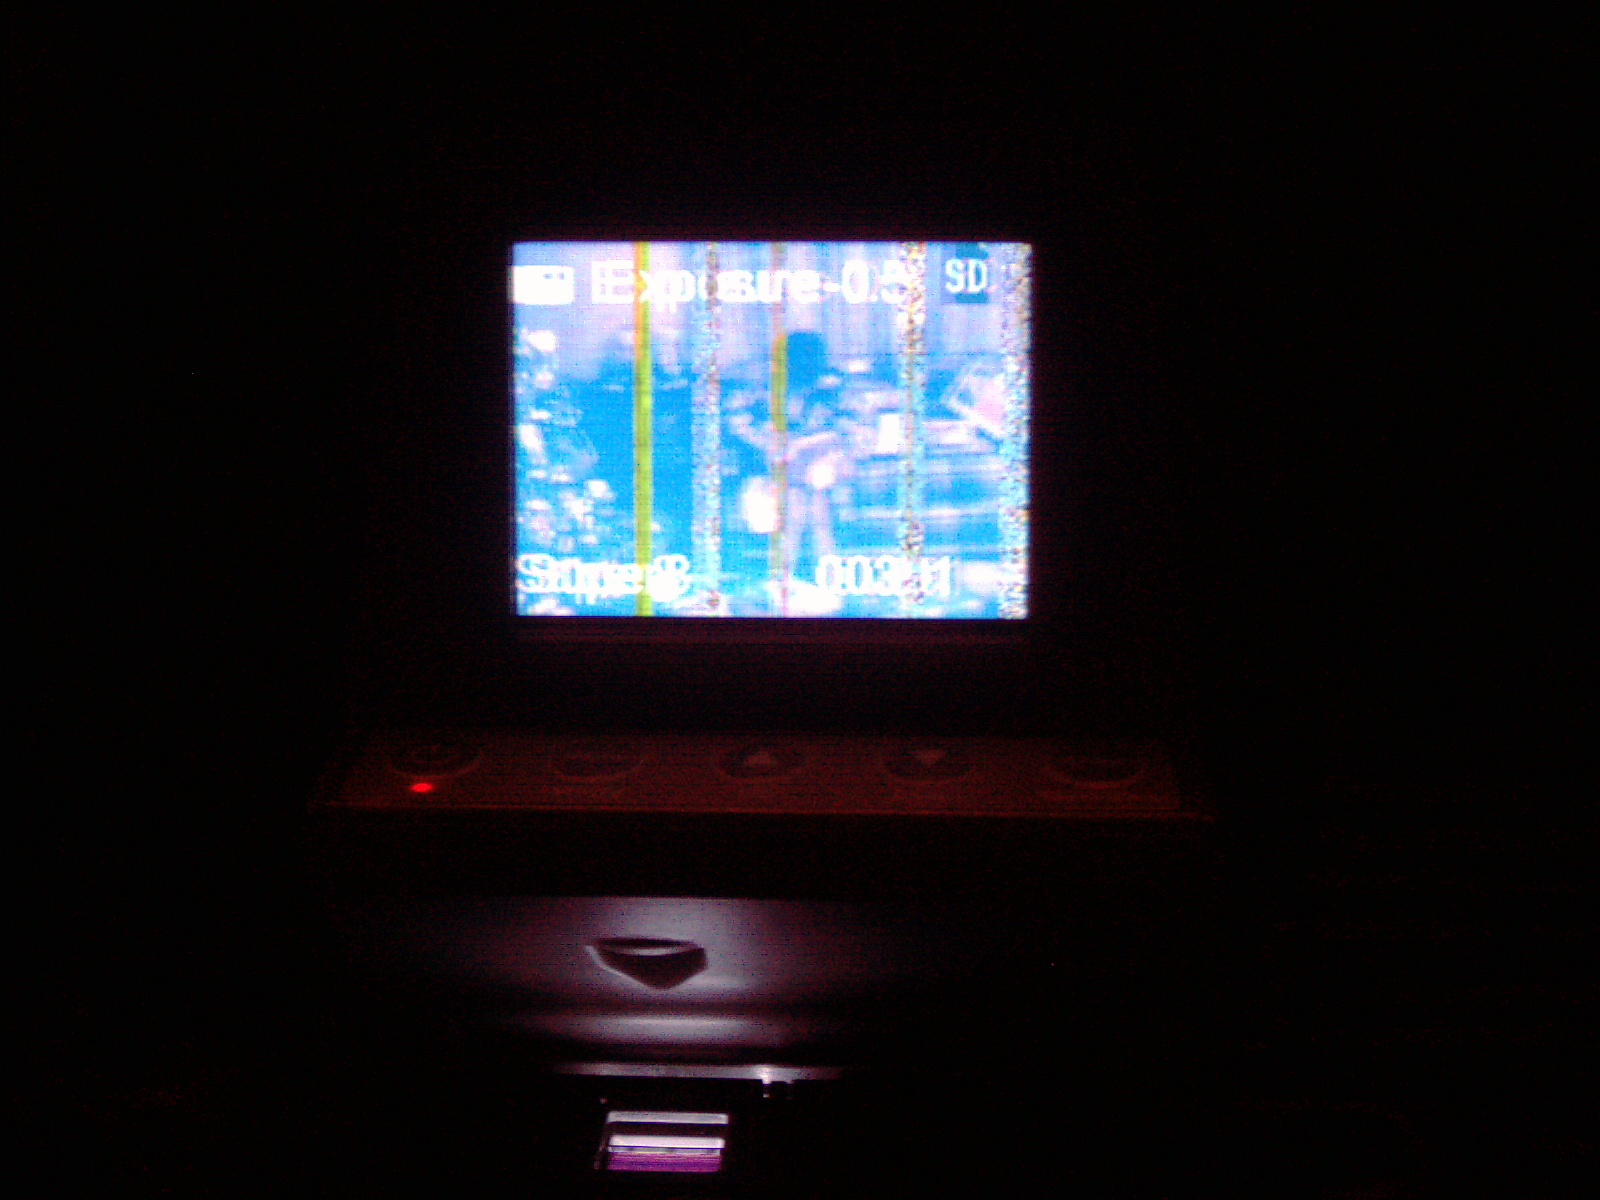
Update 10/27/18
I have been scanning boxes of films for several days and have not had a repeat of the lockups on the Wolverine MovieMaker Pro. I make it a point to scan a small file of a few seconds before I scan the order. It is my hunch that whatever is going on is a firmware issue.
I tried to scan later that same night and the next day using the very same card which already had files on it- to determine if it was a capacitor issue or ??? and I conclued that it wasnt a card issue or a capacitor issue. I scanned at similar temps etc and int have any problems. The issue seems to that the software doesnt begin to create a file IF there isnt already a file there. As long as there is at least one file already on the card - then the Wolverine MovieMae Pro creates files on that card.
Intermittant issues are hard to pin down and those are my hunches on what happened. Glitches cn be managed as longf as Im aware of the hiccup and figured out the workaround for it. I see no reason to upgade the firmware as it creates good files and I havent stumbled on that freeze up glitch for awhile.
10/29/18
MovieMaker Pro scrambled Screen issues (continued)
I was scanning on four machines- then gave them a rest period and tried half day later to finish. My Wolverine Movimaker Pro is the only unit that has this issue. I loaded a 3" film and tried to scan onto same SD Card as last session and after a couple of minutes the scrambled-screen-locked-up-and-unresponsive-but-mechanism-still-scanning symptom was back. I tried severl times to turn off and scan and even to make a short scan then stop and rescan - nothing worked. So I got a spare 32GB SD card from another unit and reformatted the card and made a short scan then stopped. Then the scanner worked for the remaining 3ea 3in reels without any further issues. I see that it is a good idea to have a spare 32GB card as the 1st on eha files on it and so at the end of scanning 2 sessions with a break in-between - I knew that some files/reels were on one sd car and some files/reels were on the other SD card.
It is my best hunch that this is a firmware issue and not a hardware problem.
Update 4/27/19 I have requested by email an updated firmware for this unit and received this firmware file and PDF instructions on how to install. I have not replaced it at this time. I am continuing to scan customer films and I have been keeping an eye on this machine and the digital thermometer closeby. I am noticing that if my room temp is 60 and humidity is very low in winter months that this is when freeze scrambled lockups etc occur more frequently. I have noticed that since March 20 2019 the temp has drastically changed and I shutoff my furnace as the inoor temps are naturally 64deg and with all of the rain the internal humidity has gone up drastically also - I have not had daily lockups and runs on the first try in all cases but one. I received a bluescreen with white letters LCD message on one occasion "____" and I had to unplug and then ran fine. I feel that this may be a PCB cold solder joint or fine crack issue which apears when it is cold- this is a hunch and I purchased a T962 Puhui IC Oven (reflow oven) and plan on reflowing the PCB when the symptoms become intolerable. For now I have a working machine and plan on using it this way for awhile longer.
Replacement Gear for Hammacher Full Size - (gear is ready but still need to make a metal bracket)
I have completed my development of a plastic gear for use on a China metalgearbox motor. I bought 1ea motor at 12V 10rpm an 1ea motor at 12V 25rpm and have not tested which one it is yet. My plastic gear was a perfect fit for the d-shaped shaft as I used a caliper to measure the shaft. I have made a total of 3ea of these plastic gears and took 2 hours and 5 minutes each.
I have to make a metal bracket so I can mount the new motor/my plastic gear to the existing mount on the Hammacher unit I bought on big-auction-site a couple of weeks ago which came with a broken plastic motor and seller reduced price due to condition.
Im very glad the plastic gear which I 3d printed and designed myself from scratch - works so well and looks very professional. The designing and tweaking took me several months of work and failed attempts. Now I can print one every time and done in 2 hours and 5 minutes.
I had some experimenting in Solvespace to get right as some of my old attempts would halt printing in the middle of the 3d print. Solvespace has some checkmarks which are to turn off/on certain characteristics - once these checkmarks are set just right then it prints fully all of the way through when Cura interprets the shape correctly and makes correct G-Code.
The gear is a nice press-fit onto the D-shaped shaft. It fits amazingly well. Its nice that it is finally a working done ready-to-use-part after months of work.

As I plan on turning over my scanners onto a soft cloth while I uncrew the back cover to install my motor etc ... I am concerned about accidently cracking the LCD screen as it is very fragile. I have been thinking about making a temporary screen cover to protect it during these repairs/installation of parts. Sine ideas are a 3d printed formfit, or a cardboard tapes over the screen. I havent come up with a solution to this yet.
Update 11/4/18
Successful 100% replacement of white plastic gearbox motor. I cut off the wire and connector from old motor and soldered onto an alumiunum 12V 10RPM motor with gearbox which I purchased from China. I used a thin piece of aluminum and cut an formed it an punched holes in it to make a mounting bracet. My 3d printed gear was a perfect fit. I USED THIS FOR 4 hours yesterday with 2 successful sessions. It is much noiser than the original but worked very well and smoothly ran film and rewound film. The motor creates more noise and may be a difference in motor design- about as loud as a breadmaker.
I ran into the crazy lockup/reboot/frozen/scrambled screen issue again yesterday. I did the same thing - run for a few minutes and save to get somthing onto the card. It worked after the second attempt.
I noticed that an ebay seller has 2ea MovieMaker Pro units for sale - each one has severe issues
1. Text from that unit's ad, "the device does not record properly. When you select record, it says "please connect the power supply" and does not record. This item is good physical condition with some marks/wear"
2. Text from that units ad, "I am selling this item AS IS because the device does not record properly. All video captured is garbled. The device is able to scroll through the menu normally. This item is good physical condition with some marks/wear"
It seems that these MovieMaker Pro units are starting to develop common issues. My own unit has developed one of the same symptoms as that ad- the 2ea ads are not mine and Im not affiliated with them. Im just making a point of showing common ever-growing issues with this model of unit.
I hope over time to find a solution to the garbled screen/lockup/ecord/power supply issues- the first step is to figure out the issue and then isolate what is causing it.
I just yesterday 11/3/18 fully solved the plastic gearmotor issue completely independent of the mfg. I used my own part and replacement motor/gearbox purchased from china and made my own bracket. That is a big accomplishment- it means I no longer have that as an obstacle. My metal bracket needs refinement as the hole placement is critical and I ended up maing punched holes in the wrong spot and had to improvise. My bracket works but is not pretty. The next one will be better as I made a paper template for tracing. The working unit is "good enough" and will focus my attention on acquiring more machines as it speeds up my film transfers to have another unit. Right now I have 5ea working machines and this means I can scan 2000ft per day wth 2ea 2 hour sessions. One morning session an One evening session with cool offer period in between.
I have completed several large box orders due to my extra machine purchases over the last several months. Im glad to no longer have any fixer upper machine - now they are all fixed (all but the lockup/garbled screen issue)
The Solution to Image Jitter (on one of my units - the rest were fine)
Update 1/17/19
I had an AHA moment where I realized that my DIY metal "C" shaped piece of sheetmetal which I had been using to push down on the plastic gate ever so slightly - WAS NO LONGER NEEDED. It was royal nuissance to apply it and remove it in between every reel change and piece of dust that need to be cleaned. I no longer need that and IT WAS SO SIMPLE TO FIX.
I used my watchmaker mini screwdriver set with a very tiny phillips head. I realized that the Metal chrome-like piece that fits surrounding the moving claw/tooth - that metal piece with 2 screws & 2 springs - was not pressing down on the film sufficiently. That was causing jitter on especially warped or horrible customer film- ONLY ON THAT PARTICULAR UNIT. I remember when I first bought that used unit - one of the first things I did was clean the machine and also I tightened the two screws - because they were slightly loose. WELL that was a mistake that I made - they are supposed to be a little loose - by about 1/4 turn possibly a little more or less than 1/4 turn for both screws. My other machines were snug all the way and worked fine that way - but this particular machine needs those 2 screws loosened counterclockwise 1/4 turn to push down on film sufficiently. Not knowing that caused me so much grief. Im glad I figured that out.
OH IT WORKS SO GOOD NOW. Now I can use that machine for horrible orders too - you know the warped and twisted horiible customer films - work on that machine too now. Now I dont have to skip that machine for some orders. Because it presses down on the film ever so slightly now. Barely barely more pressure on that metal plate. Which means that the claw/tooth now has a better flatter film for which it can use the sprocket hole. See on twisted warped film - the claw/tooth was sometimes having trouble finding/reaching the sprocket hole because the film was not flat in that spot.
Also this was my quietest unit- the frame clicks were very faint. After this very small adjustment - now the clicks during scanning are noticeably slightly louder and it transports the film much better and more consistent.
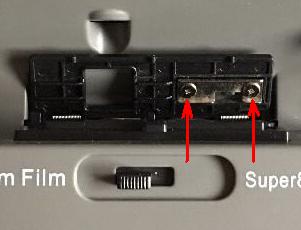
Upate 1/22/19
I made an amazing discovery today and yesterday while using my Wolverine MovieMaker Pro for scanning a customers helicopter/airplane/wilderness 3" reels as it apears the reels were shot on a high-end camera. The film itself had perfect sprocket holes and the frame was centered properly and no part of the image was cockeyed or too much in any direction. My usual customer sends me film shot on amateur cheap cameras. I did what I always do - center the image and make sure that the zoom and left/right/top/bottom of image is OK. Well this particular order AMAZED ME that my Wolverine MovieMaker Pro did NOT FREEZE or SCREEN FRAZZLE or LOCK UP or waste my time for half an hour until it stabilizes - and has been wonderful. I used this machine alongside 4ea other machines that never give me issues - at any setting. So I was absolutely shocked in a good way that this normally problematic unit was running with no issues.
I attribute this to settings which I have written down and taped to the unit itself. For some reason the machine likes these settings and seems stable. So I have found the sweetspot in its otherwise horrible glitchiness. I did not know whether it was a firmware or hardware board/component failure and since it has run fine for 2 sessions on 2 separate days without issue. I am hoping this issue is gone forever - as long as I dont change or forget the settings where it works fine.
I have snapped a photo of my machine running the helicopter scene over the forest and taped a note onto my machine which shows all of the settings copied down.
While running Super8 Film 3" Reels I had the following settings in Wolverine MovieMaker Pro (no lockup/videoglitch sessions)
In Settings for Super8 X=12 Y=25 W=19 Exp= -0.5
In settings for Regular8 X=17 Y=12 W=24 EXP= -0.5 (even though I was running super8 I still copied this down - just in case)
Film counter 618
Firmware version 20170803-ZS06
Lab temperature 60deg F 01/22/19 (My Humidity meter needs battery replaced but I estimate 35% RH)
tested to run Super8 3in reels for 2 hours with no lockups/freezes/video glitches with the above settings (sweetspot regular8 settings not figured out yet)
I contacted Wolverine a few days ago wanting to buy a set of replacement 2ea circuitboards and have gotten an email response that they are not willing to sell me boards or parts. They attribute that to a required calibration of mechanical parts (I personally dont believe that line sorry). They would like to offer me a trade-in and give me $100 off a price of a new machine. That is no bargain and even the price of the machine they offered was $50 higher than retail price- so in essense they offered me $50 for my machine and I would still have to pay shipping both ways. Im not giving them my machine for practically for free. Yikes.
Im glad I figured out the sweetspot in settings on this dreaded glitch/lockup where it works fine. I got cheated by the used machine seller and the mfg is not willing to help me at all - no replacement boards from mfg available.
Somebody still likes me upstairs - after receiving that polite but uncooperative email from vendor or mfg - who knows? - I figured out the sweetspot in settings due to this wonderful "helicopter/airplane/wilderness order" shot on a perfect camera. I attribute my machines sweetspot to my hunch that the factory is testing the machines at this perfect super8 film setting (the setting I accidently/miraculously found/many various condition orders and settings and observation on my part) where the machine works fine. The factory film they use to test the machines is probably not cockeyed and off to the left/right/up/down like the typical films I get for transfer shot on ordinary cameras. So this glitch sneaked by the factory un-noticed - that is my hunch.
Another thing I noticed on this helicopter/airplane/wilderness order which is in near perfect condition - that my Hammacher full-size unit is starting to make noises coming from the takeup reel motor. This takeup reel motor is one I took from the Wolverine MovieMaker Pro machine as I got this used Hammacher unit with a broken plastic-type motor. That motor is starting to make a rasping/ticking type noise which comes and goes (but still works fully- just the noise comes and goes). I need to look into this - it may need grease or oil or may be something else wrong or going bad.
The DIY motor/3d printed gear/DIY mount that I installed in the Wolverine MovieMaker Pro is doing just fine and has no issues but is louder and more powerful than my other units and my own motor assembly does not have the film-on-the-floor-or-table issue that occasionally plagues the other machines (even happened once to the metal gearbox factory units too) - but that doesnt happen too often. I may just replace that motor inside the Hammacher with my own more powerful DIY motor assembly in the future.
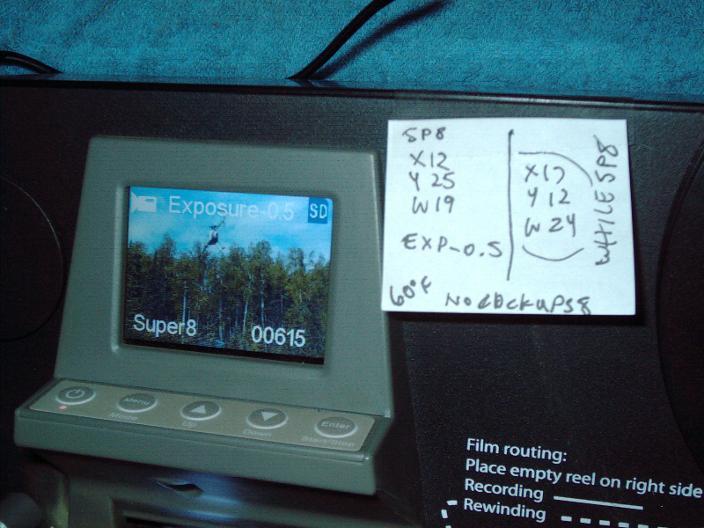
Update 4/18/19
I am having doubts about my own conclusion that the sweetspot settings are the answer. Because the sweetspot isnt helping anymore and has gone back to the same old thing of having one to three failed attempts before it works good for the rest of the session. I am leaning more towards a thermal issue with the board.
I have purchased a PCB Reflow Oven model Puhui T962 used an modded by the seller for a very good used low price. I am happy to finally have a professional reflow oven. I plan on someday using this on my PCB which I have a hunch has some microcracks an reflowing it may solve my intermittant issues of lockup/garbled screen etc.
Hammacher Schlemmer Used Unit - Bad seller/Shipping Damage etc Total Loss
I purchased a very cheap Hammacher Schlemmer unit from Big-Auction-Site and my good deal turned sour when I opened the box and found that the seller put ZERO packing materials and the unit had been battered by shipping. The front steel panel was bent and interfering with the takeup spindle turning. The takeup spindle shaft was bent. The back case cover had plastic pieces broken. The LCD screen displayed "Rainbow" colors during scanning and looked like "thermal image camera" colors with no gradients just solid colors or incorrect colors. The unit also had a timing belt instead of the gearbox motor. The serial number "DV1882016..." showed that it was made in 2016 and was substantially different than my 2017 models.
I wasnt sure if the wrong colors were caused by incorrect firmware (possibly bad seller tinkered) or hardware problem. So I decided to just do it and downloaded firmware from various vendors/mod sites and I REGRET IT ALREADY.
I only made the problem worse. The new firmware replaced my original firmware and I tried them all from all brands
1. Somikon
2. Winait
3. Wolverine
4. Mod Site with various resolutions
All of them were incompatible with my 2016 Hammacher and I only made things worse by trying to download. What did work is that these do scan- that function does work and it saves to the SDcard. But the "thermal image camera" - like incorrect colors was still there. The keypad buttons did not coincide with the firmware and menu selections were unproductive with the screen "Please connect the power supply!" and the functions had no result. So I cant rewind or change exposure or playback or any function. Only the firmware display screen works.
These are the results when I press a button (after incorrect firmware install)
Record "Please connect the power supply!"
Playback "Please connect the power supply!"
Rewind "Please connect the power supply!"
Exposure "Please connect the power supply!"
Sharpness "Please connect the power supply!"
USB "INSERT USB CABLE"
Frame Adjustment "Please connect the power supply!"
Language "Please connect the power supply!"
Format "Please connect the power supply!"
Default Setting "Please connect the power supply!"
Version "20170511-ZS04"
Scanning still works but without the ability to control exposure and way-off colors it is useless. I can still scan by pressing Menu button and then OK button gives normal message "Select Film Type: 8mm *PushLevertoLeft Super8 *PushLevertoRight" and press OK button to start scanning to SDcard.
Note this works in various resolutions on the MOD files exactly the same from the MOD site. However it is useless because my colors are wrong and my buttons dont respond normally. NONE of the download firmwares were intended for this particular unit with a single board and toothed timing belt- it is an oddball machine different from what the authors/posters of the firmware had.
While Startup, the graphic display shows "Wolverine" or "Somikon" or "Winait" logo depending on which file I download and version number differs - but the keypresses all give the same general reply although the reply message may differ in text slightly.
Before I download firmware all of those functions worked. Even playback worked from SDcards created on my other machines played back with correct colors. But the scanning did not result in correct colors.
Now after firmware change - I lost all of those other functions and the reason why I tried the firmware in the first place - the wrong colors - that is still there.
I wrote to Winait and asked for the firmware __________ and hopefully they will provide the version that I overwrote.
MY ADVICE IS - DO NOT ATTEMPT TO REPLACE YOUR FIRMWARE- LEAVE IT ALONE.
How my Hammacher Schlemmer 2016 Unit is different from the rest
1. Obviously has no takeup reel motor - more similar to the gooey belt Wolverine units - except no gooey belt - it has a toothed belt and toothed gears on both ends.
2. No vent holes on the backside
3. Serial number on the uits back shows "DV1882016 ..." was made in 2016
4. Firmware number has a different format from the other units "DV188-D03u-161125"
5. Only one circuit board
6. One large muffin fan hotglued to the inside of the back of the case with black hotmelt glue
7. No minifan underneath PCB
I received the sellers junk and was compounded by no packing materials so it got beat up pretty bad.
I did my best to repair shipping damage
I removed the back plastic case and took the front steep panel/mechanism to my precision metal working lab where I straightened the front steel panel (I took off the spindle first). I am happy that the steel panel which was so badly bent - is now good-as-new The spindle didnt fare so well and even after disassembly - and precision taps while in a precision vise and even on a precision lathe- I still do not have it perfectly straight. I still have a ten thousands wobble which doesnt sound like much but is enough to stall/interfere with the stepper motor because it has to lift the reel every revolution - like doing a curl with a dumbell.
I worked carefully on these issues and still has a log way to go. It is unfortunate this unit was wasted in shipping. It is unfortunate that I trusted the firmware of modd sites. All of that was misguided and didnt help me - only made matters worse.
"Thermal imaging camera"colors may be caused by GROSSLY set EXPOSURE settings?
I should have NEVER attempted to change the firmware. I suspected it is either a camera issue or a PCB issue. While Winait didnt send me any files - they sent a short message stating that I need to make an adjustment in the menu. This very short message makes me think that the oddball colors was actually not a defect at all - possibly very very very extreme exposure settings. In hindsight - rather than attempting to reflash - I should have gone into the exposure settings and tried to grossly adjust the exposure - maybe that was the issue. I can only speculate since my buttons do not work anymore and only give the message "Please connect the power supply!" and changing exposure or trying to set default is not possible anymore.
All of this problems with my newly purchased Hammacher unit dis-sways me from trying to "bake my pcb" from my glitchy moviemakerpro unit. I fear that I could make matters worse because Im unfamiliar with the operation of my Puhui IC Reflow Oven T962 and Im trusting in the sellers words that the unit was DIY modded and upgraded. I havent had luck with the honesty of sellers and Im not going to risk my MoviemakerPro at this time as it is still working even though it takes a few tries to get it going- it is still helping me with my workload of customer orders. When it works- it works well.
I have read in forums where the mfg/vendor/seller has emailed a person a copy of the firmware. Does anyone have firmware to solve my issues? I should never have attempted to reflash.
I have asked Wolverine and Winait for firmware by email and awaiting response.
Update 4/27/19
1. Wolverine sent 2ea firmwares per my request and one is for the MoviemakerPro and one is for the MM100 belt drive older unit Moviemaker. I received this very quickly by email the next day approximately.
2. Winait asked for photos and I sent a brief video and I am still awaiting a response. I also asked for cost of a replacement camera module- still waiting for response.
I suspect I will never get this used/newly purchased broken machine up and running unless a kind reader can provide firmware for it. It may run fine with "gooey belt" firmware - I dont have that firmware and does not seem to be posted anywhere online.
Update 4/27/19 I installed the MM100 firmware and have the machine up andd running as a 720p unit but the camera module still gives strange colors same as before. It acts exactly like a MM100 and all functions work and buttons respond etc which tells me the PCB is compatible with MM100 firmware and may be identical.
This issue was caused by the posters of firmware not sufficiently identifying which unit and serial numbers and which versions of belts/motors were in the unit that goes with the firmware they are posting. I dont suggest that ANYONE follow those advice online - else you run the risk of ruining your unit. Learn from my mistake.
Here are some photos of this particular oddball 2016 unit with a timing belt and rainbow colors similar to thermal imaging color palette.
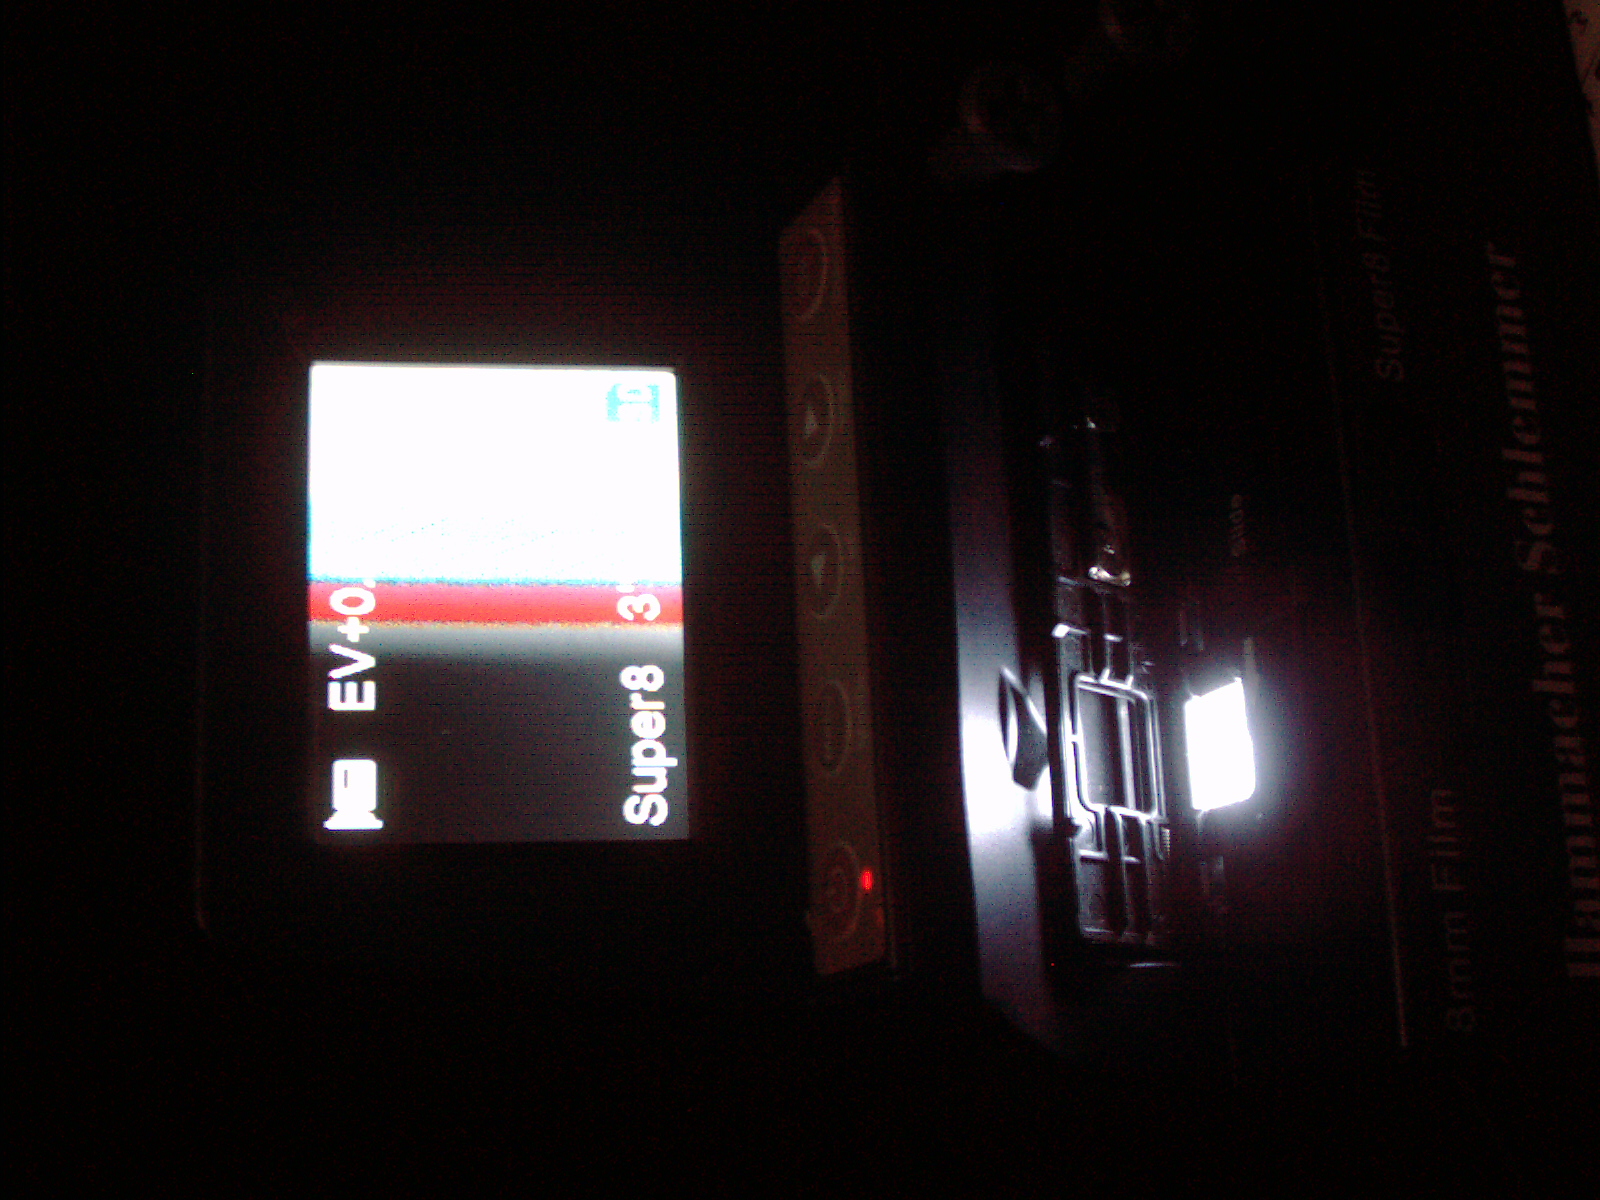
I read from the Somikon website regarding their 20fps and 30fps firmware download (one of the firmwares I tried) that the way to go back to the 30fps is to do a factory reset. Unforunately my buttons do not respond in order for me to do a "Default Settings" which is probably what they meant (I dont know for sure since their website is in a different language and translated online) basically their website says to do a factory reset then consult the manual.
It is possible that if the "default settings" menu option worked then it would just forget the firmware downloaded. I dont know that for sure but that is what apears to be said by the Somikon site about their 20fps firmware. That to go back to 30fps after installation - performing a Default Settings through the menu will put it back to 30fps. I dont know that for sure since I have no way to try that.
I am wondering if there is a way to reset through reset pins on the PCB? I will have to inspect to see if that is an option.
It is possible that the firmware was overwritten by new firmware install. However the wording of the Somikon site has me wondering if performing some kind of reset will bring the original firmware back to how it was before.
Update 4/27/19
My film counters are showing 700ish and 990ish etc and I have taken some photos. Im curious to see what will happen when it surpasses 999 film counter. Im also curious to see what will happen when the film counter goes beyond the digits allowed - will it rollover from 9999999 to 000000 like a mechanical odometer on a car?
I noticed that on the updated firmware that Wolverine sent (I requested by email) there are some MAJOR improvements
1. Wolverine MoviemakerPro firmware
a. RGB individual Red Green Blue adjustment settings GREAT!!!!
b. Film counter does not increment just by power on or power off GREAT!!!!
2. MM100 (gooey belt model) Moviemaker firmware
a. Film counter does not increment just by power on or power off GREAT!!!!
(please note that I have not replaced my original firmware at this time - but I did test and see these features on my Hammacher unit which is not compatible with the moviemakerPro but at least I could see the menu but could not select that option- dont attempt to run on WRONG machine as Im WARNING you not to overwrite your working firmware as there is no way to bring it back how it was.
Since I do want to restore the Hammacher unit back to 1080P and right now Im using 720P firmware from MM100 gooeybelt model Moviemaker and seems to run normally (despite bad camera with bad colors) I think the solution may be
1. Hammacher replied to my firmware request by stating - they offer no firmware updates for anything
2. Hammacher rubber timing belt model runs fine on MM100 Wolverine goeybelt model firmware but at 720P not 1080P
3. There is a mod site which states they modified firmware using freeware tools and changed the resolution
a. unfortunately the modded firmware they posted online ia not compatible fully with my older Hammacher machine
b. I may be able to use these software tools to modify my own firmware to change from 720p to 1080p?????
c. The mod site/forum is strange and my browser does not like going to the website and just
blinks/reloads/blinks/reloads using Android tablet and also older XP laptop. (I may go to the
public library soon to see if their very up-to-date PCs with fast internet connection can be
used to download those tools. As things like this dont/may not stay up for long and I would
kick myself for not downloading.
4. I wonder if the Wolverine MM100 Moviemaker goeybelt units can be reflashed with modded 1080P firmware?
5. All of this may be a moot point if a vendor sends me a firmware that works fully
I have recently (early 2019) noticed that a vendor "DigitNow!" also sells a similar looking unit(s) of super8/regular8 scanner and Im not sure of the resolution or which reel sizes it will accommodate. The ad photo looked like the black unit with silver or grey front console. I dont know whether the units will have internally a gooeybelt drive, a rubber timing belt with teeth, a plastic gearbox takeup ree motor, or a metal gearbox takeup reel motor, or possibly be different in one or more ways from the rest.
--------------------------------------------------------------------------------------------
Wanted camera module
(let me know if you have a parts unit for sale or will sell individual parts for cheap) for Any similar unit (I plan on installing it into Hammacher Super8/regular8 larger unit which it is my hunch that the camera moule is the same on all units from all brands. One of my units works but is showing bad colors (see pictures above) I would like to replace the camera to correct this issue. Right now this machine is on a shelf not being used - as I cannot use it with a bad camera. I contacted the vendors and obtaining a replacement part for these units is not possible from some vendors and Im still awaiting an answer from other vendors. I am not picky about whether the camera is new or used. Maybe a kind reader has a mangled-by-shipping or damaged unit that they will sell individual parts pieces? Let me know.
-------------------------------------------------------------------------------------------
I have created multiple drop down list boxes and multiple buttons - I simply ran out of room to put it all under one button. Please click buy ... click buy ... click buy until you have paid for everything you need.
IF YOU HAVE a frame-by-frame film scanner FOR SALE
IF YOU HAVE A UNIT THAT YOU WANT REPAIRED
- let me know
Pete (847) 454-7858 between 11am and 7pm daily
Illinois, USA
I am posting my own repairs and maintenance here- use at your own risk as it voids warranty to open up your unit and I used my own BEST HUNCH/EXPERIENCE in figuring out what to do and resolve issues. What works for me may not work for you.