Here is a paypal button for $10 Quote Consultation Fee. This covers my time in phone or email communication. Speaking writing and download/upload photos takes time. I charge for my time and services. This $10 does not apply to any parts or services and is non-refundable. I find that this tends to screen out 99% of emailers/callers. The 1% of emailers/callers are my buyers. I reserve customer service and technical answers to buyers only. I reserve the right to say no thankyou or to charge more due to the complexity of the question etc. I perform repairs and or diagnostics service for -circuit boards/parts etc. BUT no repairs and no diagnostics testing services are included in this $10 Quote Consultation fee.
Dr Virago Pete's
Difficult Problems & Easy Solutions Page
I am chronicling some of the difficult problems that I have overcome - things that no-one that I know - knew the soluton to and I had to search and figure this out.
Sept 2 2014
I was looking through the calendar in my computer's lower right hand corner - and I was paging though previous months July and August to see which day of the week pertained to shipdate etc. I probably accidently changed the calendar month to July. I dont remember clicking ok- but I do remember leafing through the months earlier today.
Later today - I had a really strange problem when I used the internet. Not every page had that problem. Email sites that I use and my webhost were not accessible. I just figured that they were donw today or doing maintenance. But that wasnt the case. Much later I tried again to use the internet and same old message "This Connection is Untrusted" and the computer wanted me to add this webiste to the trusted list as it was missing a certificate and warning against it. So I decided not to do that at all.
I searched on the search engines and I saw many sites that were explaining how to add the site as a trusted site and blablabla. I think they missed the point. I went back in to check my calendar and I saw that the month was set to "July" but in fact it is September. As soon as I changed the month and day and time to be correct. Now the websites that I mentioned above - they dont give that message anymore - now it is back to normal.
Having the date set wrong causes this issue. Set the time correctly- to fix. Also some website like to change settings on your computer and one of the things that you have to spot is when you
Right Mouse button Click on the lower righthand portion of the screen which displays the time
A) Adjust date/time
B)Internet Time
C)Automatically Synchronize ...
(if this is a problem remove the checkmark- the server may not be in the same time zone as you and keeps changing your clock on its own- having the clock wrong wreaks havoc on websites and browsing and produces "untrusted website" screen error
I have included a screenshot of the onscreen "untrusted"

|
This connection is untrusted image.JPG Size : 62.607 Kb Type : JPG |
My cat's lip was rotting away
About 2 years ago my cat had a mouth problem and I didnt know what it was. (no visible signs of injury) I took her to the vet and they found that one of her tiny little teeth on the lower jaw was loose and was causing her not to bite food or eat well. They wanted to pull the tooth and I agreed. They also said that she needed a teeth cleaning at the same time. They further explained that they could not help her unless they gave her a rabies vaccination. I told them that she had her rabies shot at another vet and they could call them to verify. They did call and verified that she had her rabies vaccination but it was 1 year and 3 months ago and that the law states that it must be done annually or they were forced to not treat her. I agreed because I had no choice in the matter.
Ok so they gave a rabies vaccination, cleaned her teeth and pulled the one little front tooth that was loose. When she was home of course she was groggy from the anesthetic and then within a few days later she was pretty much back to normal and eating and basically well. Then I started noticing a brown spot on her upper lip edge. This brown spot kept growing and growing into a line and widening - by growing I mean spreading upwards. It started as a black line in her lip and basically within a few days her lip was eating away rotting brown.
I researched online what that was and I saw that there were many people's cats suffereing from this problem with the cat lip. I searched on line in search engines "cat rodent mouth" and that is what I saw. I dont know exactly if that was the name of it but the pictures sure did look like it. After reading their situation - I wondered if they had visited a vet recently and had a rabies shot. I dont know that it caused it but that is my hunch- I could be mistaken. I feel that a sick or weak cat has a hard time fighting off this vaccine. Again I dont know that for sure but that is my best guess.
I am writing this years later and my cat almost lost her lip and she could have had major deformed mouth. But the vet knew what what he was doing and my cat received the correct medications.
I'm going to list it here - so that you can cosult your own vet (I am not a vet or a medical doctor)
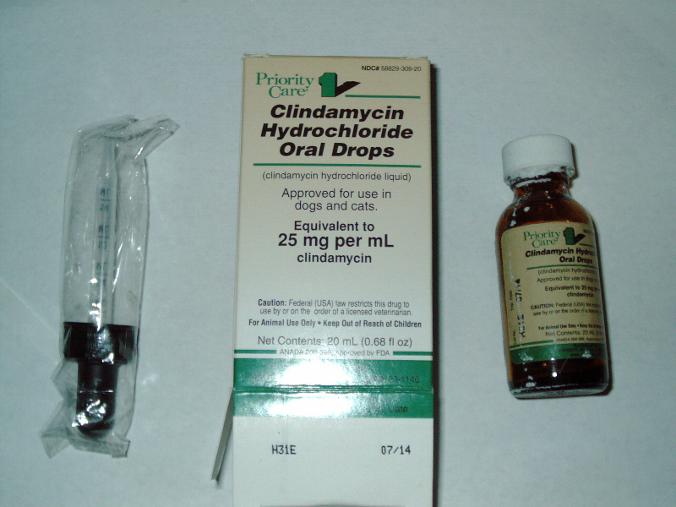
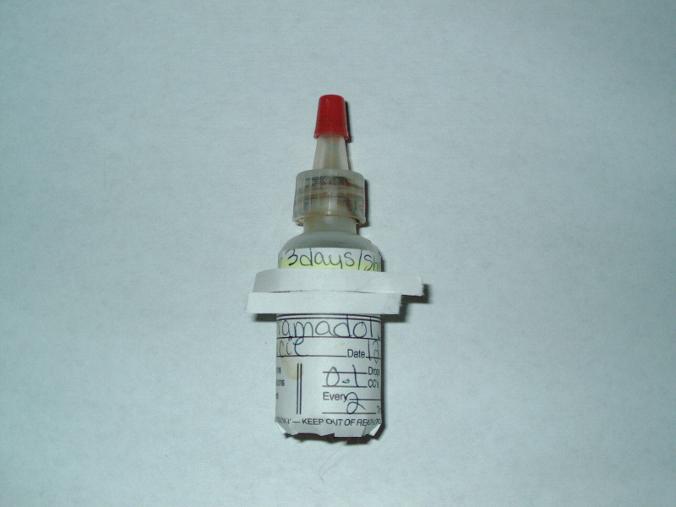
1 small bottle of Tramadol Susp (Use for 3 Days Shake Well) 2 times a day 0.1 CC
Clindamycin Hydrochloride Oral Drops ( 0.5 CC 2x per day )
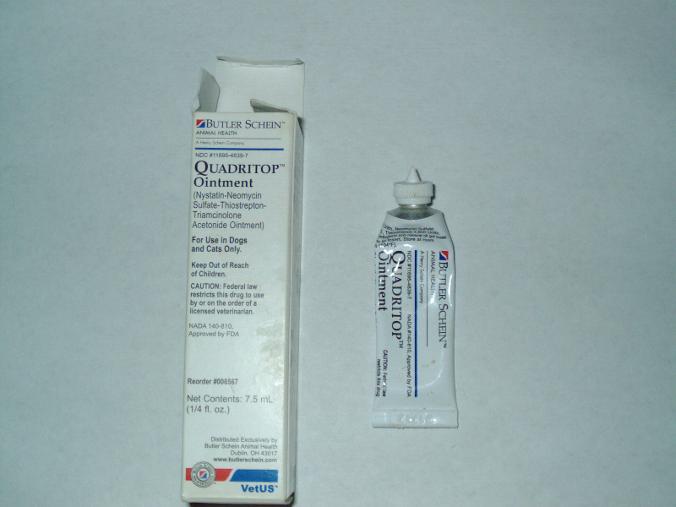
1 tube of Quadritop Ointment (Nystatin-Neomycin Sulfate-Thiostrepton-Triamcinolone Acetonide Ointment) which I applied to her lip 2x a day
I ran out of this ointment and I purchased a second tube of Quadritop from the Vet.
I personally feel that this ointment worked very very well. I hope that this helps the reader find the solution- because it really is a terrible thing to see your cats lip wasting away in such a short amount of time.
I dont know what causes it - but it could be one of several things (only guesses) my best guess is the rabies shot admisitered to a weak sick cat brings this lip problem on. That is my hunch but I could be mistaken. But if this happens to your cat - maybe reading about my experiences will give you a solution. Again I'm not a vet and I'm not a medical doctor.
So it started off as a very basic problem - a loose tooth and I ended up with my cats lip rotting away. It was a majopr problem and as I looked online - there waas no solutions offered and some cats had this for years and showed pictures of their lips all brown and rotten and eaten away. My cat had a major rotting lip after only a few days - and the vet was a professional and really saved my cat. I hope you see my photos of the medicines that were right for my cats situation.
I want to say this disclaimer that this solution was right for my cat - but it may not be right for all situations or all cats. Find a vet you trust. My cat is just fine and her lips look normal and not eaten away and her lip healed fully and the missing part grew back.
I forgot to say that when I took my cat back for a followup visit - he actually grabbed the dead piece of lip and tore it off and when it snagged - he clipped it off with a pair of scissors. It makes me sad to remember that I actually saw here black dead lip on the stainless table. But it has grown back good as new. AT first it was pink and hairless but over a few months it looked nomal and the same size as the other side which didnt have that rotten dying.
I didnt find the solution online - maybe this will help someone's cat in the same situation.
I dont have any photos of her lip or mouth sorry.
I did the right thing by seeking a qualified vets help immediately when I noticed the symptoms I also admisitered the medications to her as directed and asked questions and told hima bout what was working and what was not working.
I was initially told to come back after 10days after the teeth pull to folow up. But I noticed the black lip after only 3 days and I phoned and came into he vet on the third day. So my concern for my cat and acting immediately was also important factor.

I owned a 1996 Ford Windstar van about 7 years ago and the emissions testing place refused to test it or pass it because it had a check engine light. I tried several mechanics and no one could find the solution to this problem. I bought this van at an auction and had a bad transmission when I bought it. I replaced the transmission but the check engine light was a real booger to diagnose. To make a long story short - here is the solution. The overdrive lever which is to the right of the steering wheel - this lever has a overdrive button on the end of this lever. This button was being sensed as being pushed on/off/on/off/on/off and this is what caused the first transmission (the one it had when bought at auction) to go bad. What the problem was is there is a wire at the base of this overdrive lever and that wire was shorted/bare metal touching. So by fixing this wire - the check engine light was solved.
Only other problem - rear wheel bearing needed replace
Very comfortable ride. I no longer own it. Looked just like the picture but the blue was much darker and the grey lower panels were just like the picture. If you cant pass emissions testing your life is miserable. I hope this helps the reader.

- intermittant or always
I documented my troubleshooting and here is the web address to my own page about this issue (copy & paste)
http://www.drviragopete.com/appliance-troubleshooting.php
The problem was hard to diagnose and I know of no online help that hit the nail on the head - so to speak.
The solution costed me about $25 and the internet is plagued by salesman wanting to sell you parts unnecessarily. In these tough economic times - that is harmful to many people.
So here is the solution in summary (disconnect from electric first)
1. Your $25 pump may be bad - turn the washer carefully on its side and check the pump's underside of the pulley. If you see a corrugated retainer slid out from the pulley - then buy a new pump from big-auction-site. The noise is the corrugated retainer dragging and scraping - it is a horrible noise and 1000x louder than you may think.
2. Your motor has a skating back and forth plate. When your washer goes to spin or wash or drain - the motor swivels roughly into position. I'm going to call this plate a "skate plate" because the motor skates back and forth on it. Here is the symptom of a rusty skateplate - you turn the timer into a wash cycle and it works fine. But then you try to drain and spin and you just get a HMMMMMMMM motor sound and if you just leave it - it will smell like smoke (I always shut it off before that) The issue is that the surface rust on the skate plate just below the motor - the rust doesnt let the motor skate well. The solution is to sand the rust on this plate to make a smooth surface. I also applied a light grease over the sanded area.
I dont know of anyone else online who is saying to sand the rust off the skate plate (I'm calling it that) . Most want to sell you a transmission, or a pulley kit or a timer or a new motor. And this motor humming problem / horrible grinding sound can sound like any of those are the culprit. But really - it is just a matter of comparing your symptoms and looking at your pump's pulley and also underneath your motor to see if motor is able to swivel freely and even if it seems to swivel freely by hand - clean that surface rust off.
I hope this helps - see my webpage for photos and details of how I solved my problem. I'm sure glad the problem wasnt the transmission or another expensive part. I like this washer and dryer. My model washer is MAV5057AWW but the models are very similar and you may benefit from seeing what I did and comparing it to your own model.
Update 6/4/2015
Firefox 30.0 Windows XP has a hard time loading and constantly Stops and Starts interruptions and doesnt finish loading webpages
Enter the following in a Firefox Browser Address Bar
Steps
1. Type "about:config" (make sure no spaces)
2. Click on "I'll be careful I promise" (it really does say this)
3. Type "pipelining"
4. Double Click on "network.http.pipelining" (make sure it says "true")
5. Double click on "network.http.piplining.ssl" (make sure it says "true")
6. Double click on "network.http.proxy.pipelining" (make sure it says "true")
7. Double click on "network.http.pipelining.reschedule-timeout" (play
with this number for best results - Mine is now set to 50 - originally was set to 1500"
8. Doubleclick on "network.http.pipelining.max-optimistic-requests"
(play with this number for best results - Mind is now set to 50 - originally was 4"
The 1500 means that the software sits there in a Do-Loop or a For-Next loop doing nothing for a count of 1500. By reducing it down to 50 - or some other number of your choice - the software has much less "chasing its own tail" time wasting. Id rather it sit there and count to 50 than sit there and count to 1500 before it tries again to see if it gets a response from the website.
The strategy of increasing the number from 4 to 50 means that if a certain part of the page is difficult to load - then it is not much of a hinderance for the rest of the page to load in the meanwhile. Its like getting stuck on a diffucult puzzle piece and not moving forward with the rest of the pieces, by increasing the number - I'm telling it to try 50 pieces at a time. Not just 4. Because if it get stuck on 4 difficult things on a page - it will just sit there otherwise. At 50 it works much better for my needs.
Your situation may differ - play with these settings for YOUR best results.
Update 6/4/2015
Reducing Youtube Playback Choppiness and Reducing Lagtime
Youtube was showing a black screen and not playing videos all the way through much more than occasionally - especially higher definition videos. I downloaded a Firefox Add-on which goes in the "extension" section of Firefox. This add-on is called "Youtube Center 2.1.0.1 - signed" and has a checkbox in the settings for "HTML" or "Flash". This add-on allows customization of youtube experience and allows changes of settings. Without this add-on I would not be able to watch youtube based on my hardware and software etc which is considered ancient but it still works fine if I tweak the following things.
I find that loading the videos with "flash" gives lots of errors but the video has a higher framerate but the video has long lags and the modem just sits there doing nothing. When I set it to "HTML" then I get a lower frame rate in video playback maybe 10 fps ? - but the DSL modem loads much more consistently and will most of the time play the video all the way through. The culprit is the flashplayer which is somehow not compatible with youtube and somehow the flash is not 100% compatible with Firefox. So I just use the HTML setting within "Youtube Center 2.1.0.1" add-on gives me a much better youtube watching experience. The tradeoff is a lower framerate when using HTML for my computer hardware/videocard/operating system/web browser version/DSL at 768K etc.
By doing this I save on hardware and software and internet connection speed. Which is a savings of untold hundreds of $ every year.
Why upgrade when your old one works just fine with a few tweaks?
I'm a saver - I dont waste my hard earned money.
Update 8/10/15
Youtube stopped playing back a few days ago (black screen) so I changed the settings for FLASH rather than HTML5. FLASH worked but had the dreaded lag and stalled/hung and refused to restart and all of the reasons why I was so glad to switch to HTML5 were now gone.
I tried to upgrade to Firefox 36 then 39 and found that the browser became bloated or speed was slow or other reasons and after a few days of trying them - I decided to drop down to Firefox 30 as it worked better for me. Also I tried upgrading my Adobe Flash and so I determined that the reason I was getting black screen has to do with youtube. I eliminated the other possibilities by trying other browser versions and flash versions. HTML5 doesnt work anymore on my computer for youtube.
In my poking around my settings and trying things ... to make a long story short ...
I found something that solved some of my issues.
I installed Adobe Flash WIthin my Firefox 30 webrowser and it somehow corrected something where HTML5 is working again.
How to install Adobe Flash as an Add-on to Firefox 30
1. Go to the top menu of the browser
2. Tools - Add-ons - Search
3. Type in "Flash"
4. Select and install "Youtube Flash Video Player 38.0-signed"
5. Close & Restart Firefox
6. Notice an italic "f" inside a red box at the upper right of the web browser
click on it and select "flash video player" (see my screenshot photo)
7. While watching youtube videos - select a video resolution which your internet connection can keep up with (for me it is 144 or 240)
I can select HTML5 or Flash depending on how fast the internet connect is at that particular time of day as the broadband speed can vary.

Update 6/26/15
FireFox web browser jumps back a page
The backspace has a major function attached to it. By pressing the backspace key - web browser goes back a page. Some malware and poorly written website exploit this.
I personally never use the backspace key for page navigation.
Sometimes in AT&T email I am typing an email reponse and the page flips back to a previous page and loses everything I just typed. I was trying to figure out why. I have had this issue for over a year and can go months without incident and then I forget all about it and it happens again. I hope this will solve this issue.
I have disabled this page back function in my browser the following way
Typed the following in my Firefox address Bar
1) about:config
2) "This will void your warranty" Click on Ill Be Careful I promise
3) Type in "backspace" inside filter field
4) doubleclick "browser.backspace_action"
5) 0 is enabled backspace to go back, 2= disabled backspace to go back
Update 8/16/15
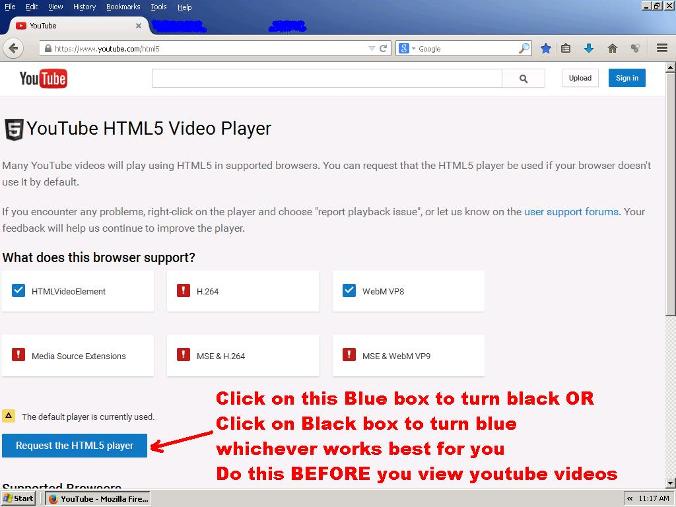
Here is another method to speed up Youtube that had a substantial difference in how the "gas gauge" bar (buffering bar) keeps ahead of the youtube video playback point.
1) In Firefox web address type "https://www.youtube.com/html5" and press enter
2) Use mouse pointer and click on blue box "Request the HTML5 player"
3) The blue box will turn to a black box "Use the Default player"
When I did the above - my "gas gauge" gray buffer bar (correct term is "progress bar") seemed to stay further ahead of the current playback point in the youtube video.
I found that if I close my browser or come back the next day etc - I need to click on my self-made bookmark and then click on the blue box to turn it black or vise versa click on the black box and turn it blue (see steps 1,2,3 above) and it will remember my youtube video playback format the reset of the web browser session. This allows me to view videos peacefully without constant stops and starts (maybe one or 2 per video but drastically alot less than without this
So in Summary
Must go to youtube HTML5 page as a preliminary step before watching youtube videos - otherwise they do not play correctly on my computer and otherwise would be a real chore with all of the starts and stops and refusing to continue to load etc. Going to the youtube HTML5 page is a MUST before viewing videos on their site.

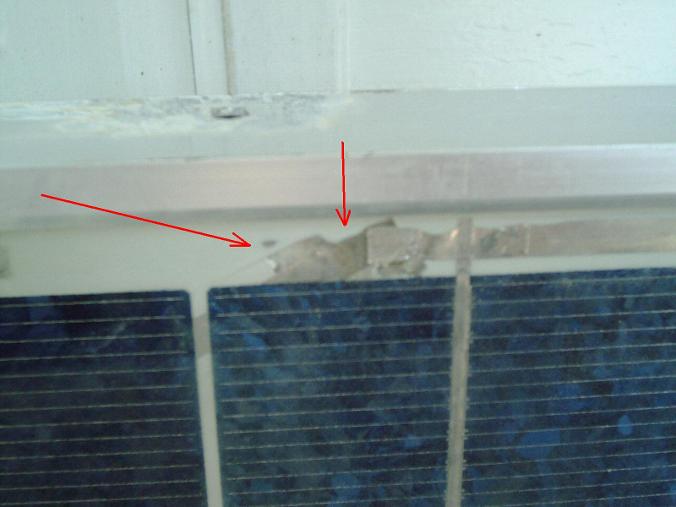
Kyocera KC120-1 120 Watt Solar Panel with 2ea Rusty Internal Points
I ordered 1ea Kyocera 120watt solar panel from big-auction-site and the seler accepted my offer of $110 includiung shipping for a 1ea used "working panel" and it really and reuly does work fully.
I thoroughly cleaned it as I plan on storing it inside my house - for emergency use or occasional use.
It had dried mud and the plastic box looked like it was dragged on the asphalt and - those things were very minor.
My big concern is the 2ea rusty internal points- I think they sold this panel because it is about to fail - technically it still works but the 2ea small corroded areas - it doesnt take much more intrusion of water seepage to make it fail. This solar panel was removed because it was considered "junk"
But the sellers ad made no mention of this condition. I also left positive fe3edback today Because I just dont "mark myself" by leaving bad feedback. ALso I may order another one - who knows? $110 is a very cheap price for a solar panel and that included shipping too.
I played around with it today and I have a slight sunburn on my face to prove it. I used an empty barrel to lean it up against and I tried various angles and facing towards the sun etc. Today is July 22, 2015 and is a nice sunny summer day I would imagine approx 75-80degrees out - people are going to he beach just down the street - just a typical nice summer day.
My test results couldnt be on a more perfect day. The clouds come/go and I have a few neighborhood trees etc. I put the solar panel on my boat and on barrels and leaned up against barrels and on the flat asphalt driveway. I tested a 300watt modified sinewave inverter (I have this for years) and a corded drill and a small 20" box fan with 3 speeds.
Amazingly the box fan is a 220watt approx fan - but the solar panel runs it at approx 1/4 speed and makes a humming noise and when the clouds cover the sun the inverter cuts off and refuses to start until I turn it off and on again (of course the clouds are why the inverter cut off) But my point is the box fan does run with just a 120Watt solar panel in full sun. When the sun is strongest and the solar panel angle is absolutely perfect - all three box fan speeds run - albeait not as fast as it should and just about 1/4 speed - but it does blow air.
My corded drill refuses to run it is a 550watt and if i press the trigger then it just 1/2 turns and then stops. Its not going to power it.
My Kill-A-Watt meter tells me my modified sinewave inverter is 126v AC and 30hz and this Kill-A-Watt meter is having difficulty operating in between my inverter and the box fan. The Killawatt meter LCD scree is blank sometimes and resets itself and is not working properly inbetween the fan and the inverter with only a 120watt solar panel and the clouds passing by and even with full sun.
The Killawatt meter works fine as long as the box fan is disconnected. Im wondering if my modified sinewave inverter went bad due to my turning it off and on and trying to get the ac fan to run in this makeshift jerry-rig manner. The only thing that makes me believe that I may have ruined it is that it only shows 30Hz not 60HZ. Maybe that is how this inverter is. I unplugged the inverter and used a motorcycle battery and the box fan runs fine and powerful in all three box fan speeds.
Hopefully I didnt do something that caused the inverter to only put out 30hz. It still runs for box fan use on a battery - maybe thats how it came from teh factory - who knows?
The main thing is that I now feel that the solar panel is clean and fully working. I used Green Cleaner, Qtips, water from my outdoor water spigot and a plastic container to splash water on the panel. I put a piece of packaging tape over the knockout hole in the side of the plastic box at the rear of the KC120-1 solar panel. I didnt want to wet the electrical contacts - and possibly seep water inside the internals of the solar panel. My piece of tape withstood the water splashing and was very dry inside.
The Internally Rusty Spots
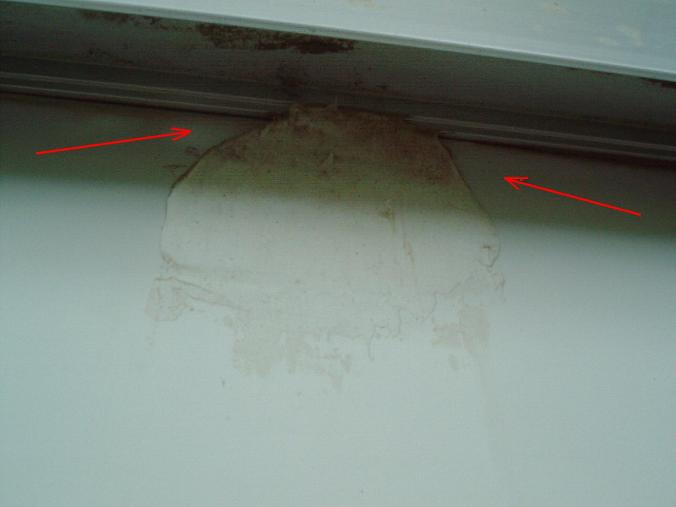
I noticed that the factory or previous owner caulked some areas - very sparingly- My hunch is the factory did that. There are 2ea caulked areas which look like they spread the caulk with a spatula. I feel that the person spreading the caulk at the factory did a lousey job. They stopped just before the reached the point where the caulk reaches the edge of the aluminum frame- if they would have moved their spatula a 1/4" more - maybe there would be no rusty spot - water got in due to the caulk not flowing enough to seal out the water.
Having just washed my panel and brought it inside - I plan on letting it very very thoroughly dry for 1-2 weeks. If a drop of water found its way inside somehow - I hope that letting it alone - will evaporate. I see no intrusion of water no humidity internally etc - it looks dry and clean to me. But just to make sure - I will let it sit indoors for 1-2 weeks. after that - I will add some caulk to the 2 areas where it looks rusty - the 2ea backside of these rusty areas - has insufficient caulk.
I hope that this photo (which I used PAINT software to draw on top of my photo) shows the areas I plan on adding caulk. My hunch is that the factory used "Acrylic Latex Caulk" and that is my hunch - I could be wrong. That is what it looks ad feels like - like it contans latex. Pure silicone - they used underneath the black box. But they used a spatula tool to smear latex caulk (Im going to use acrylica latex caulk) in the 2ea "future rusty" areas. I just think the worker who did the work is at fault - the solar panel itself looks very good. One bad factory worker can do alot of damage to product.
Im going to add caulk and hope for the best. It works fully and I hope that adding caulk will prevent any further corrosion internally. I alse see a scrat on the backside and will caulk over that scratch as it has exposed tiny area of copper which has turned green. I will patch that with a dab of caulk - after it dries from my throuogh careful washing.
I was a good deal and Im glad I bought it. Other sellers are double or triple the price for new panels of a different model/brand. These Kyocera Panels are in use at power companies and I see them on youtube by hobbyists and I just felt that it was a good brand and model. It is "good enough" for my needs - I may add 1 or 2 more to my inventory in the future.
Here is some photos I took today
Here is a photo of the area which I plan on recaulking.
Update 9/26/15
My Akai 1800SD Reel to Reel audio tape recorder from approx 1973 made a burning smell and only worked for fast/forward & rewind in the LOW speed. Also play in the high speed only lasted 1 second and then would shut off.
I searched for a replacement run start capacitor at 250V .5uF on one side and 250v 2uF on the other side but could not find a replacement. I improvised by using 2ea .5uF 250v non-polarized capacitors and soldering then back to back to create a 1uF capacitor.
I measured the original capacitor and found one side was fine .6uF 4.5ohm ESR (good enough) and the other side was a dead short. I left the good side alone and lifted the third pin in the capacitor by snipping extremely close to the solder point. Then I soldered in the homemade 1uF capacitor to the middle pin on one side. Then the other side of the homemade capacitor got soldered to the wires I snipped from the capacitors 3rd pin. The 3rd pin of the original capacitor is desoldered and not connected to anything now. Here is a photo.
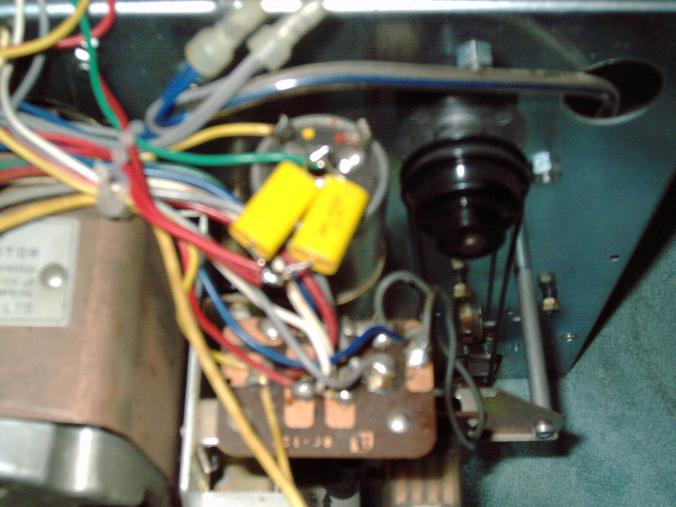
Note that I didnt make the homemade capacitor 2uF as I only had smaller uF values at 250V and didnt want to bundle too many together- but I could have bundled a few more to meet the 2uF original. I found that 1uF is sufficient and runs it just fine. At this time I have played an 8 track and find it plays fine at the low speed. I have not played a reel to reel at high speed and so I will reserve judgement on whether 1uF is good enough - until I have a known good high speed recorded tape to test. If I find it plays incorrent speed - then I will add capacitors until it is 2uF.
My hunch is that the run start capacitors create a pulse to keep the motor running - but the motor speed is controlled by the 60hertz power line. My hunch is that as long as the capacitor gives it at least 1 pulse per 1/2 second then the motor keeps running. A shorted capacitor gave it zero pulse so the motor would not continue to run. In other words I dont think the capacitor uF being 1uf rather than 2uF is an issue. As long as the uF is not exceeded. I believe the uF value affects how strongly/powerful the motor pulls. In ac motors the run start capacitor affects how much horsepower it is- putting a smaller capcitor makes it slightly less powerful but it is plenty powerful. I dont suggest exceeding 2uf on the high side or .5uf on the low side because you will cause the motor to run hot.
It is normal for a capacitor to be slightly under or over specification by a small amount - no problem.
I smelled a burning smell and didnt not continue to run the machine. I immediately stopped and unplugged and repaired it. I also lubricated the motor with spray can silicone lubricant from the autoparts store on both ends of the motor giving one tiny spurt through the long thin red tube of the spray can. No need to disassemble the motor since Im careful and the thin red tube was extra long. I was very careful not to overspray or leak onto anything else.
Also I noticed that the blown 2uF side of the capacitor affected the low speed side setting also and made it act funny. After I replaced the one side with my homemade capacitor and lubricated - it is working normal and responds normally and has no burning smell etc.
Summary to disassemble Akai 1800SD
All power unplugged. I removed all screws from the front panel. Unscrewed all knobs setscrew. Uncrew cap covering the capstan roller and remove capstan center nut and put aside as an assembly. Uncrew the head cover and X track selector knob by the setscrew. I removed the 2ea decorative faceplate covers and this exposes the 2ea sections - upper mechanical section and lower electronics sections. I removed all screws on the perimeter of the upper and lower sections. Then tilted the unit forward onto a soft towel. I removed the back plate panel and unhooked a speaker connector.
I lifted the wooden body from the 2ea sections over the towel- disconnecting a few wires to enable complete removal.
I made scratch marks and used a fine tip magic marker to mark where wires go - so I could put back as before.
Note
I made the mistake of unscrewing the tall foot and then I heard a nut fall inside - this was my first time disassembling the unit and unscrewing the feet is not the way to disassemble. I am putting this as a word of warning - leave the feet alone. After I had the case off - I put the foot back and found the nut and washer which fell in.
I checked my belts, friction wheels and checked ESR on a few other capacitors. I found no other issues. The inside was clean and very little dust on the fan blades.
Update 2/28/16
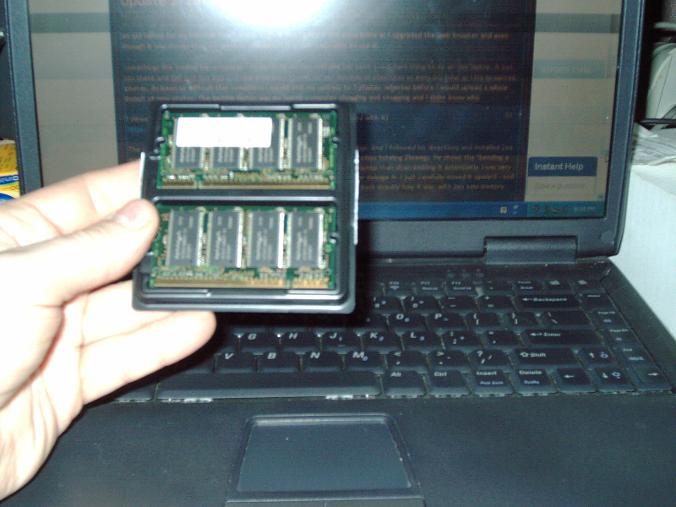
LAPTOP CHUG CHUG CHUG Very Slow and Stalls for up to 1/2 hour on Big Projects like Large Websites
My full size desktop computer is down/died and has been down all winter. It didnt power up one day and I have been using an old laptop for my internet as a backup. Luckily the laptop is still compatible as I upgraded the web browser and even though it was slower than my desktop computer - it is still reasonable to use it.
Somethings like loading big webpages - or updating my own website has been a real hard thing to do on this laptop. It just sits there and tsst tsst tsst tsst ... (hard drive busy sound) for ten minutes or 15minutes or even 1/2 hour as I try to upload photos. Its been so difficult that sometimes I would limit my uploads to 1 photos- whereas before I would upload a whole bunch of new photos. The limiting factor was my laptop computer chugging and chugging and I didnt know why.
I viewed the following video on youtube (not my video and Im not affiliated with it)
https://www.youtube.com/watch?v=t5kzYN8FuHU
The author shows how to upgrade the memory in a Dell Inspiron 2650 laptop. And I followed his directions and installed 2ea memory chips (totaling 512meg) into my laptop (replacing the 2ea existing chips totaling 256meg). He shows the "bending a metal plate" technique which I did also. I felt it was actually safer for my laptop than disassembling it extensively. I was very careful with the bending metal part - and I feel that I didnt put a crease or damage it- I just carefully moved it upward - and I dont feel my metal was damaged or bent or harmed in anyway. I put mine back exactly how it was- with 2ea new memory chips - one under the keyboard and one on the bottom.
I lubricated my fan with a drop of auto parts store - silicone spray lubricant (using a thin red tube) by lifting off the round sticker on the fan hub. The fan was noisey and now it is smooth and quiet. This probably will add life to the laptop by rejuvinating the fan- it was right there as I removed the keyboard- might as well maintain the fan too.
My laptop runs SO MUCH BETTER NOW. I cant begin to tell you how awful using the computer on big projects was. It was unbearable. I was also concerned that the ticking and chugging of the hard drive would overwork the hard drive and cause it to wear out prematurely. After the memory upgrade - there isnt anymore ticking and chugging of the hard drive. The hard drive was being overworked as "virtual memory" and using real memory is SO MUCH BETTER and faster and quieter. I tested my photo uploads (see above photo) with 512megs of RAM and it was VASTLY FASTER than before with only 256megs of RAM.
I spent $7.99 on the set of 2ea 512meg total memory chips (2ea x 256MB-DDR-266MHZ PC2100) with FREE shipping- from big-auction-site (type in "inspiron 2650 memory"). What a bargain that was. I appreciate that very good instruction video on youtube. I feel that the "bent metal" technique is the fastest and easiest way to upgrade the memory. If done carefully- metal can be put back exactly as before - with little or no damage done. I massaged the metal straight again- so it has no curve or any telltale signs it was ever bent up. The keyboard sits nice and flat on top of that "bent/straightened metal plate"
Also I like this laptop because it only uses 48watts of power and my big computer including monitor uses over 150watts of power. I like having very low electric bills - I use LED lightbubs, lower power laptop computer, etc. I still plan on fixing my big computer as I have some files/software on these which I need to use occasionally. But the laptop has been a real good thing to have as a backup.
This laptop has one more issue - a power plug that wont stay connected - if I wiggle it then it powers up and charges. Every once in a while I will look up from typing and see that the battery symbol appears and is running on battery power instead. This means the power connection has a problem. For now it works good enough and having 256megs of extra RAM installed helps alot. But the power plug problem means that I have to keep an eye on the battery icon and wiggle the power cord/plug if it disconnects on its own/makes poor contact intermittantly. I dont have a solution to that issue at this time.
Update 4/16/16
I am writing on a backup Laptop #2 which is Notebook (thats the namebrand "Notebook") model 5600P which is a P4 1.6Ghz and has 512Med memory. This is a laptop which is in rough shape and I purchased on big-auction-site a few years ago as a fixer upper. I use this as a backup and mostly sits on a shelf.
It has Windows XP and I use Firefox 12.0 which is still working for email and youtube and website updating etc.
I tweak it occasionally and I found a setting on my own which helps internet work better and load more consistently.
This is for 768K DSL and XP Laptop or XP Desktop
1. Start Menu - choose Control Panel
2. Double Click System
3. Click Hardware Tab
4. Click Device Manager
5. Click Network Adapters
Mine Shows 1394 Net AQdapter
(I changed nothing here)
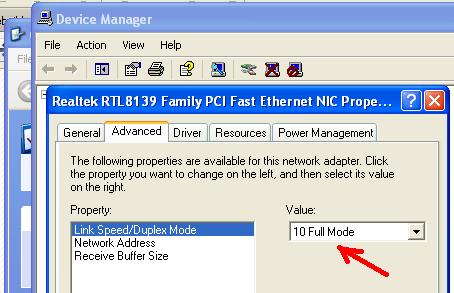
Mine Shows Realtek RTL8139 Family PCI Fast Ethernet NIC
6. Double click Realtek RTL8139 Family PCI Fast Ethernet NIC
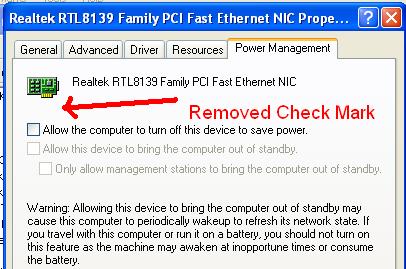
7. Click Power Management Tab
Uncheck mark - Allow the computer to turn off this device to save power (before this had a checkmark and I removed the checkmark)
8. Click Advanced Tab
Link Speed/Duplex Mode (was set to "Auto Mode")
Note that if you have a higher internet speed than 10mbps - you should use a higher setting. For me a 10mbps is much faster than my 768k which is not even 1mbps so setting it to 10 is plenty. I feel that the Auto setting was a possible source of turning off/on/off/on my DSL modem so just set it to one setting - which for me is "10 Full Mode" so the computer doesnt have to keep polling the port trying to sense which mode the Network cable is receiving/sending. SO basically I turned off Auto here.
9. Select 10 Full Mode (I am useing 768k DSL Slow Internet)
The issue was that the laptop was turning off the network port and turning it back on, Off and On and Off and On and here I was trying to figure out why some pages werent loading fully and then a few seconds to a minute later continuing to load etc. What apearsed to be a ATT DSL connection issue was really the laptops power saving mode. I will try this on my DELL Inspiron 3650 Laptop too but right now it has a power jack which has a bad connection and while it does still work while pressing the powerjack/power cord in - it is not practical to use it that way. So for now I am using my laptop backup #2 and this internet speed increase by turning off the power saving mode in the internal network adapter seems to make it load internet pages more consistently. Also the DSL modem which is a 2-Wire 2701HG-B seems to now load very consistently with green LED flashing while downloading. Where before it would flash green while loading and then stop for a few seconds to a minute or so and then start flashing again. This lag downtime was caused by Windows XP power saving mode and has caused me an enormous amount of grief over the years. I am glad to discover another culprit/cure/solution for internet download robbing hoopla integrated into the browsers and operating system. See it really isnt the DSL line causing the problems.
Im saving alot of energy by using a 49watt laptop and 4watt LED lightbulb in my small office. Whereas previous years I was using a 250-300watt desktop computer and 60watt lightbulb overhead. So any increase in power consumption in my laptop is negligible and
I would much rather not have the computer's power management system interfere with my internet connection constantly.
Unfortunately since I am using Firefox 12.0 and Yola (my website host) keeps changing their website creation online software - (removed their Picture button in favor of a different one which probably requires a later version of Java) I dont have a way to upload the screenshot images or photos while using this particular backup laptop. Everything else on the internet seems to work fine on this old laptop#2 and also my other backup laptop uses Firefox 30 so that one had available photo uploading although it worked crazily but still better than nothing at all. Using Firefox 12 brings up a blank button popup in Yola and has no options or anything displayed - so it is not compatible with Firefox 12.0. I like Firefox 12.0 as it is very compatible and Im leaving that alone. Firefox 12.0 has a few things here and there which arent compatible - but its good enough for what I need to do most of the time.
Update 5/1/16
I see that the laptop has rolled back the settings - so I redid the above settings to solve the lag in internet speed. It seems the computer likes to turn its own power management settings on - but I turned it off again.
I uploaded the 2 photos today (see above) I see that my old SD card reader started to work again (I cleaned it inside) and my new SD card reader arrived from China so now I have 2 working card readers and can upload photos from my camera again.
Update 5/19/16
I continued trying to improve my online experience as I found the Yola website (my website host) stalling at sometimes and it could sit there non-loading for a minute or two before it continued to load a page and sometimes never completing. I went into my Network cards settings through control panel/hardware and I modified the network buffer - changing it from 64K to 8K buffer and I see that I have less lag this way. Every little bit helps - it is possible that the computer was waiting for the buffer to fill and 8k fills faster and more often than a 64k buffer - that strategy seems to have reduced the lag some more.
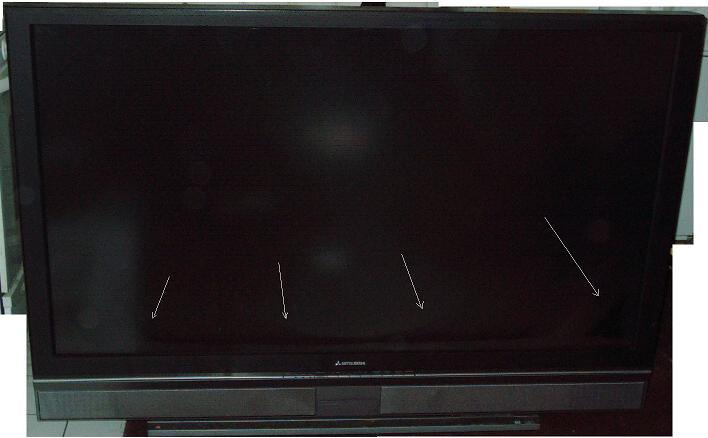
Mitsubishi WD-62627 62" DLP TV Restoration 1080P from 2005 or 2006 era.
I found a discarded Mitsubishi 62" DLP TV and - as a project - am in the process of restoring it. It is in awful shape as someone probably had it in their backyard for several months as there is quite a bit of rust on the internal metal parts. I polished the aluminum chassis by rubbing with a cloth and the white dense flecks of oxidation are cleaned off. After cleaning by hand, the aluminum looks good again. Also the steel plates some have airholes- I have cleaned with a wirebrush back and forth until most or all of the rust is completely gone. Rather than a chrome-like steel appearance it is a just plain steel appearance - but that is ok as it looks decent now. Some odd things are 2 pieces of corn dried were found inside - who knows how or why those were in there? I cleaned all of the dust and debris and even mud (was outside in the rain and probably all winter too) and now the plastics and boards are very clean. As I cleaned everything - I restored the 3ea fans by either pealing back the sticker and later resticking it, or by cutting the sticker with a blade in the very center. Then I squirted a drop of silicone lubricant (from the autoparts store) in the fan ball bearing for lubication. I then covered the small slit in the sticker with a small square of clear packing tape. The fans are fully clean and lubricated so they spin nice and freely. Before the fans were gritty and spun strangely by hand.
I also cleaned all of the rust areas on the circuit boards as the water rusted the steel panels, the rust colored water went into some areas of the boards and painted it with iron brown. I was concerned that the iron areas would be conductive and was very careful to clean all of the brown areas with no reside or discolored remaining. I feel that it was cleaned very thoroughly.
Interestingly the several layers of screen (fresnel lens etc) sandwiched some water which over the weeks has subsided and eventually gone completely. The water probably left some waterspots and dirt which will need to be cleaned in the future by removing the screen assembly and cleaning. For now, I left that alone and am concentrating on the electronics/circuitry restore.
The lamp was not busted or exploded internally. but I do see a few small pieces of glass dust/debris inside the lamp. It is an arc lamp and relies on a gap between contacts. I don't know if the lamp is good enough or will need to be replaced. It is unknown whether the lamp is good or bad at this time. I cleaned it thoroughly without leaving any residue or fingerprints as the lamp can shatter if any oils from fingerprints contaminate the glass. The glass itself looks murky and not clear as a brand new DLP glass should look. So this bulb is either no good or near the end of its life - will see...
As I cleaned the boards and dust, I also ran into one area which was difficult to get into. It is the board which I am calling the DMD board which is also where the DLP chip / DLP socket is. I could remove the 3ea small set screws on 3 sides but there is one set screw which is a the bottom and that set screw was preventing me from being able to remove the cover on the metal shield box. I decided to drill a 1/2" hole up through the aluminum chassis directly under this set screw. I used an electric hand drill and carefully and slowly drilled. I vacuumed up all of the aluminum drilling bits/pieces/dust for a nice clean work area. Then I used a small watchmaker's phillips screwdriver to remove the remaining set screw - inserting it up through the homemade 1/2" hole up through the aluminum chassis. I used a large drill bit only due to giving myself a large leeway on the exact placement of the hole and the screwdriver in relation to the setscrew - I didnt want to miss so I used the "shotgun approach." So really a much smaller drillbit can be used instead- just enough to fit a watchmaker screwrdriver through.
This new access to the DMD board allowed me to clean the last fan (#3) fully from all sides and lubricate. I also used a small Harbor Freight 1" paintbrush to clean off all of the dust and dirt from the board and also all of the heatsinks. Also there is a rubber/silicone heatsink spacer (which I cleaned - so it presses well against the metal shield and acts as a heatsink)
I cleaned the remaining puddles of water inside (still from after 2 weeks of letting it dry out) and feel that I have cleaned and restored everything I could reasonably get into. I have not gone into the optics as I feel that is a sealed airtight and moisture barrier - hopefully so. At this time I will leave it to dry for one more week and then give it a test by plugging it into AC power.
This cleaning and restore project mostly took 1 full day of work. But it was here for about 3 weeks drying out thoroughly. The first thing I did to it after lugging it to my shop is to remove the back panel and mirror and also removed the long plastic rear electronics panel cover. The sponge-like foam surrounding the lens were soaking wet and I cleaned as mush debris as possible. I left it open without the mirror and back panel for about 1-1/2 weeks and that let the remaining moisture evaporate.
I have done alot to restore it and now what remains to be seen is the original problem - for which the previous owner discarded it. When I plug it in, the moisture and rust and dust will no longer be a factor - hopefully I got every last trace out. The optics cleaned, the fans cleaned and oiled, the heatsinks cleaned from dust. I hope it will work but there is a good chance that the original previous-owner-discard-worthy problem remains to be repaired.
In 2006 this model of tv costed somewhere between $2500-$4000 and similar models in 2011 were approximately $850 to $1200. I felt it was a worthwhile project, and I hope this TV will work fully and give years of personal use. I am willing to put some money into its repair/restore.
I have viewed several youtube videos regarding DLP repair and feel that those are worthwhile videos with handy tips. I have never seen anyone drill a hole up through the chassis - that is my own invention. I also clean and lubricate fans differently than the videos show. I don't think anyone else would undertake a project of restoring a rusty/corroded DLP chassis. My view is that everything is fixable- with enough patience and replacement parts cost. I see a seller on big-auction-site selling this exact model of TV in working condition for $50 and is willing to part it out. A TV of this size isn't shippable due to extremely high shipping cost making it far exceed its value. I emailed this seller and he is willing to sell parts.
I am tired and sore today from the marathon cleaning and restore work which was completed at 5AM and hope to plug it in next week- just in case there is a any residual moisture in there - give it additional time to evaporate.
Update 4/16/16
I have not plugged in this DLP TV as I still see some humidity inside the screen plastics. Most of it has cleared up but in the lower right hand corner and the lower middle there is still a small streak of moisture. I contacted the seller of the same TV and he has sold the TV to someone else- they want some parts and he will let me know if he has any leftover parts and pieces.
Update 4/26/16
I have not plugged in this DLP TV as I see a little bit of humidity in the lower right hand corner of the screen's plastic sheet layers. I will give it more time to dry thoroughly before I plug it in. I emailed the seller of the WD-62627 on big-auction-site andhe still has the TV as it seems the buyer has not paid or followed up. That is good news for me as who knows which parts I will need - until I plu it in- after thoroughly drying all traces of moisture.
Update 4/30/16
It responded to the press of the power button at the front with a green lit led (after a minutoe approx of blinking green as it was resetting itself) and I heard the hiss of speakers and no reception audio and seemed to respond to the front buttons. I see no lamp turn on. After about 2 minutes of being on I hear a TSST faint sound like the bulb is trying to strike an arc and immediately the red led is lit showing a problem in the lamp. I inquired from an ebay seller the cost of a used remote control and lamp. I tested the TV using self-diagnostics 1. When I power it (after being unplugged) on the green LED blinks resetting itself ater about a minute.2. Press and hold for 5 seconds DEVICE button and MENU button on front panel 3. I see flashing code 1 2 1 2 ... and ends in a single 3. The code 12 means means no internal error (the 3 at the end is puzzling to me - and possibly just a lacking space between the 1 and 2 at the end of the sequence as I dont see that code in the manual for a 3) 4. I repeat step #1 and then I let it go all the way to solid green - then leave it alone for about two minutes and I see a solid red standby = red standby means lamp didnt turn on This leads me to believe that the lamp is bad and I see on big-auction site some brand new no-name lamps are somewhere between $16 to $19 at the low end prices for generic lamps. If the ballast board was bad then the code for that is 66 and I didnt see that code. I may get lucky and have only one issue - the lamp. But still there may be corrosion of the connectors and jacks and I did hear scratchiness in the volume control- and fans or color wheel which is making noise but possibly still operational - for now. |
Added 4/2016
LCD Screen with smudges and blotches.
I had a streak of really good finds (wasnt looking for them) Over the last month I found several BIG LCD monitors thrown out on trash day and I remember just a few years ago these were $1000-4000 in value so I really figured - why not? I found this problematic Emerson TV - which actually works for about 1-1/2 hours and then when it heats up too much it starts turning itself on/off/on/off repeatedly a few times every few seconds. So that tells me it has a need for capacitor replacing.
The LCD TV was face up on the ground with snow and ice on it. It had drizzled rain and then frozen. It was outside probably 1-3 days in my estimation (trash find). I thoroughly took it apart and cleaned everything. I let it dry out in my shower stall for 2 weeks. When I felt it was dry - I plugged it in and was amazed that it worked (for 1-1/2 hours.) I noticed a large amount of discoloration in the screen panel and spent an ENORMOUS amount of time and effort trying to find a source for replacement screen (too expensive) or a replacement polarizing plastic sheet sticker (online sellers sell this but they dont sell just 1 - lot of 10 - which makes it unecomical to repace it.) So even though I was looking for replacement parts etc and actually I found another TV with the same size screen and was planning on combining the two into 1 good one. But I noticed that over time the screen/image splotches were lessening. Less and less area was splotched. So really it was moisture trapped under the polarizing filter. It actually wasnt dirt underneath or the sticker glue damaged- as I originally thought. It was healing all by itself - the moisture was evaporating and the image distortion becoming less and less over time.
The white picture below shows a 12" area of the screen and hopefully if you look close you can see splotchiness which is more apparent when a color picture is displayed. When I found this tv - the screen looked OK when powered off - when powered on it was severely splched and distorted - this photo doesnt do it justice - but is sufficient to illustrate my point. This photo was taken as the splotchiness is almost gone - I made a point of taking a photo before the splotches were all gone. So the solution to this horrible problem - was very simple - give it alot of time to dry out all by itself.
My hunch is that the polarizing filter is permeable - meaning it breathes and lets moisture in and out. This TV still needs capacitors replaced and more time to fully dry out the screen's polarizing filter. I am also considering buying a used mainboard from big-auction-site. I still havent decided on the next step.

I have recently run into what I will call "Browser Prejudice" and "Operating System Prejudice" where certain websites are specifically targeting older browsers and causing older computer owners grief. Probably in an attempt to force upgrading operating system or web browser for monetary reasons.
I havent given up on my old computers or old browsers and they work just fine.
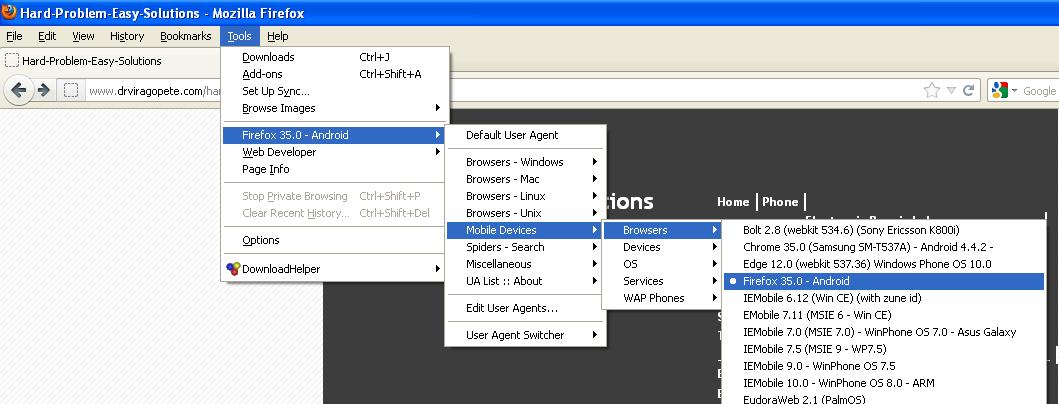
I downloaded an Add-on for my Firefox 12 called "User Agent Switcher 0.7.3.1-signed.1-signed" which answers a website's question "which browser and operating system are you using" the response given is "Android operating system Firefox 35" which is telling the website that I am browsing their website on a tablet or a phone. So this allows the page to load on some websites that I use frequently to check my email or other daily functions.
Windows XP and Firefox is attempting to be made useless by certain website - but actually is still useful and this add-on has helped me alot to not have to buy new operating system or hardware.
Here is a screenshot of the menu in Firefox 12 and how to select among the replies given to a website - For my website I dont limit the user in any way. Certain websites require certain operating systems or browsers - so in that case I can select which response is given to the query.
Browser and Operating system wars are awful for users. My point is that they are trying to make us buy something we already have. I dont need to upgrade over and over and over again. I will make do with what I have for as long as possible and as cheaply as possible.
I cant believe it even my webhost "Yola" now works for uploading pictures. As it is expecting a cell phone Android - but really Im uploading from Windows XP. This has caused me so much grief for 2+ years for absolutely no reason. Sheesh. All I have to do is switch back and forth with the User Agent Switcher as some websites work best with telling the website Android and some are just the opposite and the user interface is better non-Android. My browser itself is not changed - just the response to the websites query is different now. Im so mad that this was done to purposefully cause XP users and older browser users such grief. Problem is solved.
I also have great success with some of my frequently viewed websites by choosing a PC operating System which is more current and a Firefox version which is later than my actual. For example in Youtube I have an AWFUL experience when my own web browser tells it "Windows XP Firefox 12" but when my web browser (and User Agent Switcher add-on) answers the query with "Firefox 40 and XXXXX more recent operating system" - then the videos work fine and even the HTML5 automatically switches to match the video mode. SO my point is - I have to remember which websites work with which web-browser and version and operating system - then select that from the menu - for that particular website. Its a couple of extra steps to view a website - but at least it is a way to make it work.
I saw another User Agent add-on in Firefox Add-ons which allows to choose a user agent response for each and every webpage and remember that. But I chose this one - for now I am very pleased that it worked after I rebooted after installation of that add-on.
As paypal changed their webpage and their pages become more and more "cell-phone-ized" I feel more and more that they are leaving behind the middle-sized to large-sized users and instead are going after the small-fry users which primarily access their account by cellphone.
As some people in forums refer to the changes as the "dumbed down" version of paypal.
Since 2014 paypal has had an onscreen button called "classic site" and this was located in the lower left hand portion of the screen. By clicking on the "classic site" button - the webpage transformed back to its original form and would switch back afterwards - but still allowed the use of old features (tedious to always switch by clicking classic site button).
As of about a week ago 6/25/16 approx this classic site button is missing from front page and I searched online and could find no answers. I stumbled on this "classic site" button located within paypal under "help"
I book marked this page as a favorite in my web browser so I can access it anytime. I also made a screenshot of the URL so I can manually type it into the address bar (in case my laptop dies or operating system crashe who knows ... etc)
I phoned paypal 1-888-221-1161 and asked them to switch me to the classic site permanently and she didnt have anyway to do that and said there was a grace period in which classic site button was available but she cant give me back the missing onscreen button - classic site unavailable. After that phone call (which I couldnt believe) I continued to look on paypal.com and actually found the button by clicking on the help menu. Yikes thank goodness I have technical skills ... I received wrong information from that technical support person - classic site button DOES exists and this url IS working - the classic site button within help menu works fine as of 6/30/16 today.
Even finding paypal's phone number is not easy ... and I rely on my own notes even for that.

Update 9/14/16
I am finally DO-ing the switch away from the BIG BAD landline phone company which has been the source of grief for years and recently in the last couple of months once again screwing up my phonebills blatently charging incorrectly.
I purchased on big-auction-site a MagicJack Go which is a standalone VOIP Phone device where it uses my internet connection to allow my normal phone to bypass the phone company.
Yesterday my MagicJack Go arrived and I activated it online and paid $30 in additional fees to "port" a phone line which I disconnected from the Big-Bad-Landline phone company. So this means my internet phone has the very same phone number as I had 2 months ago. The downside right now is for "5-10days" according to the live chat session I had with MagicJack representative - it takes 5-10 days for porting process- during that time I can make outgoing calls but incoming calls will show "you have reached a number that has been disconnected or nolonger in service if you feel you've reached this message by mistake please try again" That is because it WAS a disconnected number. Im lucky it was not already assigned to some new customer. So in the meantime I can dial out with my MagicJack Go connected phone. I still have one landline phone and DSL phone with the Big-Bad-landline-phone-company but will be reducing my services one-step-at-a-time to finally get out of their treachery and be rid of them.
The additional charge of $30 to port my number and 911 fees which were undisclosed are small issues compared to the overall savings VERSUS the heavy gouging of my current phone company. The cost savings is 20 to 1 over what I have now.
Im also planning on switching to a local wireless internet provider with SLOW 500kbps internet for $35 per month and hopefully will be fast enough for MagicJack Go to work with.

Dell Inspiron 2650 laptop computer - keyboard not working (Feb 15, 2017)
I was replying to an email and all-of-a-sudden, my keyboard stopped working. The touchpad worked fine and so I plugged in an external USB keyboard to finish my email message. But the USB keyboard was a temporary solution to the problem as juggling back and forth between the touchpad and the external keyboard is awkward.
I searched online to find the solution in a forum. This happened to other users and the solution was to shut the computer down, unplug the power cord, disconnect the battery, press the power button for a few seconds. Then reconnect everything and power on as normal.
This worked for me- basically it erased whatever was stored in memory. Possibly a glitch in the DELL BIOS or Windows XP? Possibly a malicious online incident- who knows. It is working fine now and I no longer need to use the external USB keyboard. I didnt have to replace the keyboard- as there was nothing physically wrong with the keyboard - nothing was spilled on it or other damage. The power needed to be removed from the computer totally for a few seconds to make the keyboard function again.
I own several of the Multipro 395 Variable speed and several single speed tools. I purchased so many (over the years) because the previous one died... Now dont get me wrong - they last a good long time and I used them alot over the last 20+ years. But since I never throw out the old one- I save it for spare parts. I was able to always reuse as many of the old parts and combine into at least one good working unit. But I ran out of good used switches.
Some parts that failed
1. Armature with a bad winding - doesnt spin well and makes horrible noise
2. Front bearing or rear bearing failure
3. Bad switch (electrically bad or melted plastic around the brush holder)
4. Bad carbon brushes
I once ordered a replacement armature from mfg (the winding and shaft) and costed almost as much as a whole new one with shipping etc. So I only did that once.
I needed a replacement switch - and was looking online for replacement parts and the switch is another big expense which is over half the cost of a new entire unit.
I was looking around big-auction-site and I see that China has a replacement switch (bright orange) and only costs $1.69 plus 59 cents shipping. I waited for it to arrive nearly 3 weeks.
I installed it today and got it to work with an hours time fiddling.
1. Doesnt fit perfect (I added 2ea slivers of cardboard to act as a spacer- one on each bearing)
2. Required soldering the AC cables black and white to the red wires.
3. I added my own heat shrink tubing around the solder joints.
The DREMEL works fine with the aftermarket replacement switch. I actually installed it in a single speed case and used a bunch of leftover parts - I found a complete set of good parts in my inventory of 5ea dead DREMELs.
Without the cardboard slivers acting as shims - it made a horrible scraping as the switch is not actually a perfect fit. By adding a bit of single layer cardboard just on one side of the case - for both the front bearing and also around the rubber boot which goes around the rear bearing - that allows the armature to have enough clearance to not scrape against the plastic case of the switch.
Also the coil unit has a silicone/rubber-like rectangle on one side. I found that I had better results if I turned the rubber on one side or the other. I played with that until I got it to all fit together solidly. The replacement switch is not perfect - but good enough. Cant complain for $1.69.
The variable speed of the aftermarket switch is almost all the way to the end and has about 3 clicks of usefulness. The last click position is highest speed (what I normally use) The next click is drastically slower and the next click barely turns at all. Three quarters of the switch travel does nothing. But since it is replacing a single speed - I actually made it more variable than its original which is only on/off.
I've ordered another switch - maybe I'll be able to make another working unit out of my leftover parts- AGAIN. Maybe this orange switch will be a discontinued item ???? and I would kick myself for not buying a spare - who knows. But it solved my problem for 1ea unit so far. The second one was $1.69 plus 99 cents shipping - so the shipping went up- even so it is a real bargain (just ordered today)
What I didnt like is - it was shipped in an envelope and the 4-pins were all bent over and required fiddling to get straight. I was very concerned that the bending of the metal pins to straight - would crack them off. But it actually survived straightening it with needle-nose pliers. I kept the straightening to a minimum - tried to do it only one time for each pin. It would be nice if they shipped in a cardboard box - but the price was so low - again no real complaints. Was a real bargain.
I see that there are some of these switches for sale on big-auction-site and some show just the switch and others show the switch plus 2ea caps for the brushes. I ordered the ones with the caps - which costed a few cents more.
So the cost of 2ea aftermarket replacement switches is less than $6. It ends some clutter too - collecting things that dont work but saving them for parts - you know in case you will need it someday... I may order a third one too - but I will just order one-at-a-time...
The level of difficulty in getting the shims and rubber rectangle and taking apart/reseating trying to make all fit solid was a real NUISSANCE but now that it is all put together - Im pleased with the end result.
I have more cases armatures etc to build another one - and I dont want to undo my built unit just to try out the other parts. It was a real hassle to get it put together. SO I will do that on the next one that arrives. Once it works - Im not going to open it unless it develops a problem - very finicky to get working right.

You know- a simple thing like not being able to find a durable good canopener for years is a nuissance. I used to have a good one purchased several decades ago and somehow it was lost. I puchased all kinds of can openers over the years from lots of stores. I currently have 4 canopeners in my kitchen drawer which are junk- and make make big mess trying to open a can - not puncturing well, worn sprockt drive, plastic parts, wiggly cutting wheels, have problems with thinner can lips. Just a nuissance and un-necessary expense replacing it with a good looking- but still no better than before can opener. I cant tell you how relieved I was each time to bought a new one - only to find a short time later - it was no good also.
I was looking on youtube for "can opener" and there was alot of testimonials about "EZ-DUZ-IT" can opener and I decided to plunk down $11.18 with free shipping on big auction site ( there was 3 colors available and I chose blue handle). It arrived a few days later and Im just am SO HAPPY for simple stupid thing like a can opener. This feels SO GOOD, no wiggly wobbly, it cuts so well. I CANT BELIEVE IT. It is like a cadillac smooth. It cuts exact to where it started and leaves no little snag behind- Very clean smooth can opener. Cuts like butter. No plastic parts. Rubber-like handle - similar to the rubber used in pliers.
It reminds me of the OLD STYLE canopeners sold by "ZAYRE" store in the 1970s. It flips open for cleaning and has a very thick heavy feel. The steel it is made of has a chrome plating and the steel mechanism has a light blue steel tint to it. It is DRASTICALLY different than the EL CHEAPO expensive junk in the stores. My local stores sell junk. I find that by buying online, I am sometimes better off. This is a perfect example of buying something better ONLINE than I can buy locally.
For the crappy ones - some I paid $1 for at the dollar store (and they work fine for awhile, I bought one for a spare and that one didnt work - not even once - SO I HAD IT WITH THAT) Some I paid $6 for and was pretty with black handle and chrome insets in the handle- really good looking can opener and worked for awhile. But when you add up all of that nonsense expenses in just a simple stupid necessary basic necessity of a can opener - I was gypped out of about $20 and good grief the misery and sometimes cutting myself on trying to pry the lid up and out because it didnt cut well. Some I purchased from defunct department stores over the years which I no longer have, and were good name brands including celebrity cooking show host brand names - all junk which didnt last reasonable lengths of time.
Thank goodness for the EZ-DUZ-IT and well worth the $11.18 I paid for it - Im sure the shipping cost was about $5 estimated (incuded in the price) Solves one of my daily nuissance tasks. I probably should get a spare one - based on the testimonials online and on youtube it seems that some people so far have had one for a couple of years and still working. I read somwhere that the SWING-A-WAY and EZ-DUZ-IT are both very similar so they may both be good ones. Maybe the one I had years ago was a SWING-A-WAY which lasted me for over a decade of use with no issues and then somehow got lost? The rest of the brands in my opinion are just a nuissance and empty your pocket. A canopener shouldnt be something you have to buy over and over and over. 3/22/17
Keyboard Key Cap Popped Off (Dell Inspiron 2650 older Laptop with Windows XP)
Update 4/12/17
My cat is increasingly getting on and around my computer and I always gently push my cat off the computer. Well this time I lifted my cat with two hands gently and claws went to grab the computer as he doesnt like to be picked up. One claw grabbed the "Page Dn" key on the right side and it went flying on the loor and I heard the tink-tink sound as it hit the floor.
I searched on youtube to find the video on how to snap it into place - as I remember having the same problem a year or two ago.
Here is the helpful youtube link which shows simply to snap it into place.
https://www.youtube.com/watch?v=ViSDkgRmUQw
Since it is SO DELICATE I decided best to actually see someone else doing it - so I dont break it.
Well the key is back on same as before good as new.
Basically - Line it up and press down. (This is asuming your white plastic mechanism underneath is still lined up and in place)
Last time my white pieces went flying also - this time I just had the cap pop off.
I saw some cat hairs under there but decided NOT to Vacuum as I didnt want the white plastic mechanism to be sucked up and lost. It wasnt too bad so I left the hairs alone. Its important not to overdo a fix. It doesnt have to be spotless to work just fine.
Replacement battery for Dell 2650 Laptop from big-auction-site
Dell Inspiron 2650 Battery replacement on 8/17 and as of 10/6/17 the battery capacity run time is quits after 1.5 hours as I use it heavily to watch youtube videos. When I first got my latop, I charged it fully and then watched a DVD movie and it was a 2 hour movie.
Here is the feedback I left for the seller 2 months ago
"Received Battery New for Dell 2650 (works for full capacity 2.5hrs) $16.99 + $0
My old battery stored zero power and when the power cable was wiggled- it would shut down and lose my work instantly. With the $16.99 battery - at least it doesnt shut down when the power cord is wiggled and I have a chance to wiggle it back to being powered by the cord again.
I use my laptop many times everyday and sometimes stays on all day or most of the day as I watch youtube alot and check emails frequently etc. Most of the time I use it on AC power but over the last 2 months have run it on battery power maybe 20 times and immediately charge it when it dies or just before it dies. The battery pack is supposed to be free from "memory" negative affects.
Update 12/11/17
I am pleased with my purchase of this battery. The amount of runtime is about 1.5 hours on average as I use it to watch youtube videos. Im pleased that I got this brand new battery for cheap.
Update 12/11/17
Plastic Welded Lamp Socket (3d Drawing Pen 3D Printing Pen)
My cat was acting bad and knocked over a torch lamp. As it fell against the wall- the light turned off. I unscrewed the light bulb and tried it on a different lamp - and the lightbulb worked fine. So I unplugged the torch lamp and removed the "half globe" and disassembled the light bulb socket with built-in 3-way turnswitch.
What I saw was a broken off plastic piece and I could not find it anywhere. I checked the floor and down the long tube, and just could not find it. I decided to just get my soldering iron to try and fuse the plastic back together but the top hako is made of some exotic plastic that is heat resistant and the bottom broken off piece looked like ABS. I was able to melt the ABS but not the exotic plastic. My goal was to fuse these two pieces together - but using a soldering iron didnt melt the exotic plastic.
I decided to use my 3D Printing pen which I purchased from big-auction-site about 6 months ago for about $25. I also used a piece of black ABS 1.75mm filament from my 3D Printer to feed it. The main reason I bought this 3D Printing Pen was to try and weld broken plastic with it - this was my first opportunity to use it. I had made a practice weld of a scrap piece of plastic a few months back
Although there was a missing piece- I decided to recreate that missing piece by using a back and forth "fishscale" pattern to fill in the notch/tab where the missing piece should be. As the plastic was still very hot- I used my thumb to push the plastic flat and fill in that space. I also carefully welded the end where the ABS nub broke off and was no where to be found.
After it cooled off and I felt that it was sturdy- I took a 2" piece of sandpaper to sand the welded area to make it smooth. Otherwise this would not slide easily into the lamp socket shell. I took a few photos of the raw weld, but I didnt take a photo after it was sanded. It looked good enough to work. I am please to say that my torch light works fine and have been using it for the past couple of days without any issues. Since I had it apart to fix, I made sure everything was reassembled carefully and now actually works better than ever- the socket was always a little wobbly and loose. But now it all feels very solid and the turn swtch is not wiggly any more.
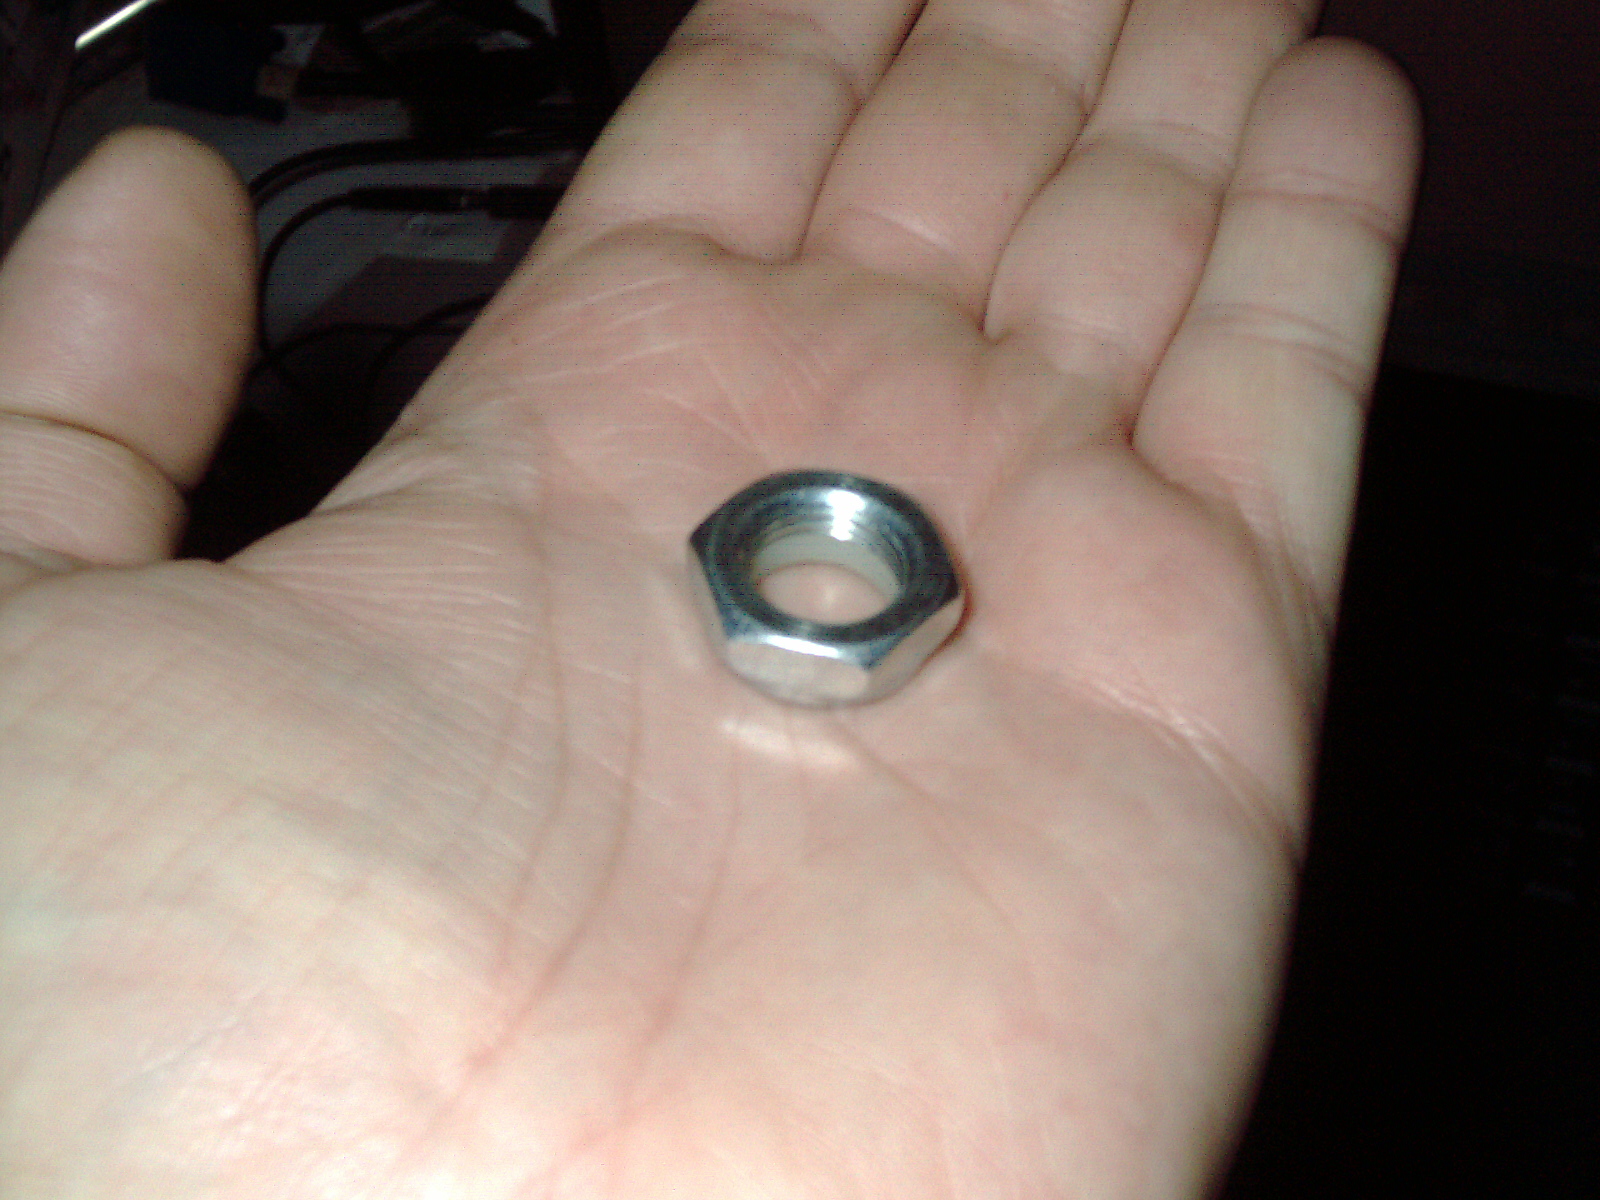
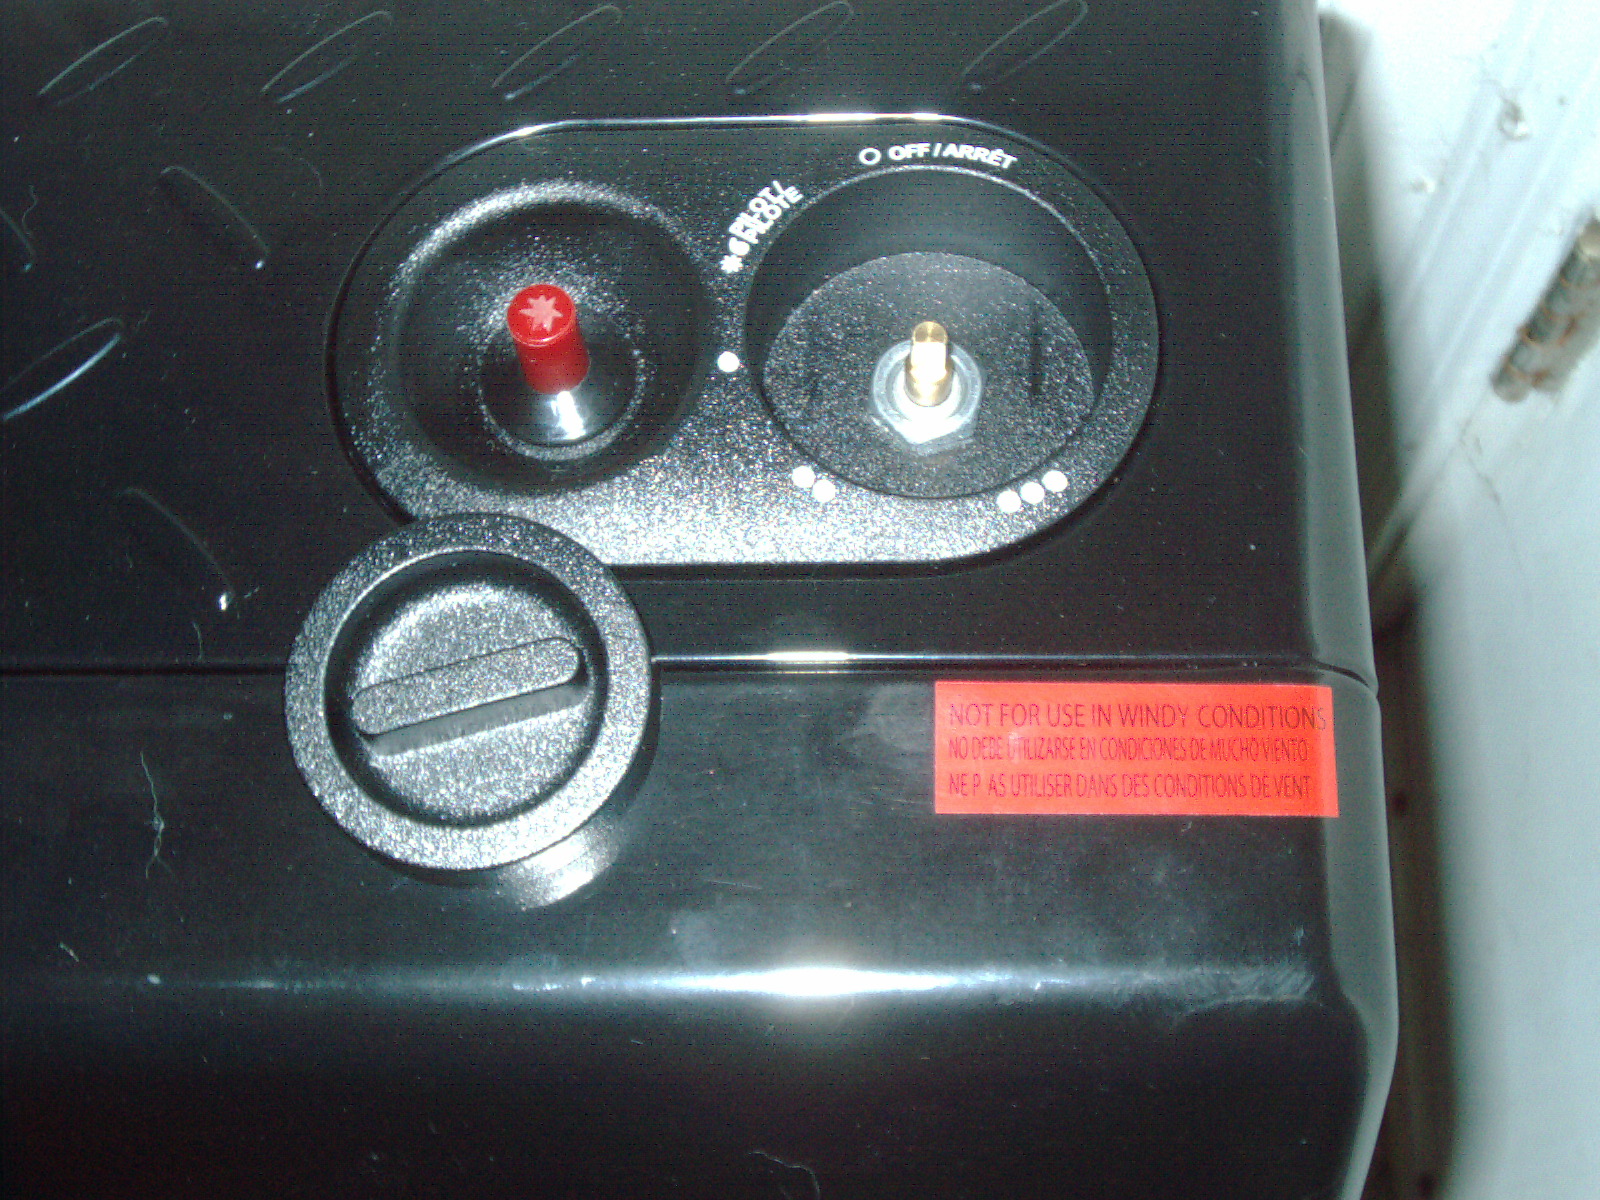
I purchased a Master Propane Heater brand new and it arrived non-working. A phonecall to the mfg is all it took for them to send me the replacement part which I asked for. All they asked me to do was provide a receipt by email for my purchase. When the replacement part arrived, the Valve assembly came without a nut. I believe that I was supposed to re-use my nut - but it was not the same thread.
I decided to purchase a 1/2"-20 tpi nut from Big-Auction-Site for 99 cents as I had determined the thread from comparing a tap/die set to the thread on the new valve. This nut was just as pictured in the ad and arrived in a few days.
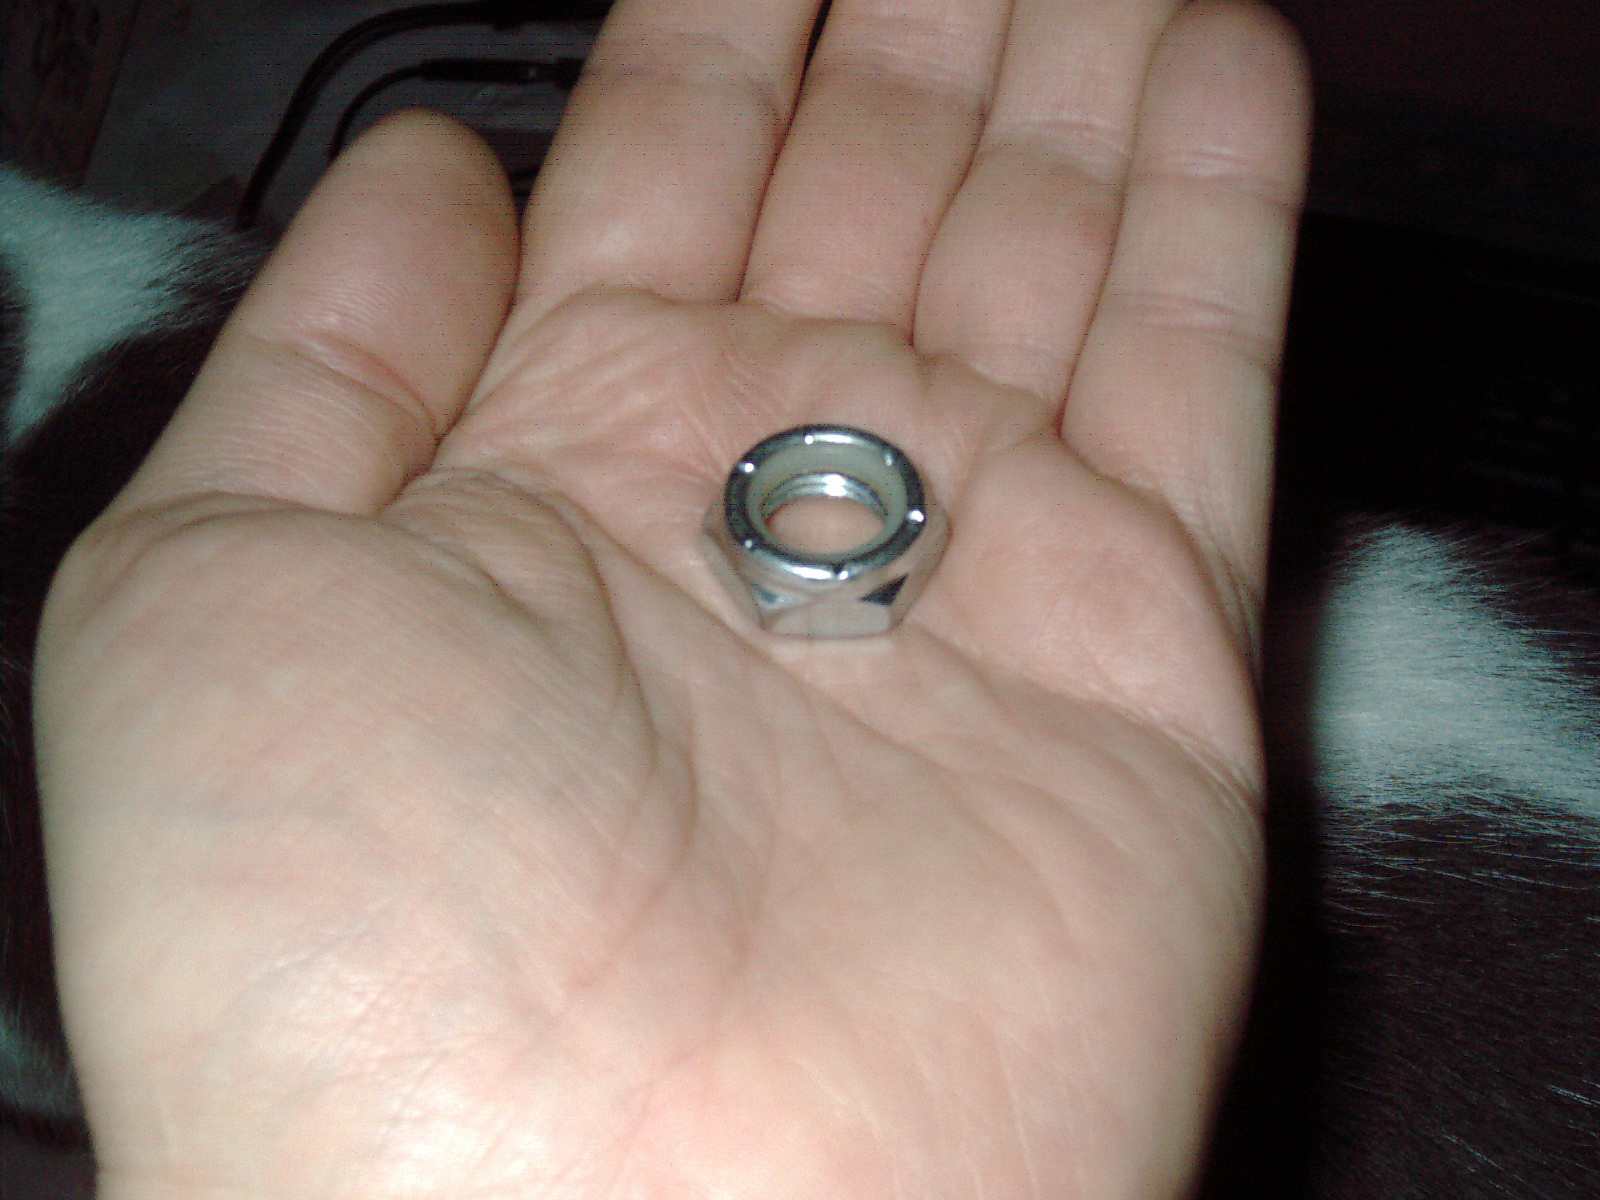
I used my green Harbor Freight 7x10 mini lathe (which I have owned since the early 1990s) to make the nut much thinner. One side of the nut had a white nylon locking portion - and that is the part that I removed completely- the other side of the nut I left alone.
I installed this modified nut and fits very nice and snug and locks the valve down very well. If I didnt tell you I modified a completely different nut - to make this work - you'd never know it. I do a very professional job.
I have shown a pictorial gallery of this.
I loved my first heater so much that I ordered another one - exactly the same. The second one had the non-working valve. Just bad luck - its a very good heater and Im not bad-mouthing the mfg in any way.
Im thinking about getting a third heater and am saving my funds to purchase another one. You know, in case the power goes out in coldest winter months- its good to be prepared for emergency heat. Its also a good idea to test your equipment and not just assume - its brand new so its good-to-go. Not this time- Im glad I tested it.
In the coldest part of winter my furnace outputs 60,000 btu of heat. Right now my backup heaters total 40,000 btu. So my plan is to purchase another one to have on hand.
Windows XP laptop
I ran into a pressing need to update my Dell 2650 Laptop with 512MB ram as I use Paypal regularly and their webpage has a message that my old browser is obsolete and their website wont work with it beyond June 30 2018. Since everything else works fine on my old web browser, I wanted to just install a second more updated version of Firefox- so I dont lose the current functions which I like in old versionbrowser.
Here is the Paypal screenshot with warning message at top
"Update your browser - it is not compliant with our security standards and will no longer let you access PayPal.com after June 30. Learn more."

As I learned about what the incompatibility is - it is something to do with TLS 1.2 or 1.3 and even though my older version of Firefox supports it - somehow Paypal needs to see a higher version of browser. I just decided to install the highest version of Firefox which will work with Windows XP which is version 52. The version of 52 I chose is here and is a downloaded zip file.
firefox-52.1.0esr.win32.sdk
There are a few other more recent versions going up a few decimal points- but I tried one unsuccessfully and decided to just use this 32bit one as it seems to work fully for my laptop with no issues.
https://ftp.mozilla.org/pub/firefox/releases/52.1.0esr/
I created a folder on my C: drive which I named "Firefox 52_1 portable" and unzipped the files into that folder
Then I created a clickable shortcut by
1. Put mouse pointer on START button
2. Click righthand mouse button
3. Choose Explore
4. Double Click on Programs Yellow Folder
5. Put mouse pointer in the right hand side over a blank area
6. Click Righthand mouse button
7. Choose new
8. Choose shortcut
9. Doubleclick on the "new shortcut" I just created
a. navigate to the c: drive and folder which I previously created which I called Firefox 52_1 portable
b. make the shortcut see the file "Firefox.exe" which is located in the BIN folder
10. Now to run this version of Firefox, I just click on START then ALL PROGRAMS then FIREFOX 52_1 Portable
This leaves my old FIrefox instalation alone and installed another Firefox different version in a different location. I like the compatibility with paypal while keeping my old browser settings alone. The new version seems to run Youtube videos smoother but lags and is bloated and takes up 800MB of space. But runs Paypal so it is OK and lets my laptop survive another year(s). The loss of 800MB of space is worth it for compatibility with Paypal. I think Paypal is just reducing their marketshare by putting in these browser requirements as there are millions/billions of users who use old browsers.
The version of Firefox is ESR which is intended to be installed on a USB drive but I just put it into a folder in my C drive. This ESR version doesnt have to replace your old version like the noremal Firefox installations want to erase your old Firefox BEFORE it installs a new one. The ESR version is standalone and I like it better although it has to be setup manually.
Update 8/18/18
After upgrading my system to a dual browser, I still got that paypal message for a number of weeks. But Paypal removed that silly nag message and even my older browser works fine. So I did that dual browser upgrade for nothing.
For the last four weeks, my normally active life of carrying groceries, working on cutting and shaping metal, carrying oxes to the Post Office - etc, was toned down drastically as my finger is in a makeshift splint as I tore a tendon and it takes at least 6 weeks to heal. So in the meantime, Ive been trying to make-do with te groceries I have and use my healing hand minimally,
Ive been noticing that my feet and lower legs were swelling but no pain and no discomfort. I just assumed I was putting on weight.
Just yesterday, I renewed my License - 1 day before the 1 year o gace period expired - even the counter clerk lady at the License renewal place commented on that. I had no choice- I had to go and renew it. That meant standing in line waiting for busses, and a whole lot of walking as the bus routes dont connect exactly from point a to point b. I figure that I must have walked 2 miles in addition to lots of standing around waiting for busses to arrive.
The good news is I renewed my license and studied for nothing as I didnt have to take the written test. The more important news is my skinny feet are back. I was so tired I slept for 5 hours. I immediately saw my feet back to normal. Excercise was missing. Im not a medical doctor- what worked for me may not be right for you. Im not advising - Im just saying what worked for me. Im normally very active and walk everywere and I dot even take the as I save on costs by walking. My last bus ride was middle 2016. But the drivers license facility was 10 miles away and bus ride was necessary this time.
Update 8/18/18
I have not had this for more than a month now. Just a freak occurance. Im very active and lead a busy active life ad walk to grocery stores etc.
Yola "Instant Help" icon is in the way - how to move it
This is a recent addition to the Yola website and is a nuissance. See it apears over the scroll slider on the right side of the screen and its placement covers the down arrow. This interferes with scrolling up/down the page.
I figured out how to move it.
1. Click on the "instant help" button to maxumize it.
2. Drag the blue header of the popup to the left
3. Click on the minimize button to turn the popup back to an instant help button (now it is more to the left)
I keep repeating this until I put it on the left side of the page where it is no loger in the way
8/2018
I also transfer Films and videotapes - Dr Virago Pete
Here is my webpage advertising home movie films and videotape transfer to DVD - take a look through my above links at the top of the page. This link is applicable to the largest set of the general population
http://www.drviragopete.com/camcorder-tape-to-dvd-transfer.php
http://www.drviragopete.com/super8_film_transfer_dvd.php
Copy and paste into your web browser
(847) 454-7858 between 11am and 7pm daily
Dr Virago Pete
Tips and Gratuity and $ donations are appreciated. If this helped you - please send a tip - and or - send some videotapes/films for transfer to dvd.


This webpage last updated October 18 2025